Meowville Finished Quilt

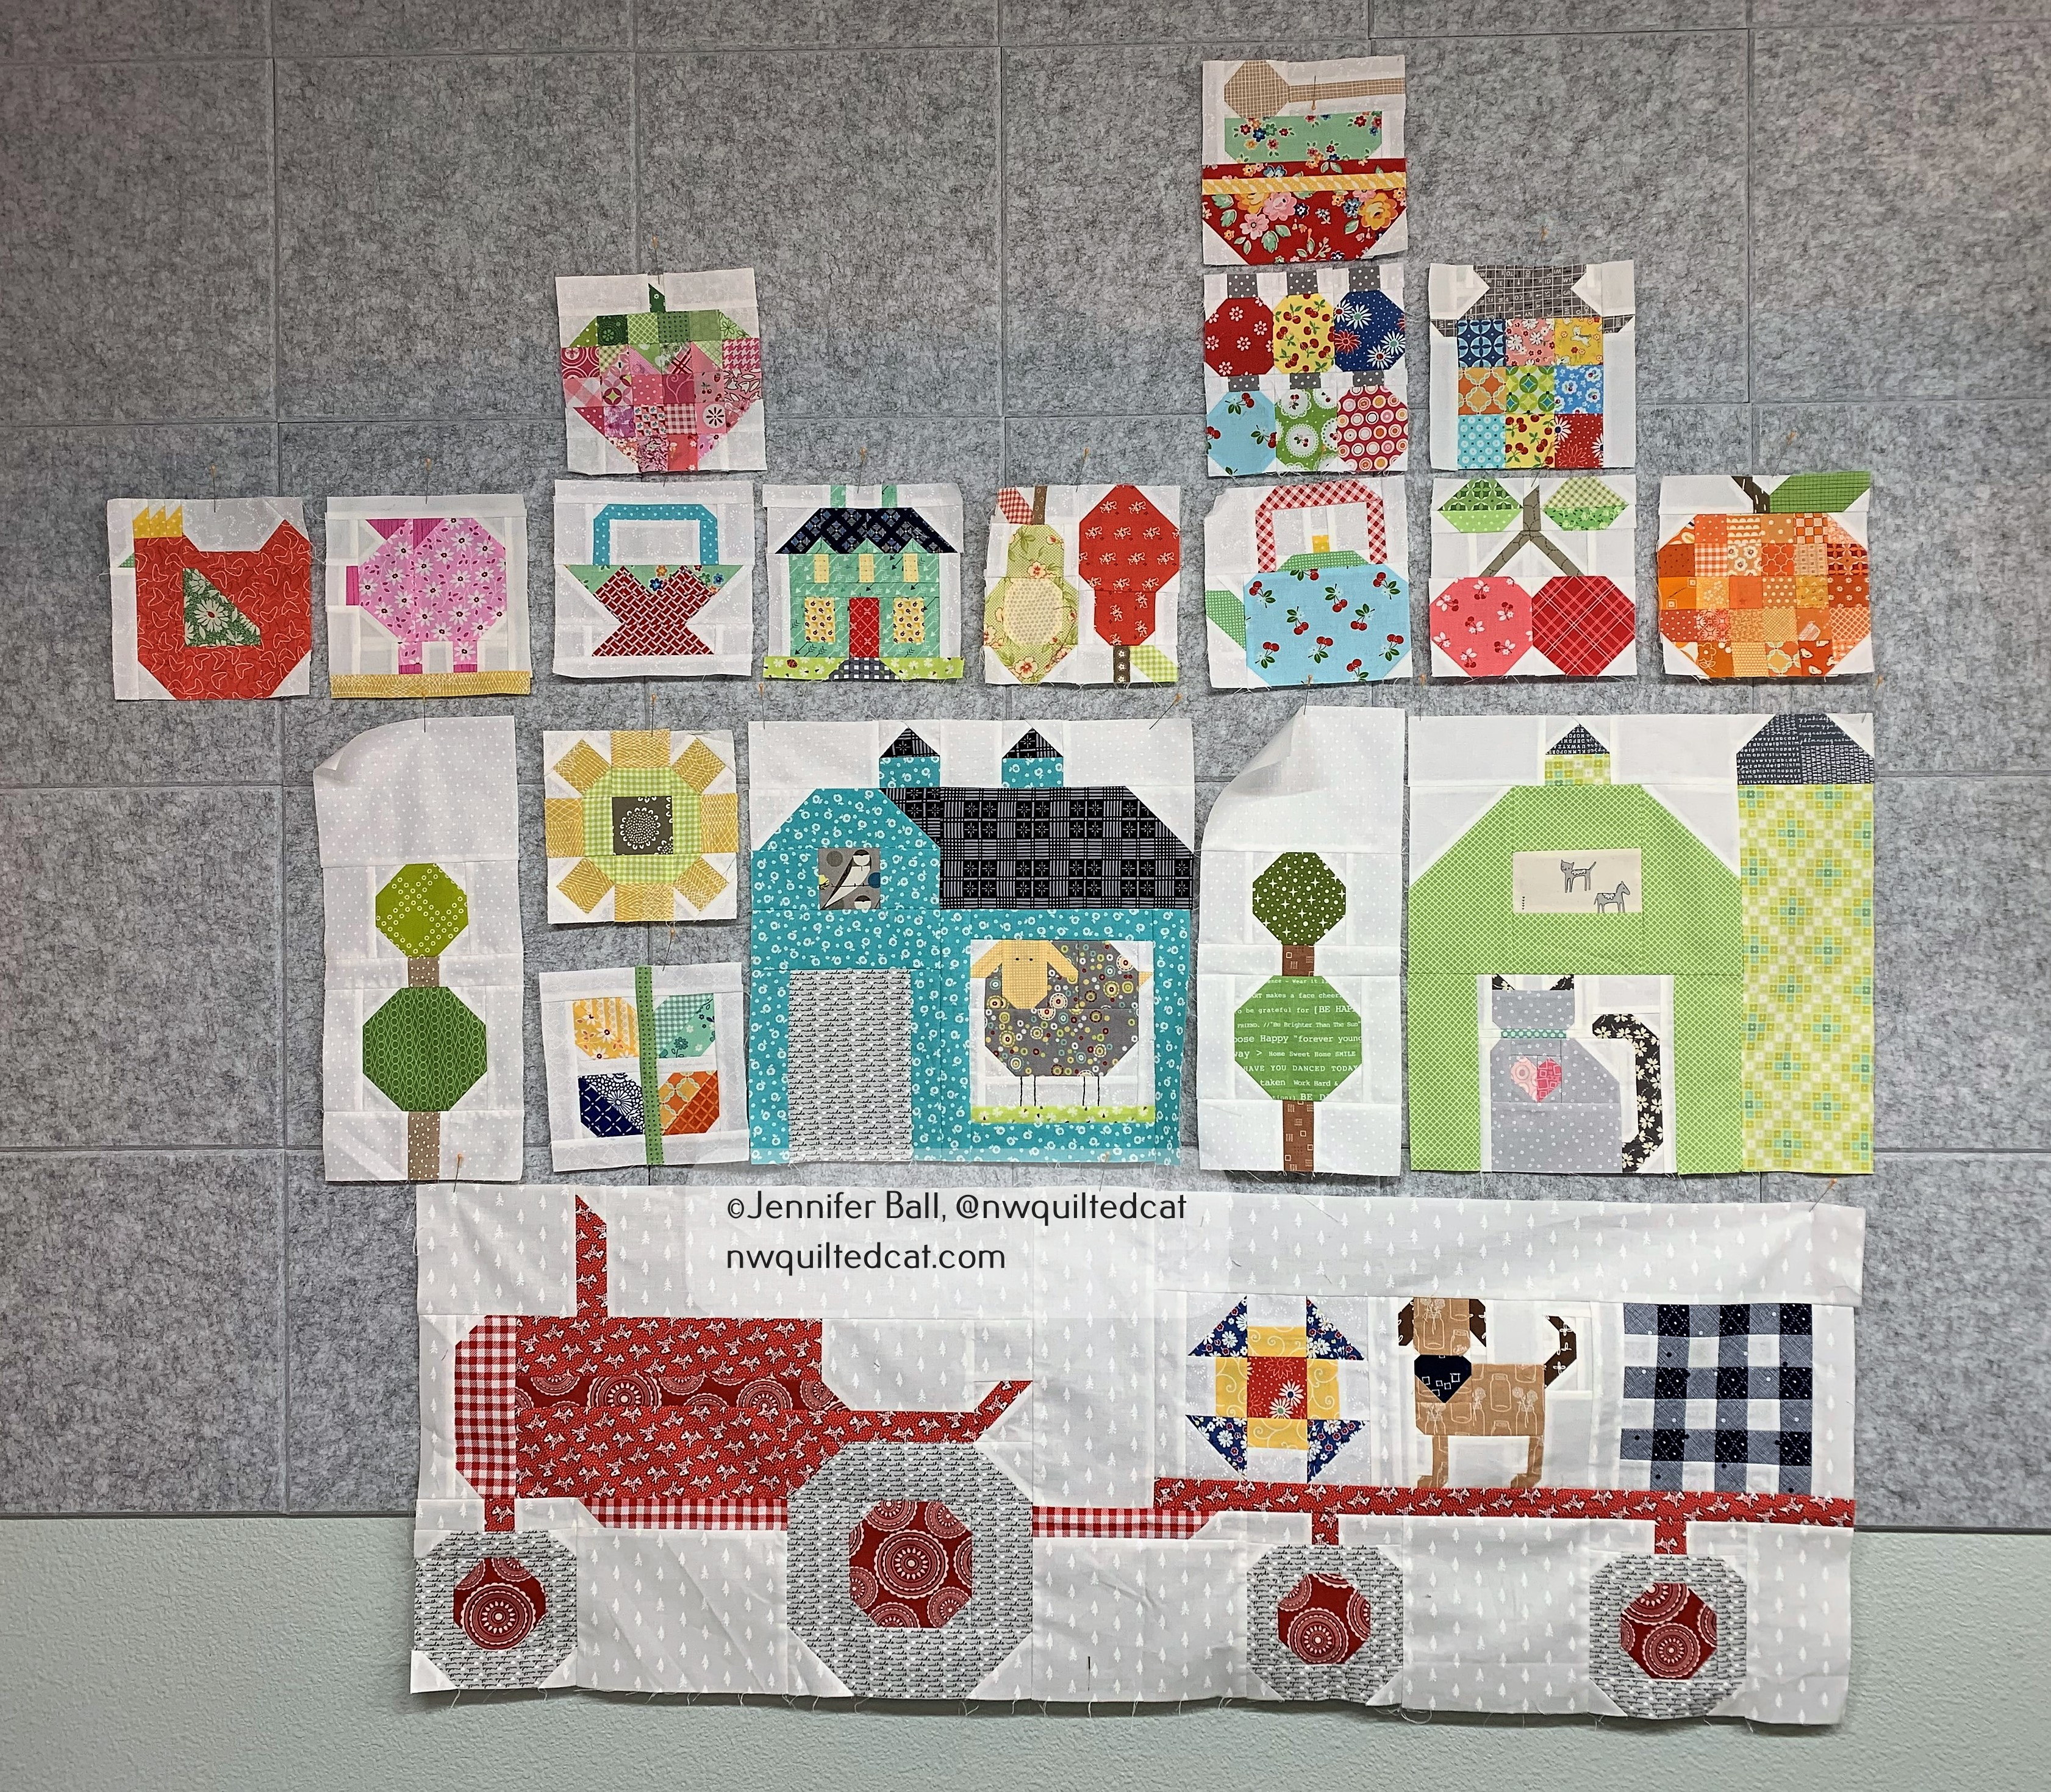
Last year, I completed work on my epic tiny house quilt. I started this quilt in 2023 as a weekly sew along with tiny 6″ foundation paper-pieced houses by Quilt Art Design.

When I last shared my progress, I was about 2/3 finished with the quilting. My goal was to finish this quilt so I could display it at the Sisters Outdoor Quilt Show last July. I realized that I never shared my finished quilt!

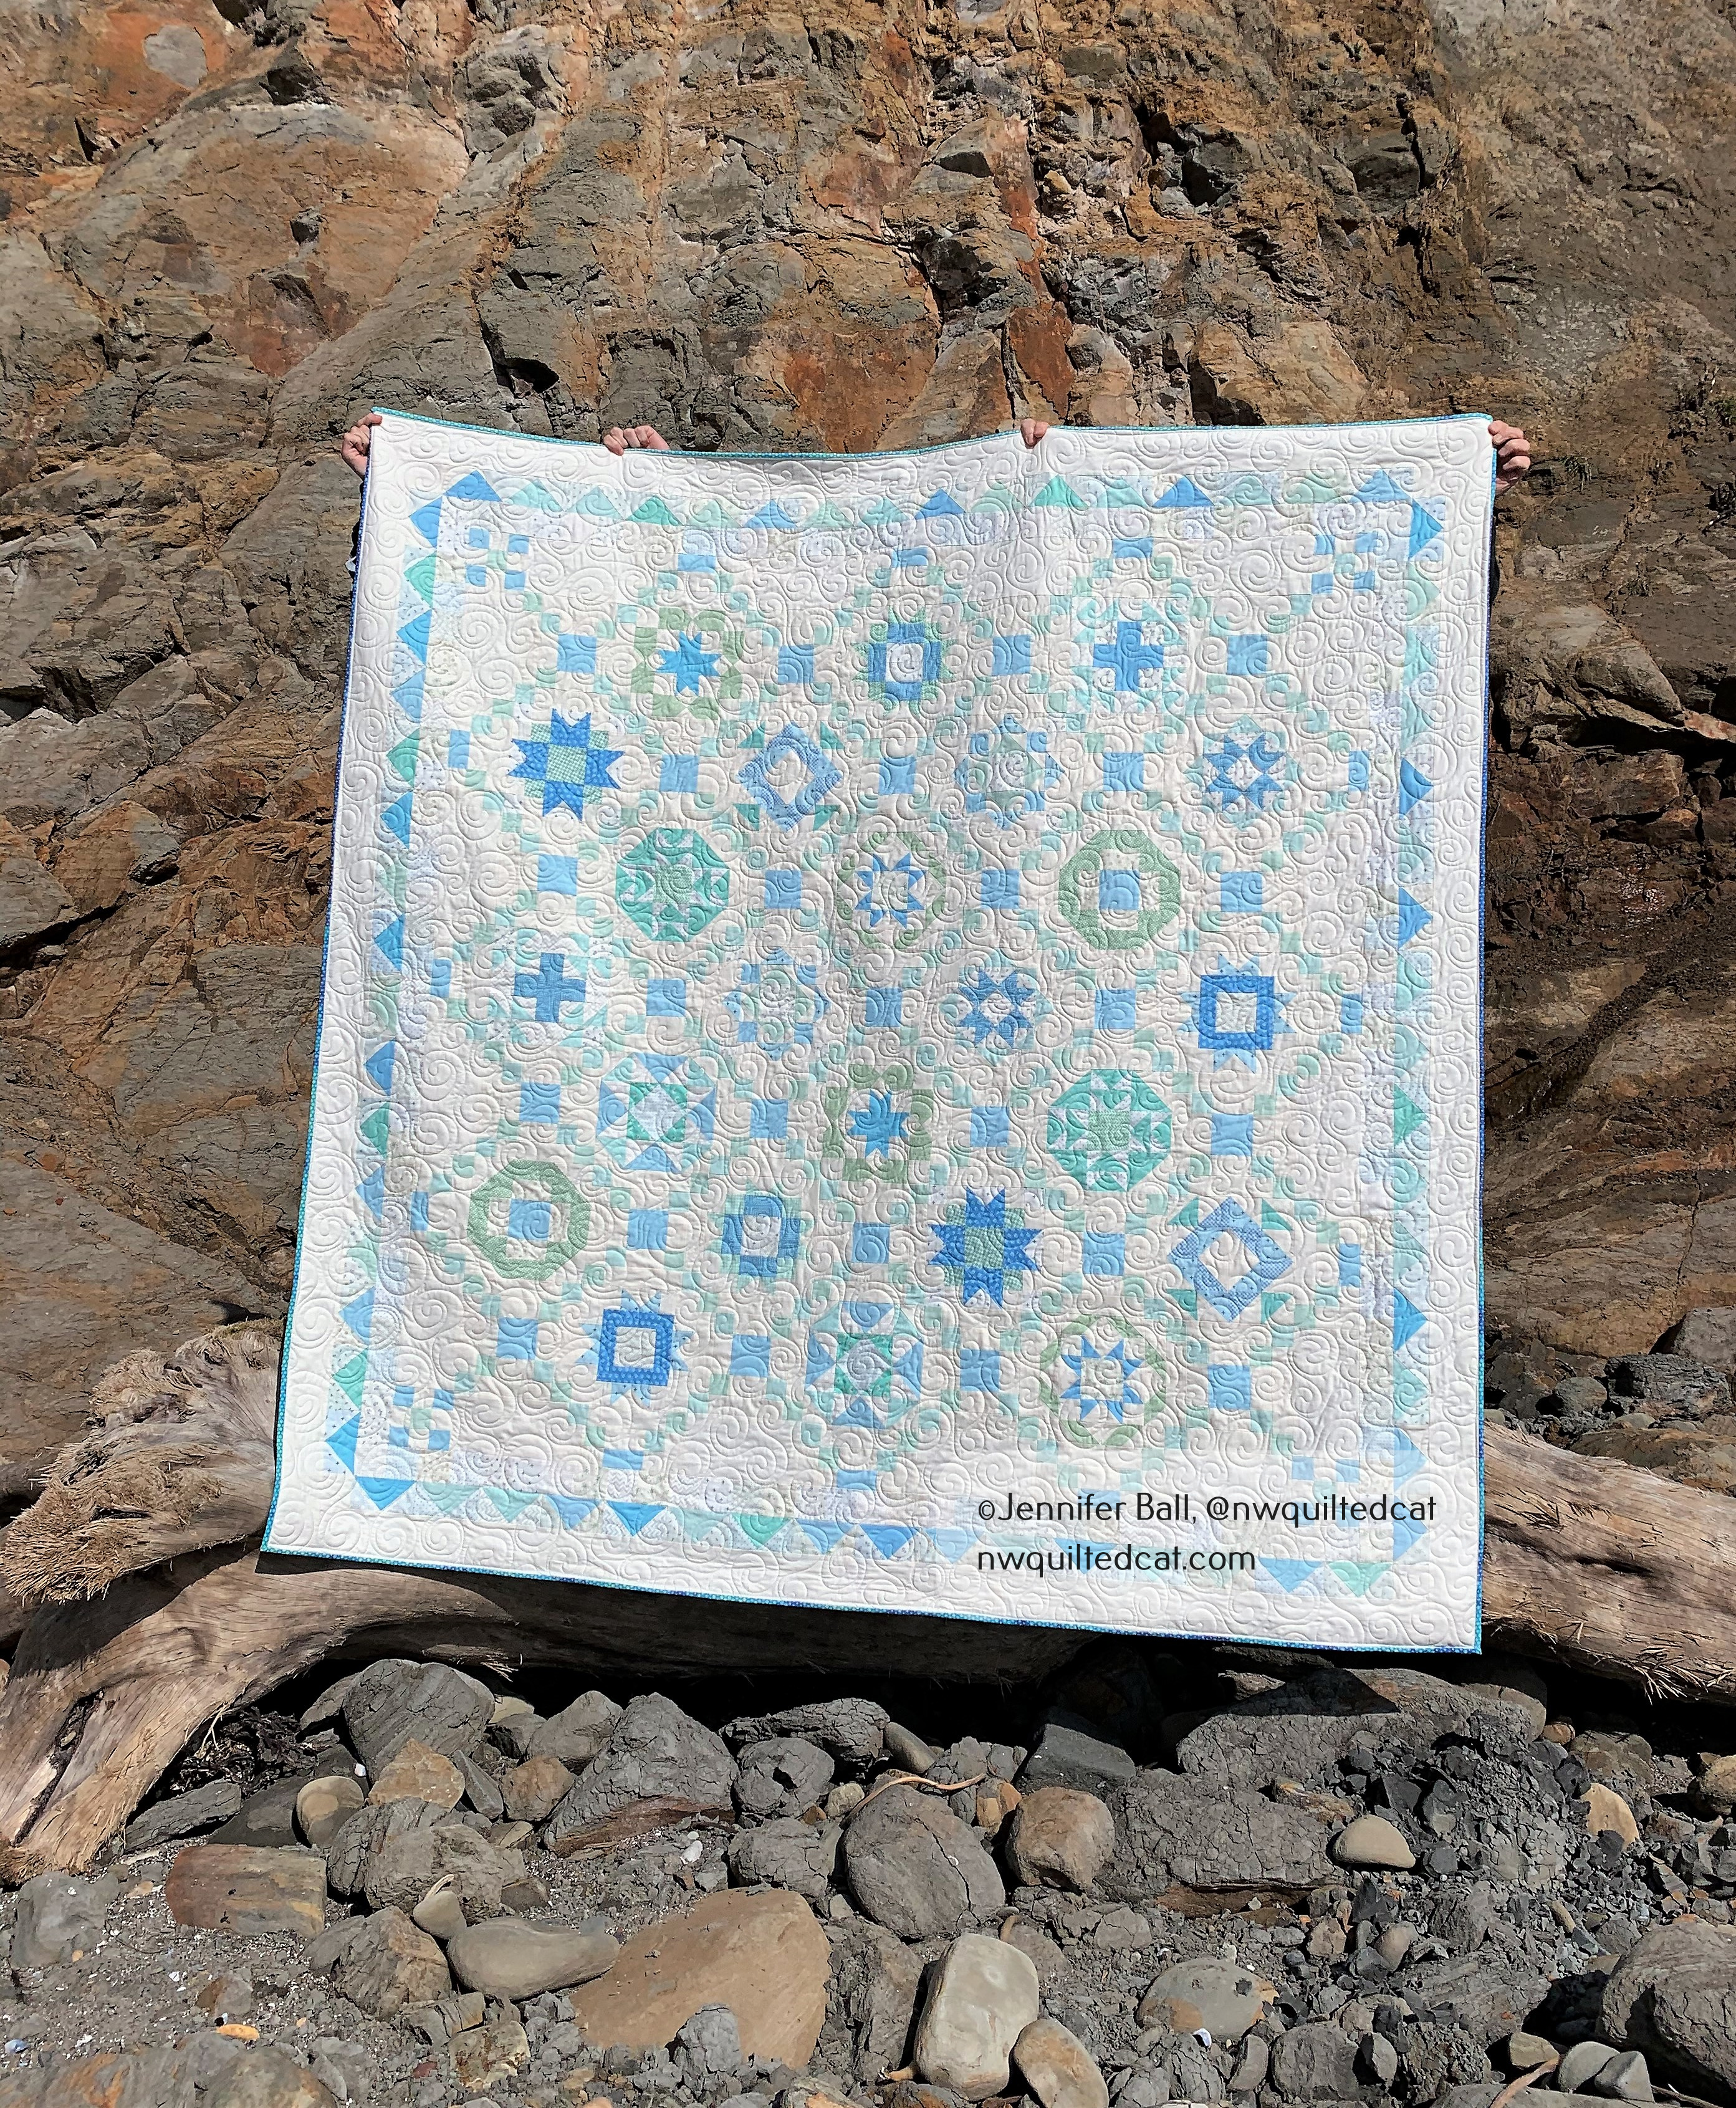
My husband and I hike and backpack regularly so I decided to take a picture of the final quilt at the start of a fantastic trail in the Columbia River Gorge called Eagle Creek.

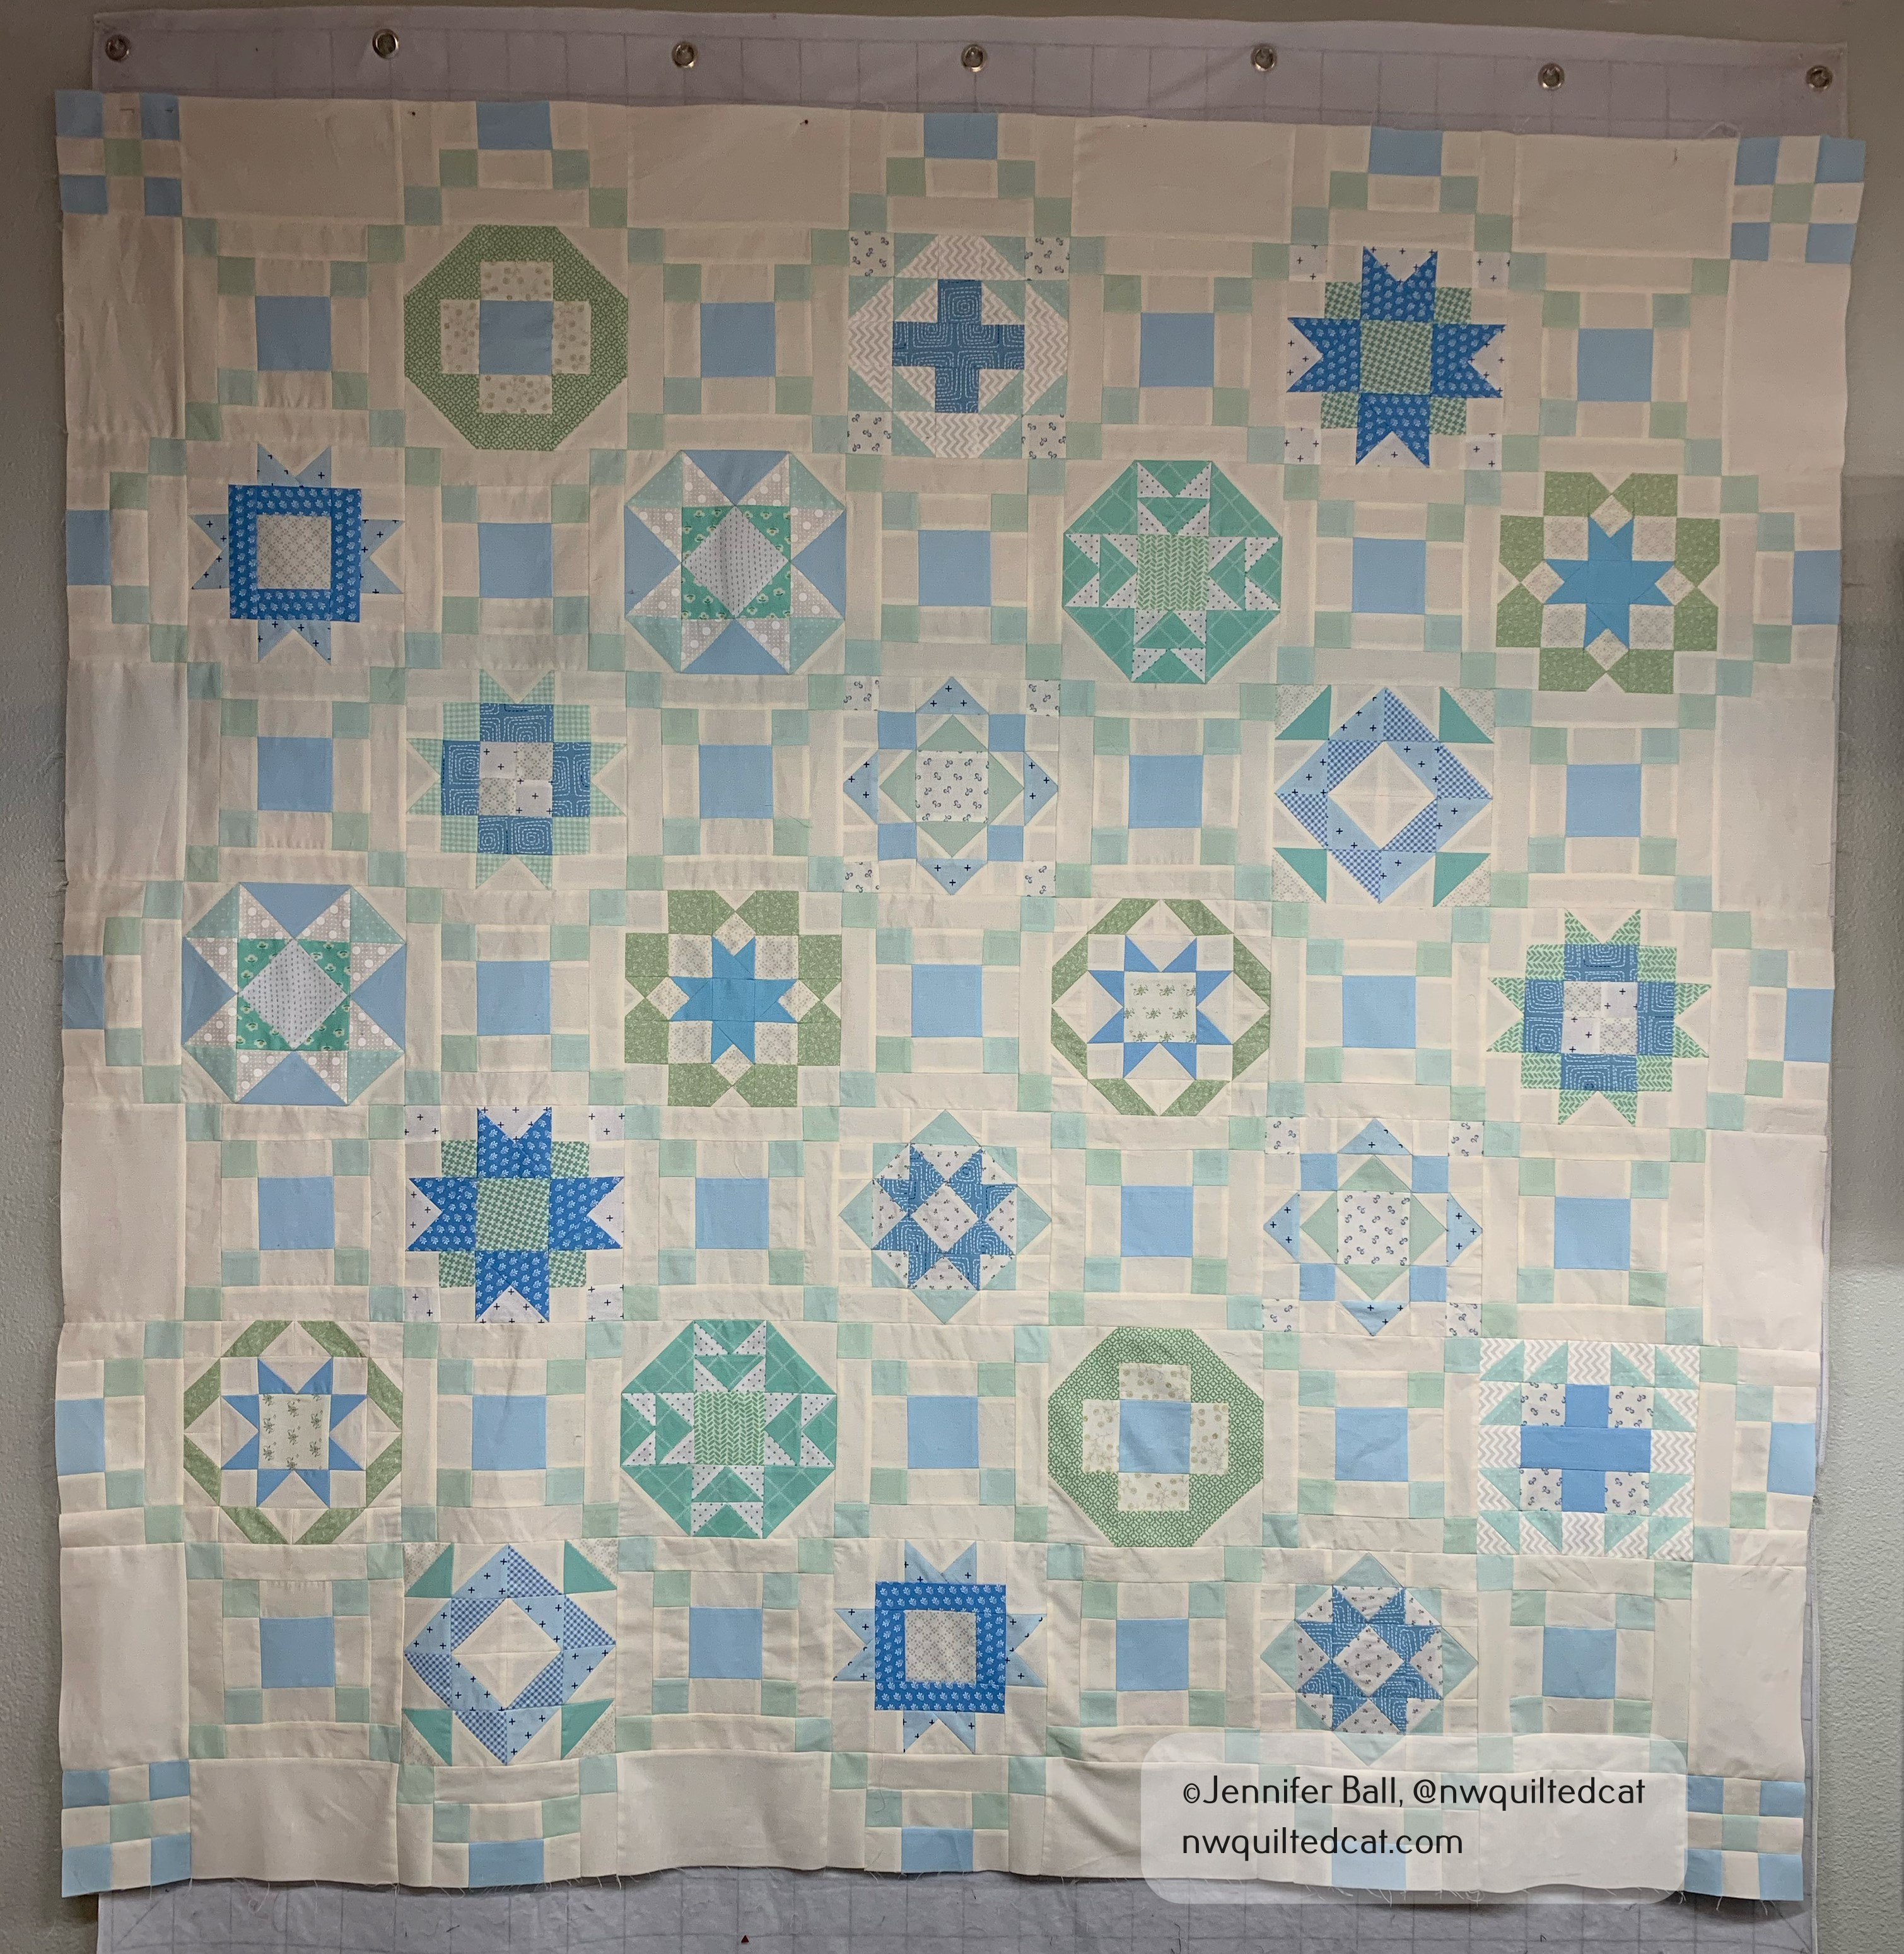
Here’s a look at the finished quilt with all the beautiful greens from the moss and vegetation:

Meowville Finished Quilt at Eagle Creek

If you’ve never hiked along the Eagle Creek trail, I highly recommend it. One of the picturesque falls that is easily doable for most hikers is called Punchbowl Falls. It’s about a 5-mile round trip hike. It does have a few sections with steep drops so be cautious, especially with children and dogs.

I have hiked all the way to the top to Wahtum lake when I was a teenager, which requires either a car shuttle or backpacking. On this particular trip with my quilt, we decided to do a long day hike. We had lunch at Twister Falls and turned around at that point. Tunnel Falls is approximately a 12 mile round trip hike with Twister being about 1/2 mile beyond. If you do hike to Twister, there is a very steep drop often called the “Vertigo Mile” that might be challenging if you’re afraid of heights. There are cables attached to the rock to help you navigate that section if you need them.

Tunnel Falls at Eagle Creek
Twister Falls at Eagle Creek
A Section of the “Vertigo Mile,” the approach to Twister Falls along the Eagle Creek trail with my hubby and dog.

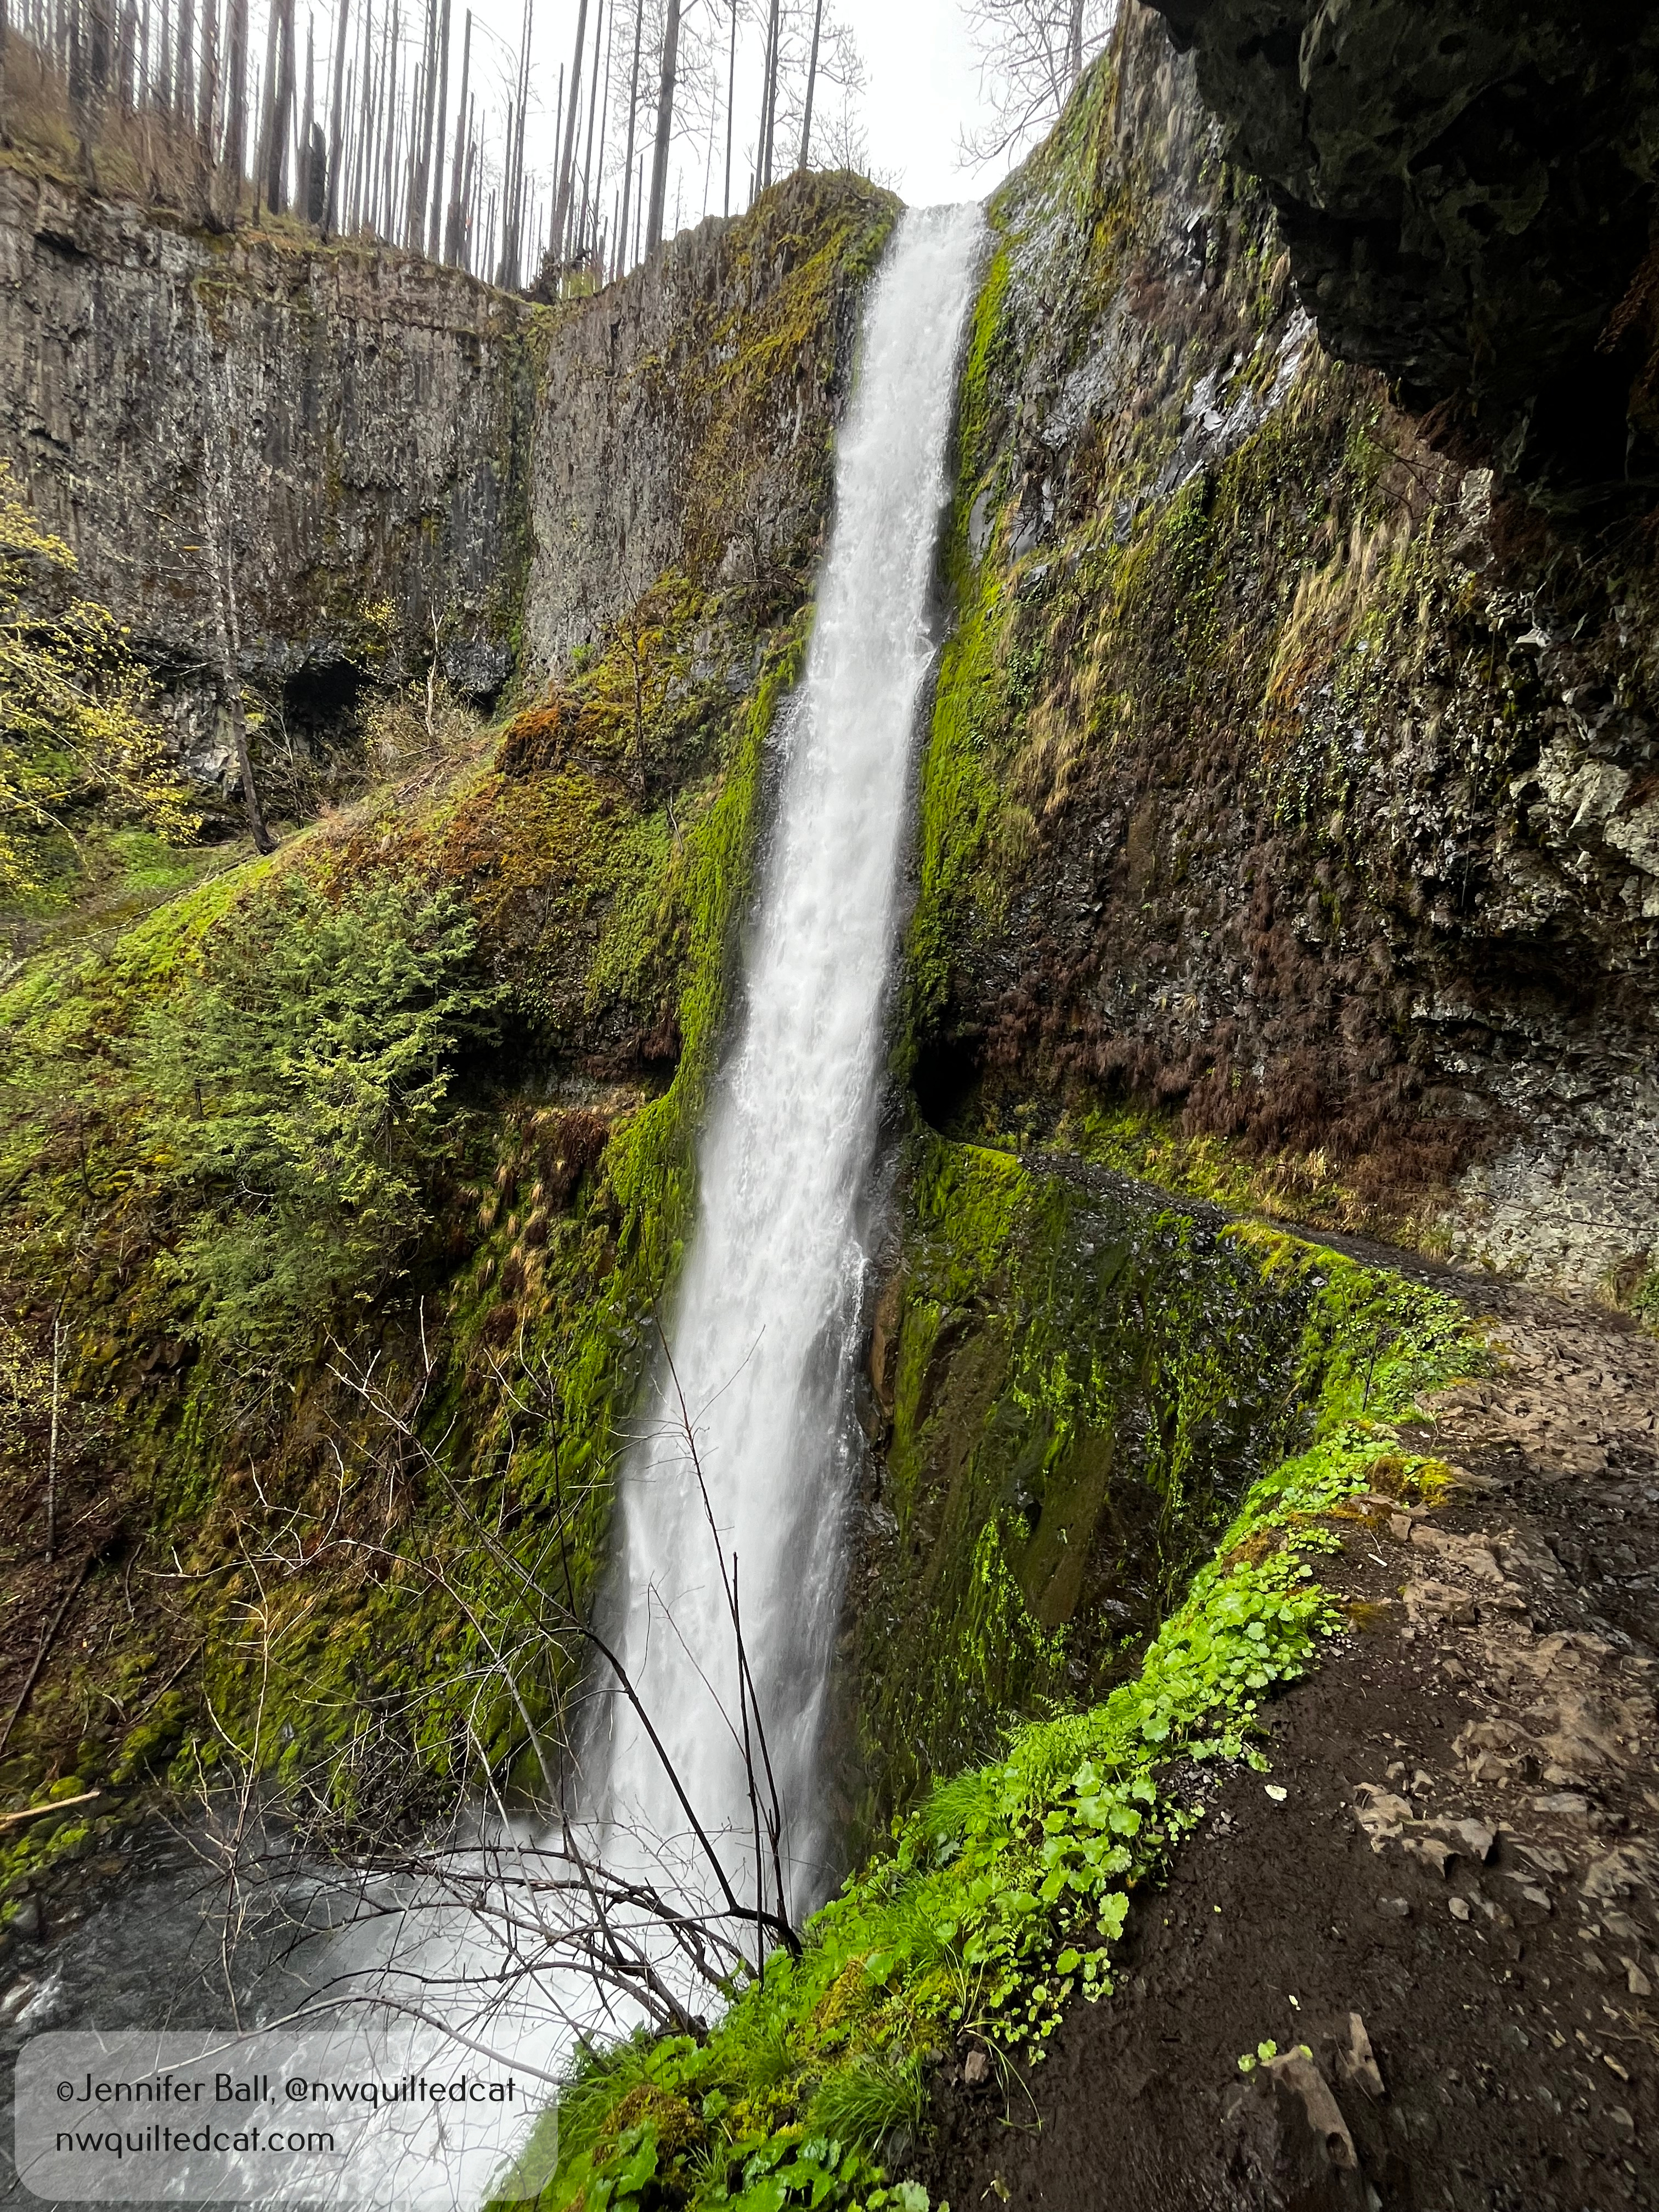
We hiked this in April 2024 so the waterfalls were flush with water. So beautiful!

I did enter Meowville into the Sisters Outdoor Quilt Show so if you visited in July 2024, you might have seen it.

Here’s a look:

Meowville at the Sisters Outdoor Quilt Show, July 2024

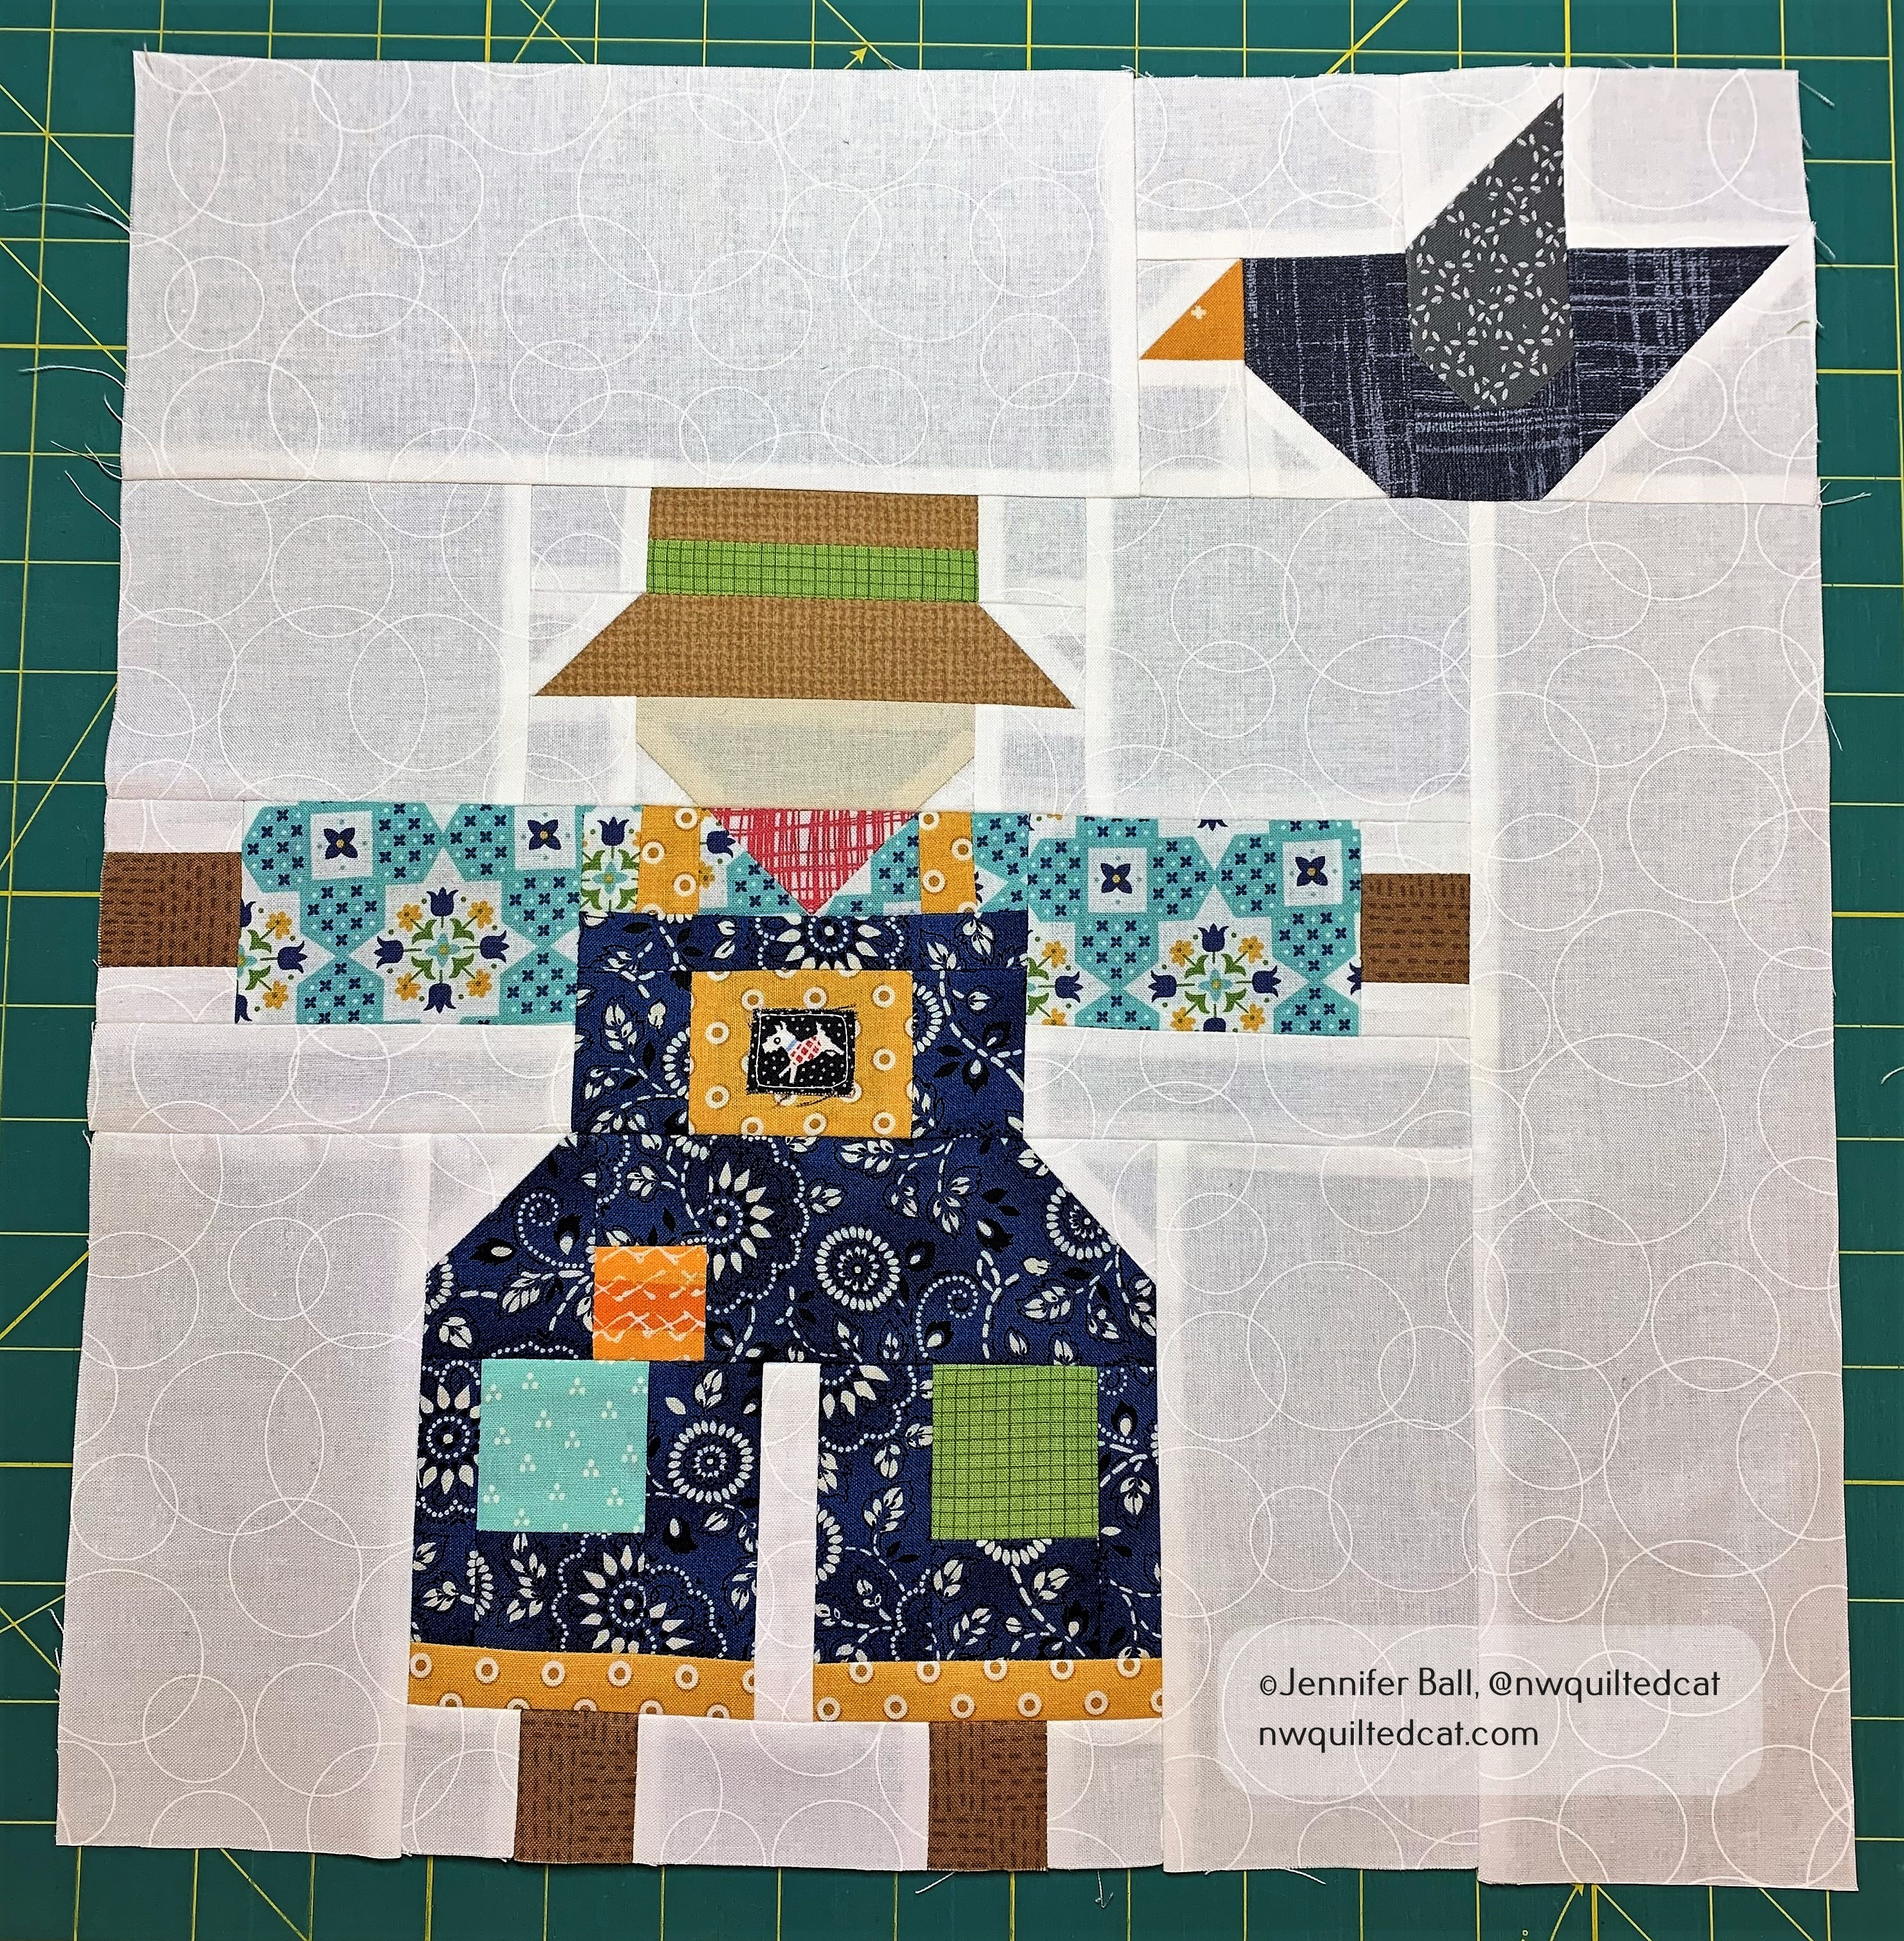
Each of those house blocks has a cat or two pieced into it. If you zoom in on the picture, see if you can find all of the cats. There are some really tiny pieces! I really enjoyed creating this quilt, and sewing one tiny house each week for 36 weeks.

Let me know in the comments if you saw my quilt at the show!

Happy quilting,

Jen

A New Year and A New Quilt Along!

Wishing you all a very happy 2025! We started the year off with a short hike through a beautiful forest. The trail contained so many hues of green from the giant sword ferns to the mosses to the trees. The trail was quite muddy from all of our recent rain, but we were fortunate to have cloudy conditions and no rain during our walk.

For 2025, I’m doing a themed quilt along with the Fat Quarter Shop called Vintage Christmas. For this sew along, you’ll need this quilt book by Lori Holt. You can use your own fabrics or you can buy the quilt kit once it is restocked.

Each month, we’ll make 4 blocks, each finishing at 6-inches. The quilt along runs until December so you’ll have a beautiful quilt finished in time for Christmas 2025, assuming you can finish the quilting, ha, ha!

I’m using the quilt kit, and here’s a look at my book with some of the beautiful fabrics.

Vintage Christmas book and fabric kit for the quilt along

I do starch my fabric, usually one block at a time because I don’t have the time or space to starch the entire kit all at once.

When I work on these smaller 6-inch blocks with many pieces, I like to label them with Alphabitties and place them on little design boards. You can make design boards by using a foam board, batting scraps, and fabric scraps for the binding or purchase them here.

Vintage Christmas block one with Alphabitties on a design board for easier piecing

When sewing these blocks, go slow and careful to maintain accuracy. I do lower my stitch length slightly and backstitch where the pieces will be exposed on the edges. I don’t like to use steam in my iron so I do a final press when a hot, dry iron and Flatter spray. I also use wooden clappers and let the blocks cool completely with the clappers on top.

Here’s a look at block one called “Away in a Manger.”

Away in a Manger block – Vintage Christmas Quilt Along

I hope you’ll join me along in this festive quilt along. I’ll post the other month one quilt blocks this week to inspire you.

Happy quilting!

Jen

Woodland Wonderland Quilt Flimsy

A few years ago, I signed up for a whimsical woodland quilt block-of-the-month program with Fig Tree & Co. I kept up with the blocks for about the first 4 months or so, and then you know what happened! Time got away from me, and I stored the remaining blocks for a “someday” project.

One of my goals for this year is to catch up on some of my quilts that are partially completed. I still plan to work on new projects, but I do want to devote some time to these WIPs. I pulled out the Woodland Wonderland project recently, and just started sewing on it every evening after work and on the weekends.

When I pulled out the remaining blocks, the project did look overwhelming initially. I decided to pull out one block at a time and really took the time to enjoy sewing each block. I started with this cute little owl block:

Owl block from the Woodland Wonderland quilt

The eyes are woo felt that I appliqued after constructing the block.

The background fabric is a black chambray from Moda.

I started to feel my enthusiasm for this project coming back, and I quickly moved on to other blocks:

Gnome block and mushroom block from the Woodland Wonderland quilt

I cleared a space on my sewing room floor to place the blocks that I had completed so far, when my quilt inspector, Romeo, jumped up onto to his special chair to supervise the job:

Romeo inspects my progress on the Woodland Wonderland quilt

He could see that I still had many blocks to complete so he went back to sleep. In the meantime, I kept sewing in my free time and enlisted another one of my quilt inspectors, Pepper. She isn’t as skilled as a cat quilt inspector, but she did her best inspecting this block:

Pepper tries to be a quilt block inspector. Romeo needs to give her more training!

In January, our teen had a band retreat down at the coast. I thought that would be the perfect opportunity to get some photos of my completed quilt flimsy. It was pretty chilly and windy, which made getting good photos a bit tricky. My husband and I stayed at a cute little motel, and he held up the finished quilt top while I took a few photos in between wind gusts.

Woodland Wonderland quilt flimsy at the Oregon coast

The motel had these fun red railings that I thought accented the quilt rather nicely. It used to be a U.S. Coast Guard lookout station in the 1940s. The most recent owners have remodeled it with a vintage vibe, including turntables in each room. You can check out LPs from the front office.

Here’s a close-up look at the quilt flimsy:

Close-up of the Woodland Wonderland quilt flimsy

I did tweak a few things in my quilt from the original Woodland Wonderland pattern. I omitted the column of flying geese from the side next to the trees and stars. I liked the look of the quilt better without the geese. I also added little blocks above the big mushroom blocks next to the gnome. I used those some blocks, slightly larger, and added them to the ends of the long vine blocks for balance.

I really enjoyed making this quilt. It’s all traditionally pieced with only a couple of appliqued features on the owl and hedgehog. The printed fabrics are all from the original block-of-the-month, and I think they are all Fig Tree fabrics. The background is black chambray from Moda, which really sets off all the green, red, and cream fabrics wonderfully!

Next up, how to quilt it? The quilt flimsy is going into my to-be-quilted pile. I want to finish up some piecing projects before tackling this pile.

Happy quilting!

~Jen

Hello Mr. Scarecrow!

Hi everyone,

In 2017, I joined a block-of-the-month program through a local quilt store. In this program, we made all of the blocks from Lori Holt’s Farm Girl Vintage book over the course of a year. I kept up each month, made the blocks, and then set them aside because I couldn’t decide on a quilt layout.

Later on, I made a few more blocks from Lori’s second book, Farm Girl Vintage 2, because the new animal blocks were so cute! I couldn’t decide which blocks to keep so I decided to combine all of my blocks into a quilt layout. I also couldn’t resist adding the little dog from her book, Spelling Bee, because what is a farm without a dog?

Here are a few of my blocks going up on my design wall. Hmm, what layout should I use?

Farm Girl Vintage blocks on my design wall

I played with a few layouts, turning blocks this way and that way. Then, I decided to sew more blocks!!

My little farm needed a scarecrow out in the fields with the tractor. The Mr. Scarecrow block is from the Farm Girl Vintage 2 book, and is a fun addition to my quilt.

Look at all the pieces! I kept them organized by using Alphabitties, which are little plastic squares that you use to label block components.

Alphabitties – great labels to use while making blocks with many pieces

I use Clover Clips to attach the Alphabitties to the fabric pieces so that I don’t lose them in the chaos of my cutting table.

Here’s a look at my assembled Mr. Scarecrow block:

Mr. Scarecrow block

Hmm, I thought that Mr. Scarecrow could use a little friend so I made him one!

A crow joins Mr. Scarecrow in my Farm Girl Vintage quilt

I will hand embroider Mr. Scarecrow’s facial features before I start the quilting. I plan to add this block in front of the tractor in my final layout.

This quilt is so bright and cheerful, and I’m having a blast figuring out how to assemble it into a unique layout. Stay tuned to see how I finish this quilt.

Happy quilting!

~Jen

Sea Glass Quilt Finished

Hi everyone,

I took my completed Sea Glass quilt to the ocean for a few pictures several weekends ago. It was beautiful weather, although the wind made it pretty tricky to get good pictures. We rented a yurt for camping and had a great time! We were so glad to be in a yurt instead of our tent because it did get below freezing at night. Brrr!

I did free-motion quilting using Glide thread in Cool Mint. I used large, open swirls that reminded me of the beach. For the backing, I used Luxe Cuddle in Seal Aqua Sea. My HQ Avante handled the cuddle backing perfectly!

Free-Motion Quilting on My Sea Glass Quilt

For binding, I opted to use a fabric that wasn’t part of the BOM. I had some Zuma High Tides in Aquamarine by Tula Pink in my stash that complements the blues and turquoises in the quilt. I think it really accents and frames the quilt very nicely. Those little anchors are too cute!

Sea Glass Binding

I did machine stitch the binding to both the front and the back because it is pretty difficult to hand sew through the cuddle fabric. I knew that this quilt was going on a bed so I also liked the extra durability of machine stitching.

Here’s a look at the completed quilt with the Pacific Ocean in the background:

Completed Sea Glass Quilt at the Ocean

We found some interesting cliffs a little farther down the coast so I asked my hubby and son climb up on a log to hold the quilt for a picture. It really helps having a teen who is now taller than me!

Sea Glass Quilt Near Cliffs

I have a full size futon bed in my guest room so this quilt will make a nice covering. The luxe cuddle backing is so soft and feels so good against your skin. I’m sure my guest (aka my sister) will love sleeping under this quilt during a future visit.

This Sea Glass quilt finish is the result of a year long block-of-the-month program through Fig Tree & Co. Although the BOM program is over, you may be able to purchase a pattern on their website.

I really enjoyed making a quilt with this soothing color palette, and I’m really glad to have another WIP completed!

Happy quilting!

~Jen

Sea Glass BOM – We Have a Quilt Top!

Hi everyone,

If you’ve been following me during the past year, you know that I’ve been working on a BOM by Fig Tree called Sea Glass. This BOM uses a soothing palette of sea glass: greens, blues, and creams.

In January, we received our final BOM packet to not only complete the blocks for month 12, but we also received the final setting instructions for the quilt. So exciting!

When I sew blocks together to form a quilt top, I like to arrange them all first and then take a picture so that I can remember the order in case things get messed up. Sometimes I put the blocks away into a WIP pile, and sometimes my little inspector likes to do a little rearranging!

The quilt inspector happily rearranges blocks!

I then sew my blocks together into rows, one at a time. I press each row carefully and remove stray threads. I like to use Clover Patchwork Glass Head pins because they are heat resistant and glide through the fabric easily.

I also use a fine mist spray bottle with plain water and a hot iron for pressing. I do not use water in my iron to avoid potential issues like rust stains. Plus, I do foundation paper piecing often and steam is a big no-no because it shrinks the paper.

Piecing blocks into rows, Sea Glass BOM

The Sea Glass quilt has, what I call, “feature” blocks and “spacer” blocks. The spacer blocks form a beautiful Irish chain with subtle variations between a light green color and a light aqua color. The feature blocks are all different, usually 2 per month during the BOM. They use deeper hues of blues, aquas, and greens, like beautiful sea glass found on the beach.

Here’s a look at the quilt with all the rows sewn together, but before I added any borders:

Sea Glass BOM, top without the borders

The final quilt layout contains 3 borders. The first border consists of cream-colored squares that were leftover pieces from the feature blocks. The second border uses the sawtooth flying geese units that we sewed at various stages during the BOM. The third and final border uses long pieces of the cream colored background. The quilt is roughly 72″ x 72″ before quilting.

It’s been so rainy here lately that it’s been very difficult to get a good picture of the completed quilt flimsy (top), but we finally got a bit of afternoon sunshine yesterday.

In this first picture, my husband is holding the quilt with his arms as wide as he could go!

In this second picture, I’m standing on a little ladder while my teen took the picture. The quilt is dancing in the breeze, and we can’t catch a moment of still air. Oh, the problems of taking quilt pics “in the wild!” I do like how the afternoon sun shines through the quilt, illuminating the sea glass colors.

I haven’t yet decided on quilting. I plan to use this quilt on the bed in my guest bedroom so I’m leaning towards free-hand edge-to-edge quilting rather than custom quilting.

I also plan to back it using minky fabric, possibly this Cuddle in Turquoise. It will so soft and comforting!

With a little luck, I’ll have time to quilt it this weekend.

Happy quilting!

~Jen

Sea Glass BOM, Months 11 and 12

Happy Friday, everyone!

This week seemed very long for some reason. Cabin fever, I suppose. We had a little snow flurry earlier in the week, giving us a skiff of snow where it was pretty to watch the fluffy flakes falling from the sky, but not enough to cause any problems. It melted within hours, and the dog loved it!

For the Sea Glass BOM by Fig Tree, I finished my month 11 blocks in early December and my month 12 blocks in early January.

For month 11, we made 4 total blocks using 2 similar but slightly different settings. The blocks on the left in the picture are called Sea Urchin and the blocks on the right are called Barnacle Star.

Month 11 blocks in the Sea Glass BOM

I love how the blues just sparkle and pop in these blocks!

I also finished all my flying geese for the sawtooth border. As of month 11, the exact layout is still a mystery.

Assorted flying geese but the final layout is still a mystery

For month 12, we made 2 blocks called Sea Sparkle. These blocks are nearly identical with the exception of the placement of the blue half-square triangles.

It’s hard to believe that we have completed all the blocks in this wonderful BOM! We received the final layout instructions with block 12 so I’ve been working on piecing my quilt top together the past several weeks. The finished quilt top has 3 different borders, one using the flying geese mentioned above.

In my next post, I’ll show you my quilt assembly process and the completed quilt flimsy. I’ve been waiting for some non-rainy weather to get a decent pic of the quilt outside with my photography assistants, and I think this afternoon just might work.

Happy quilting!

~Jen

Sea Glass BOM, Month 10

Hi everyone,

I’m playing a bit of catch-up on my Sea Glass block-of-the-month project. I finished the block for month 10 several weeks ago, but haven’t had a chance to blog about it. If you are new to my blog, this BOM is by Fig Tree & Co, and sign-ups were last year. I don’t know if this BOM will run again in the future or if the pattern will be available to everyone at the end.

I continue to really enjoy working with this soothing color palette each month, and I’m a bit sad that we only have 2 months to go! I’m not sure if month 12 will contain finishing instructions only or if that month will also include blocks.

For month 10, our block is called Water Lily. This block stitched together very quickly!

Seaglass BOM, Month 10

We’re getting very close to the end of the program, and I just received my fabrics and pattern for month 11. I will stitch those blocks up this weekend as well as catch up on my flying geese for the sawtooth border.

Happy sewing!

Jen

Sea Glass BOM, Month 7

Happy Friday, everyone!

We made it through another week, although they are starting to blur together. The warm August days are beautiful, and I do enjoy getting a little outside each day during breaks and lunch as I work from home. My little backyard vegetable garden is thriving, and we’ve enjoyed several salads from the bounty. School is starting soon for my teen, but it will so very different being online rather than in person.

I finished my month 7 blocks for the Sea Glass BOM, designed by Fig Tree. I’m really enjoying the soothing color palette of these blocks each month.

This block is called Sea Star.

Sea Star block, month 7 in the Sea Glass BOM

My blocks in the BOM are growing! I just need to go back to last month and complete the flying geese (likely for border units).

Sea Glass BOM, months 1 through 7

Pretty, pretty sea glass! These blocks just seem to sparkle.

Have a great weekend and happy quilting,

Jen

Sea Glass BOM, Month 6

Hi everyone,

Whew, it has been a warm week with temperatures in the 90s. My vegetable garden is finally starting to perk up after a cool start to our summer. We’re harvesting salad lettuces now, and the squashes are growing rapidly. I can’t wait for the tomatoes!

I recently finished my 2 blocks for month 6 of the Sea Glass block of the month by Fig Tree. The block this month is called Compass Rose.

Look at these beautiful fabrics! I think the darker aqua is so pretty.

Sea Glass BOM, Month 6 blocks, Compass Rose

I still need to sew the flying geese border units for this month so I hope to get them finished this weekend.

Here’s a look at the first 6 months of blocks together:

Sea Glass BOM, blocks from the first 6 months

Take care and happy quilting!

~Jen