Woodland Wonderland Quilt Flimsy

A few years ago, I signed up for a whimsical woodland quilt block-of-the-month program with Fig Tree & Co. I kept up with the blocks for about the first 4 months or so, and then you know what happened! Time got away from me, and I stored the remaining blocks for a “someday” project.

One of my goals for this year is to catch up on some of my quilts that are partially completed. I still plan to work on new projects, but I do want to devote some time to these WIPs. I pulled out the Woodland Wonderland project recently, and just started sewing on it every evening after work and on the weekends.

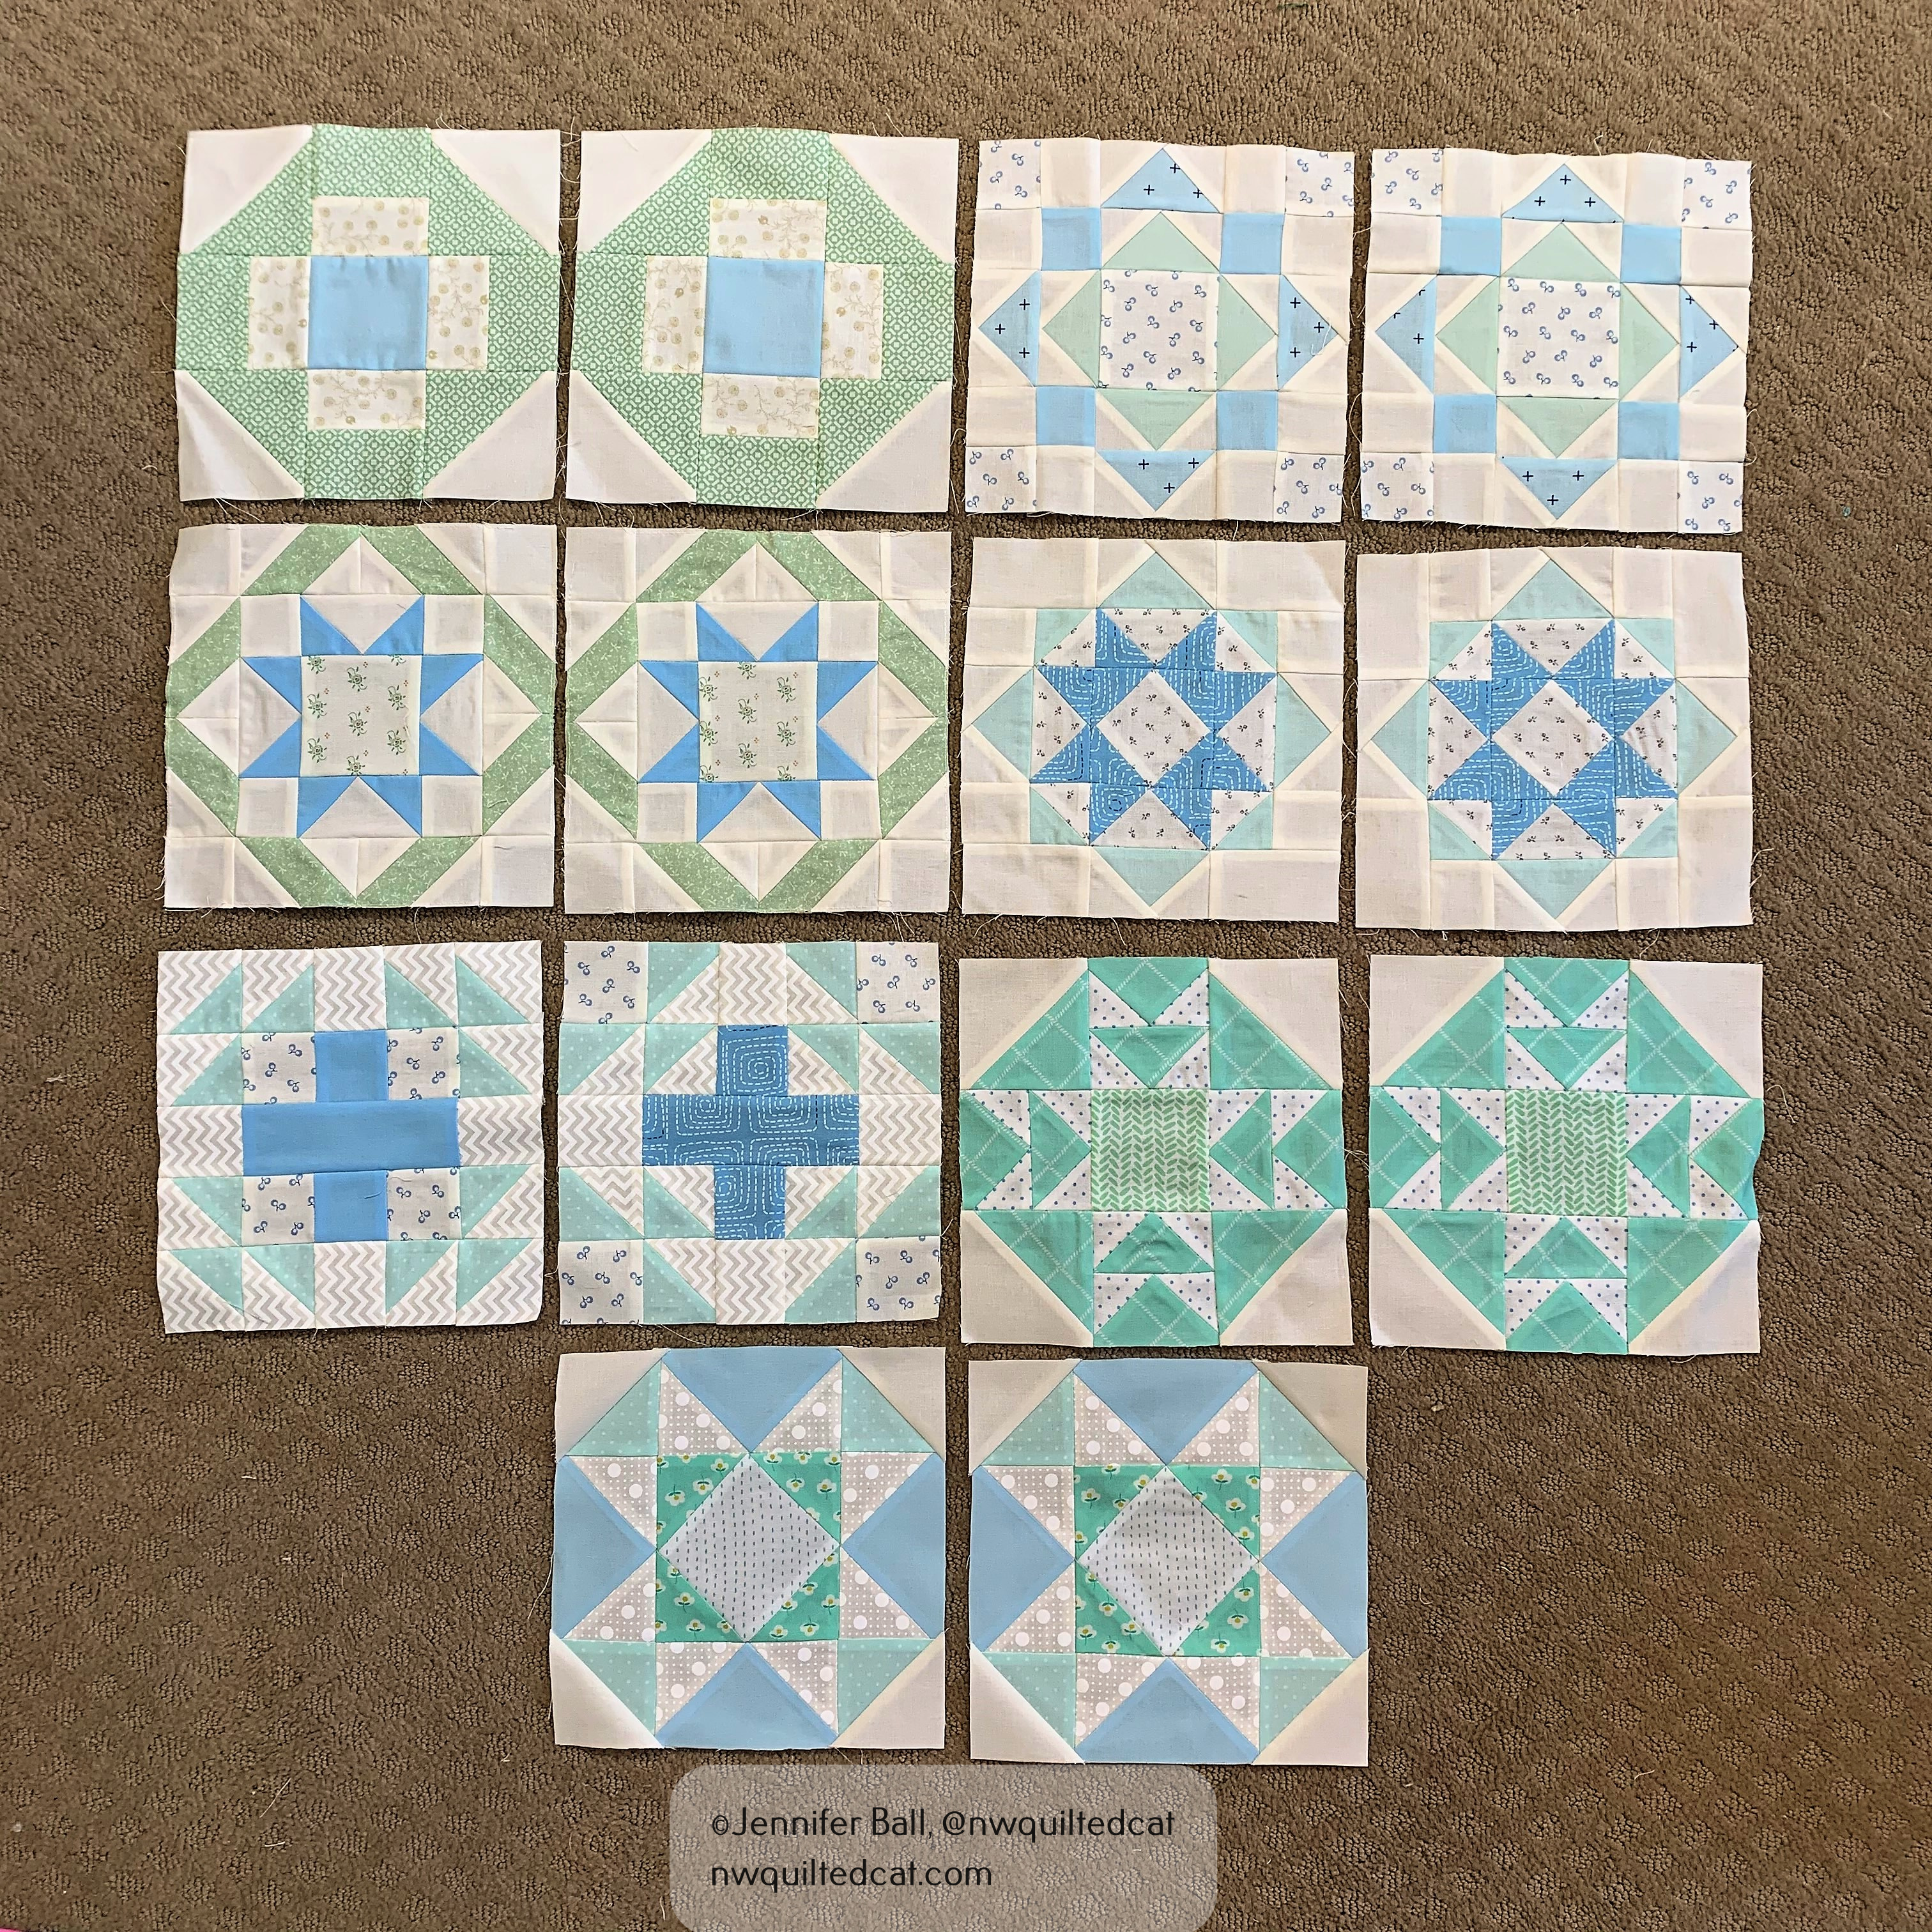
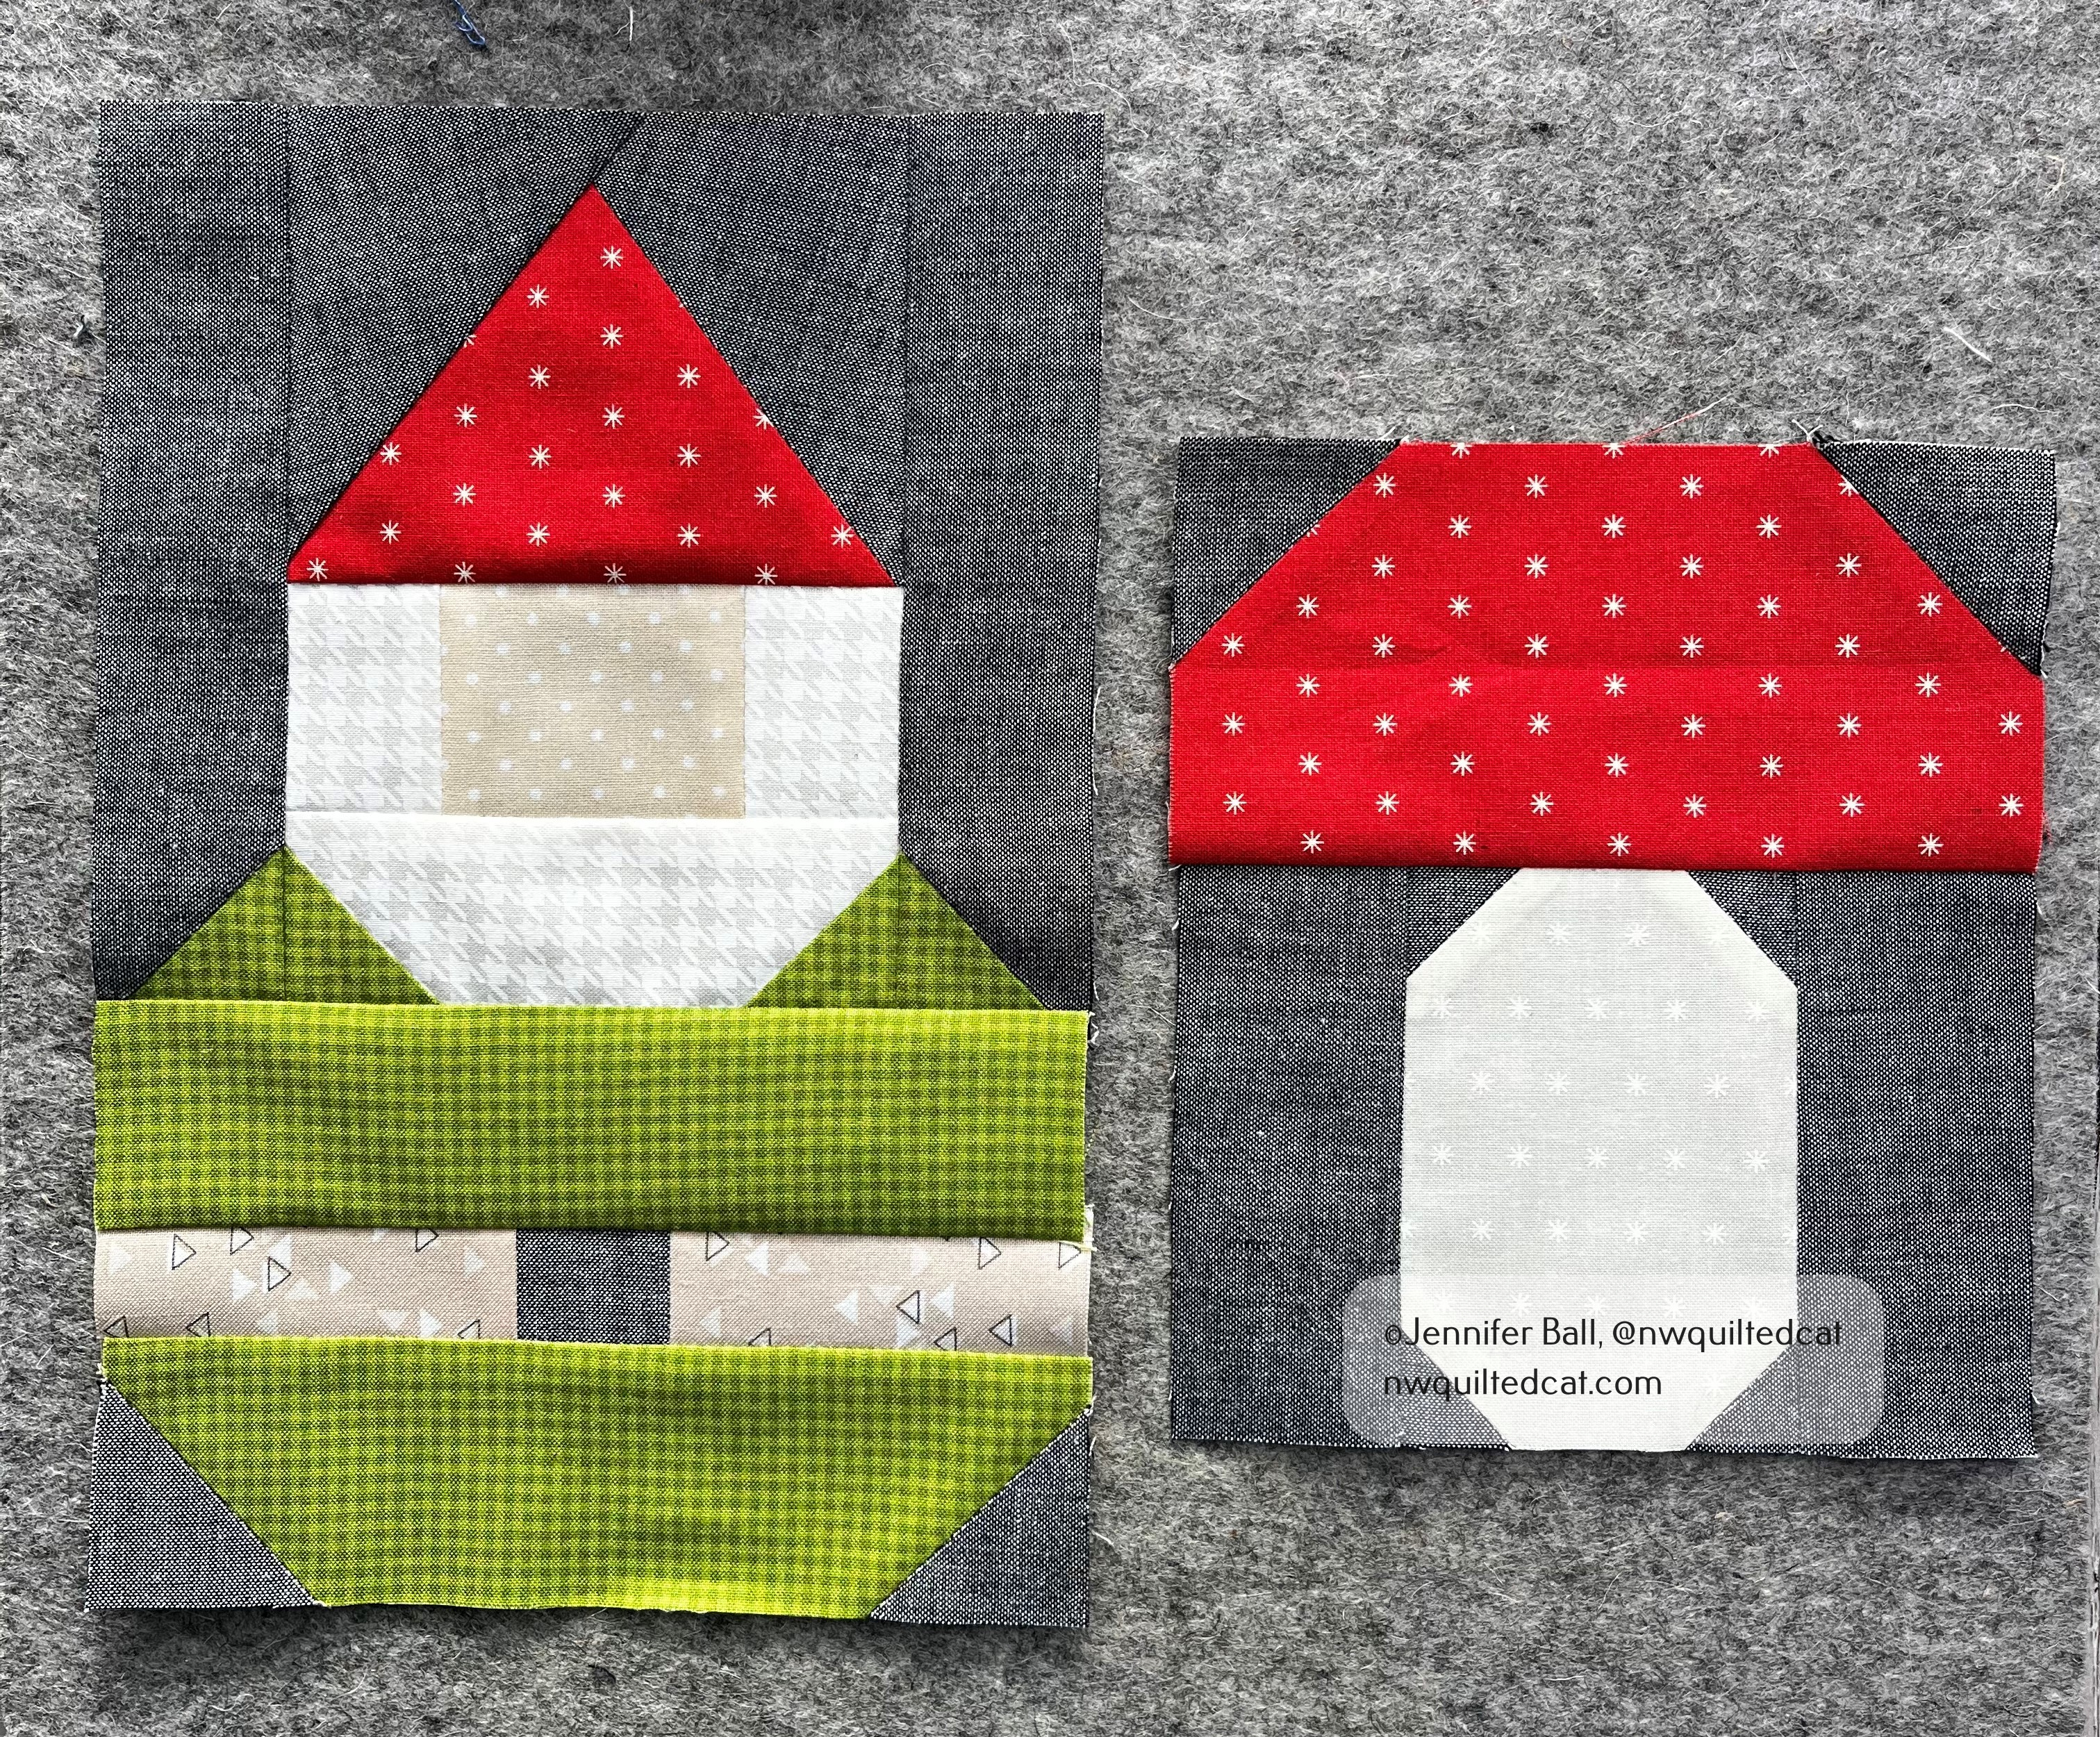
When I pulled out the remaining blocks, the project did look overwhelming initially. I decided to pull out one block at a time and really took the time to enjoy sewing each block. I started with this cute little owl block:

Owl block from the Woodland Wonderland quilt

The eyes are woo felt that I appliqued after constructing the block.

The background fabric is a black chambray from Moda.

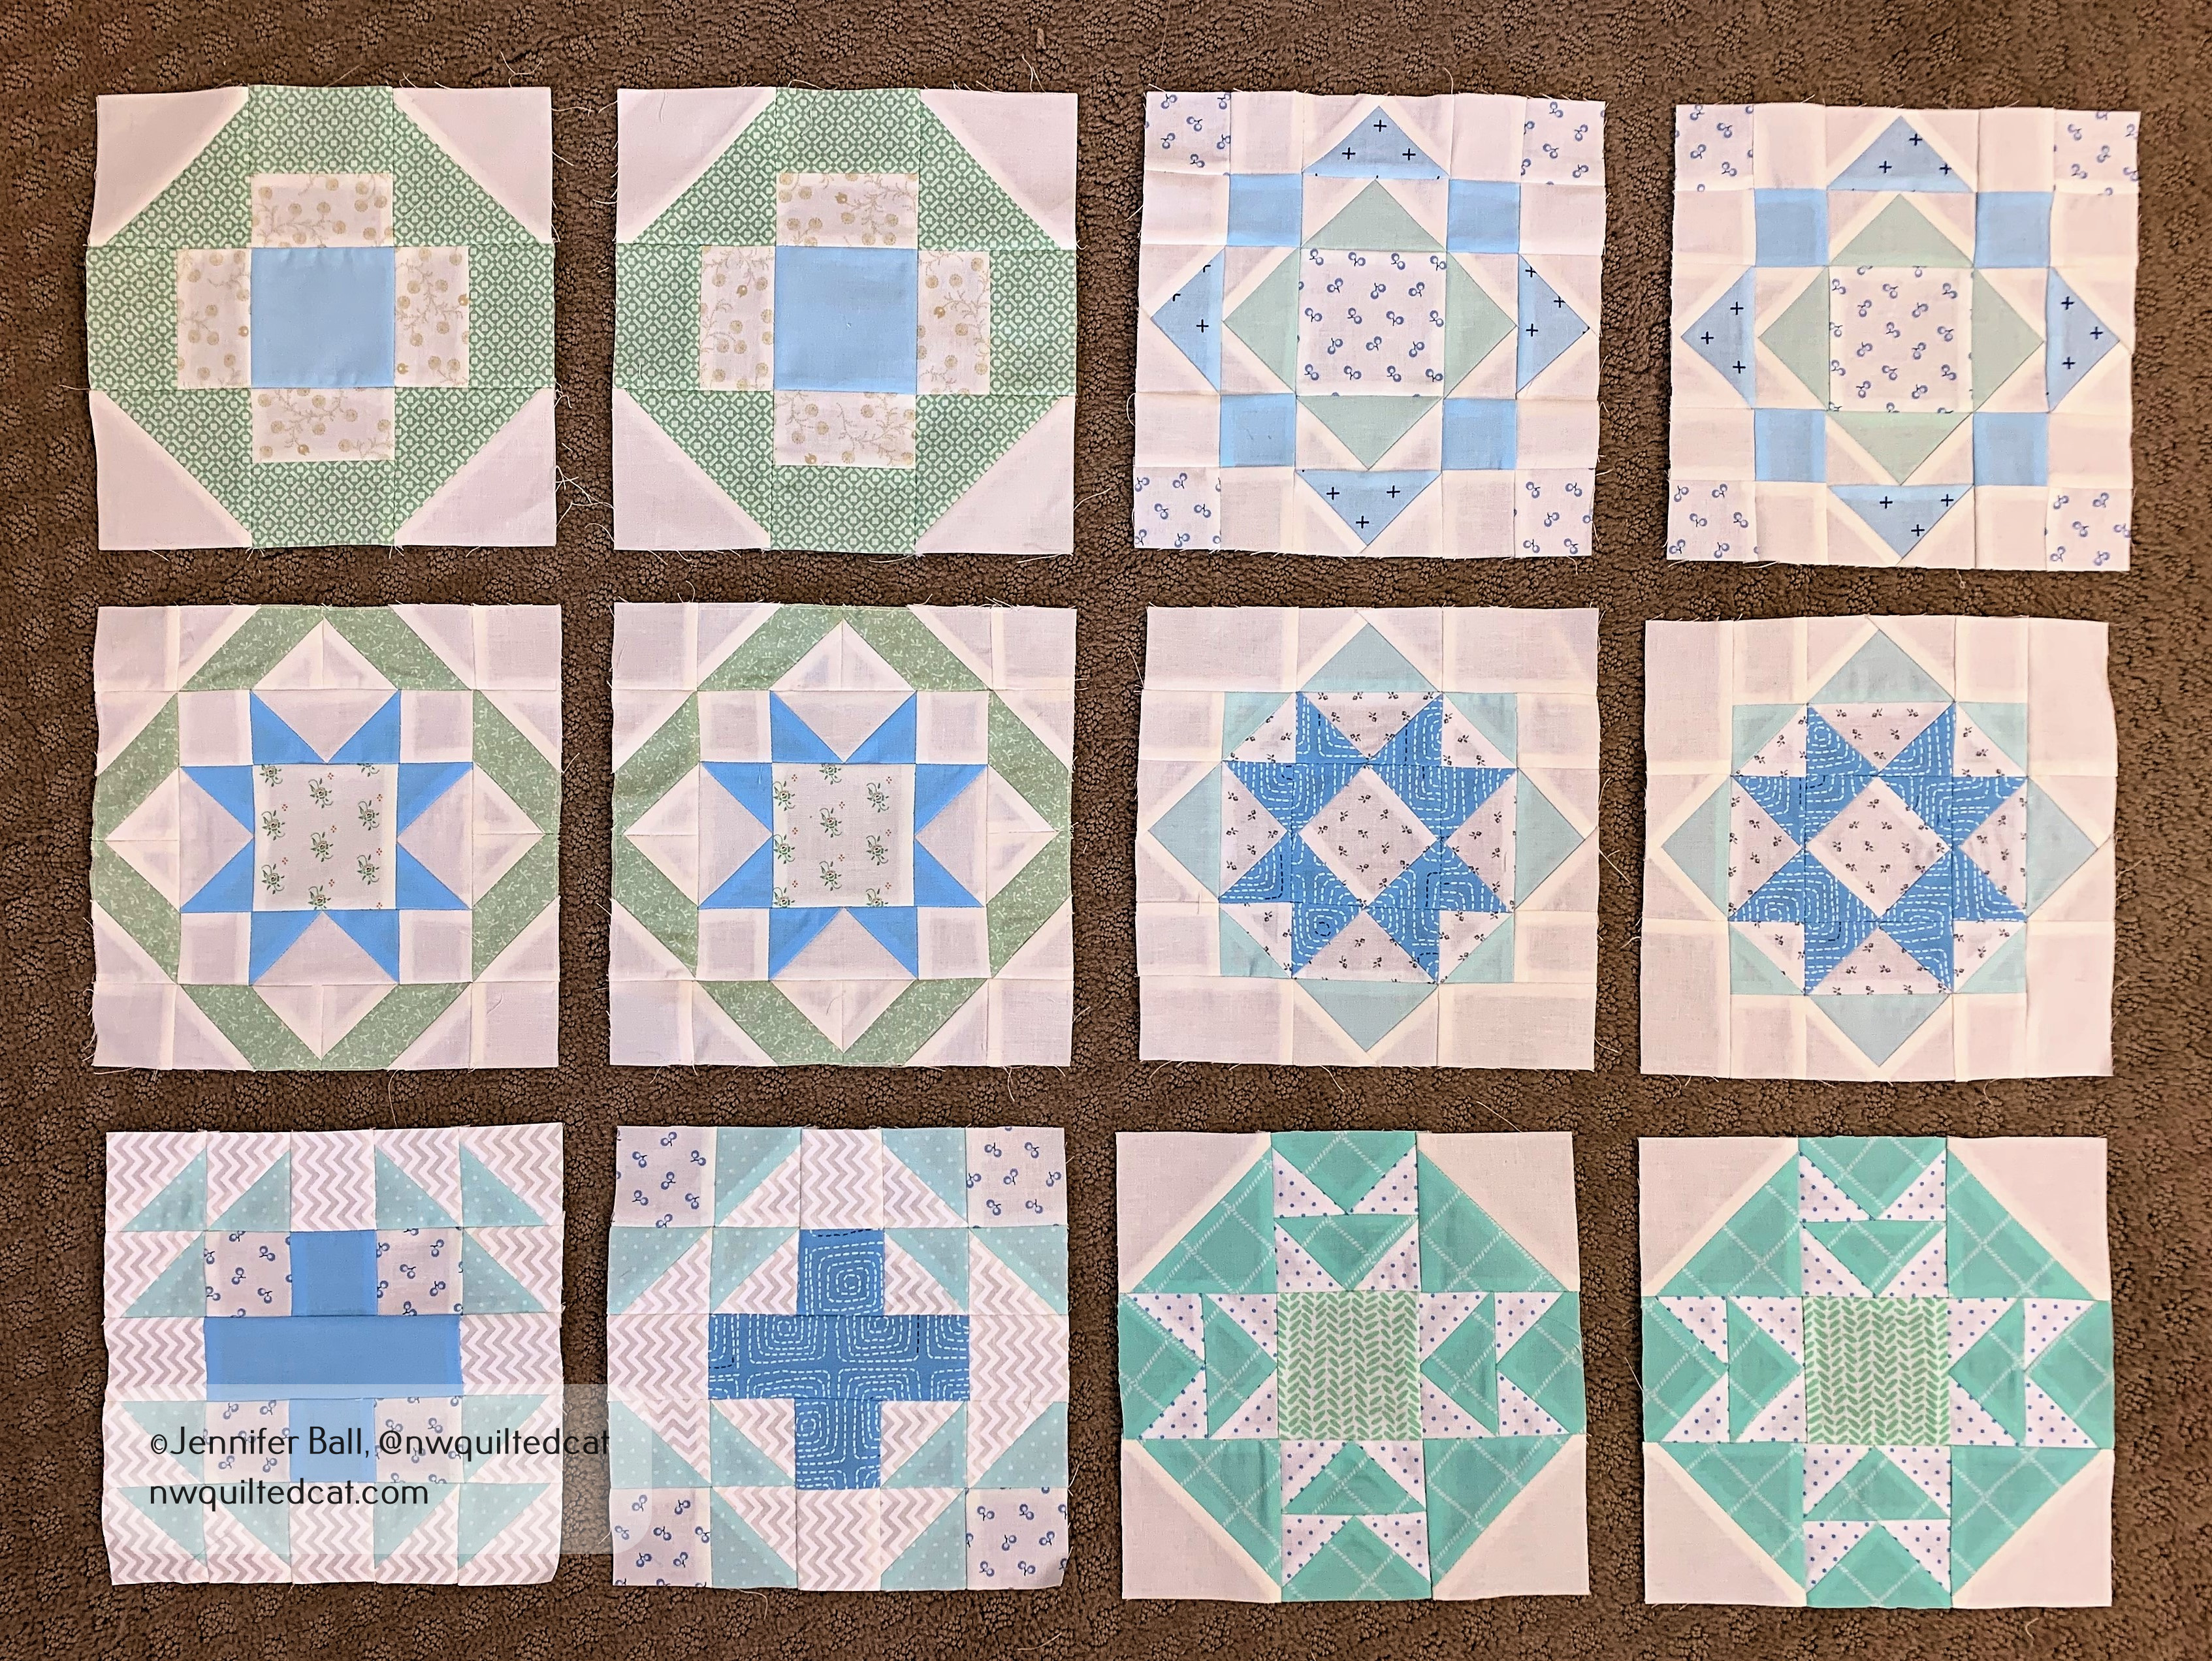
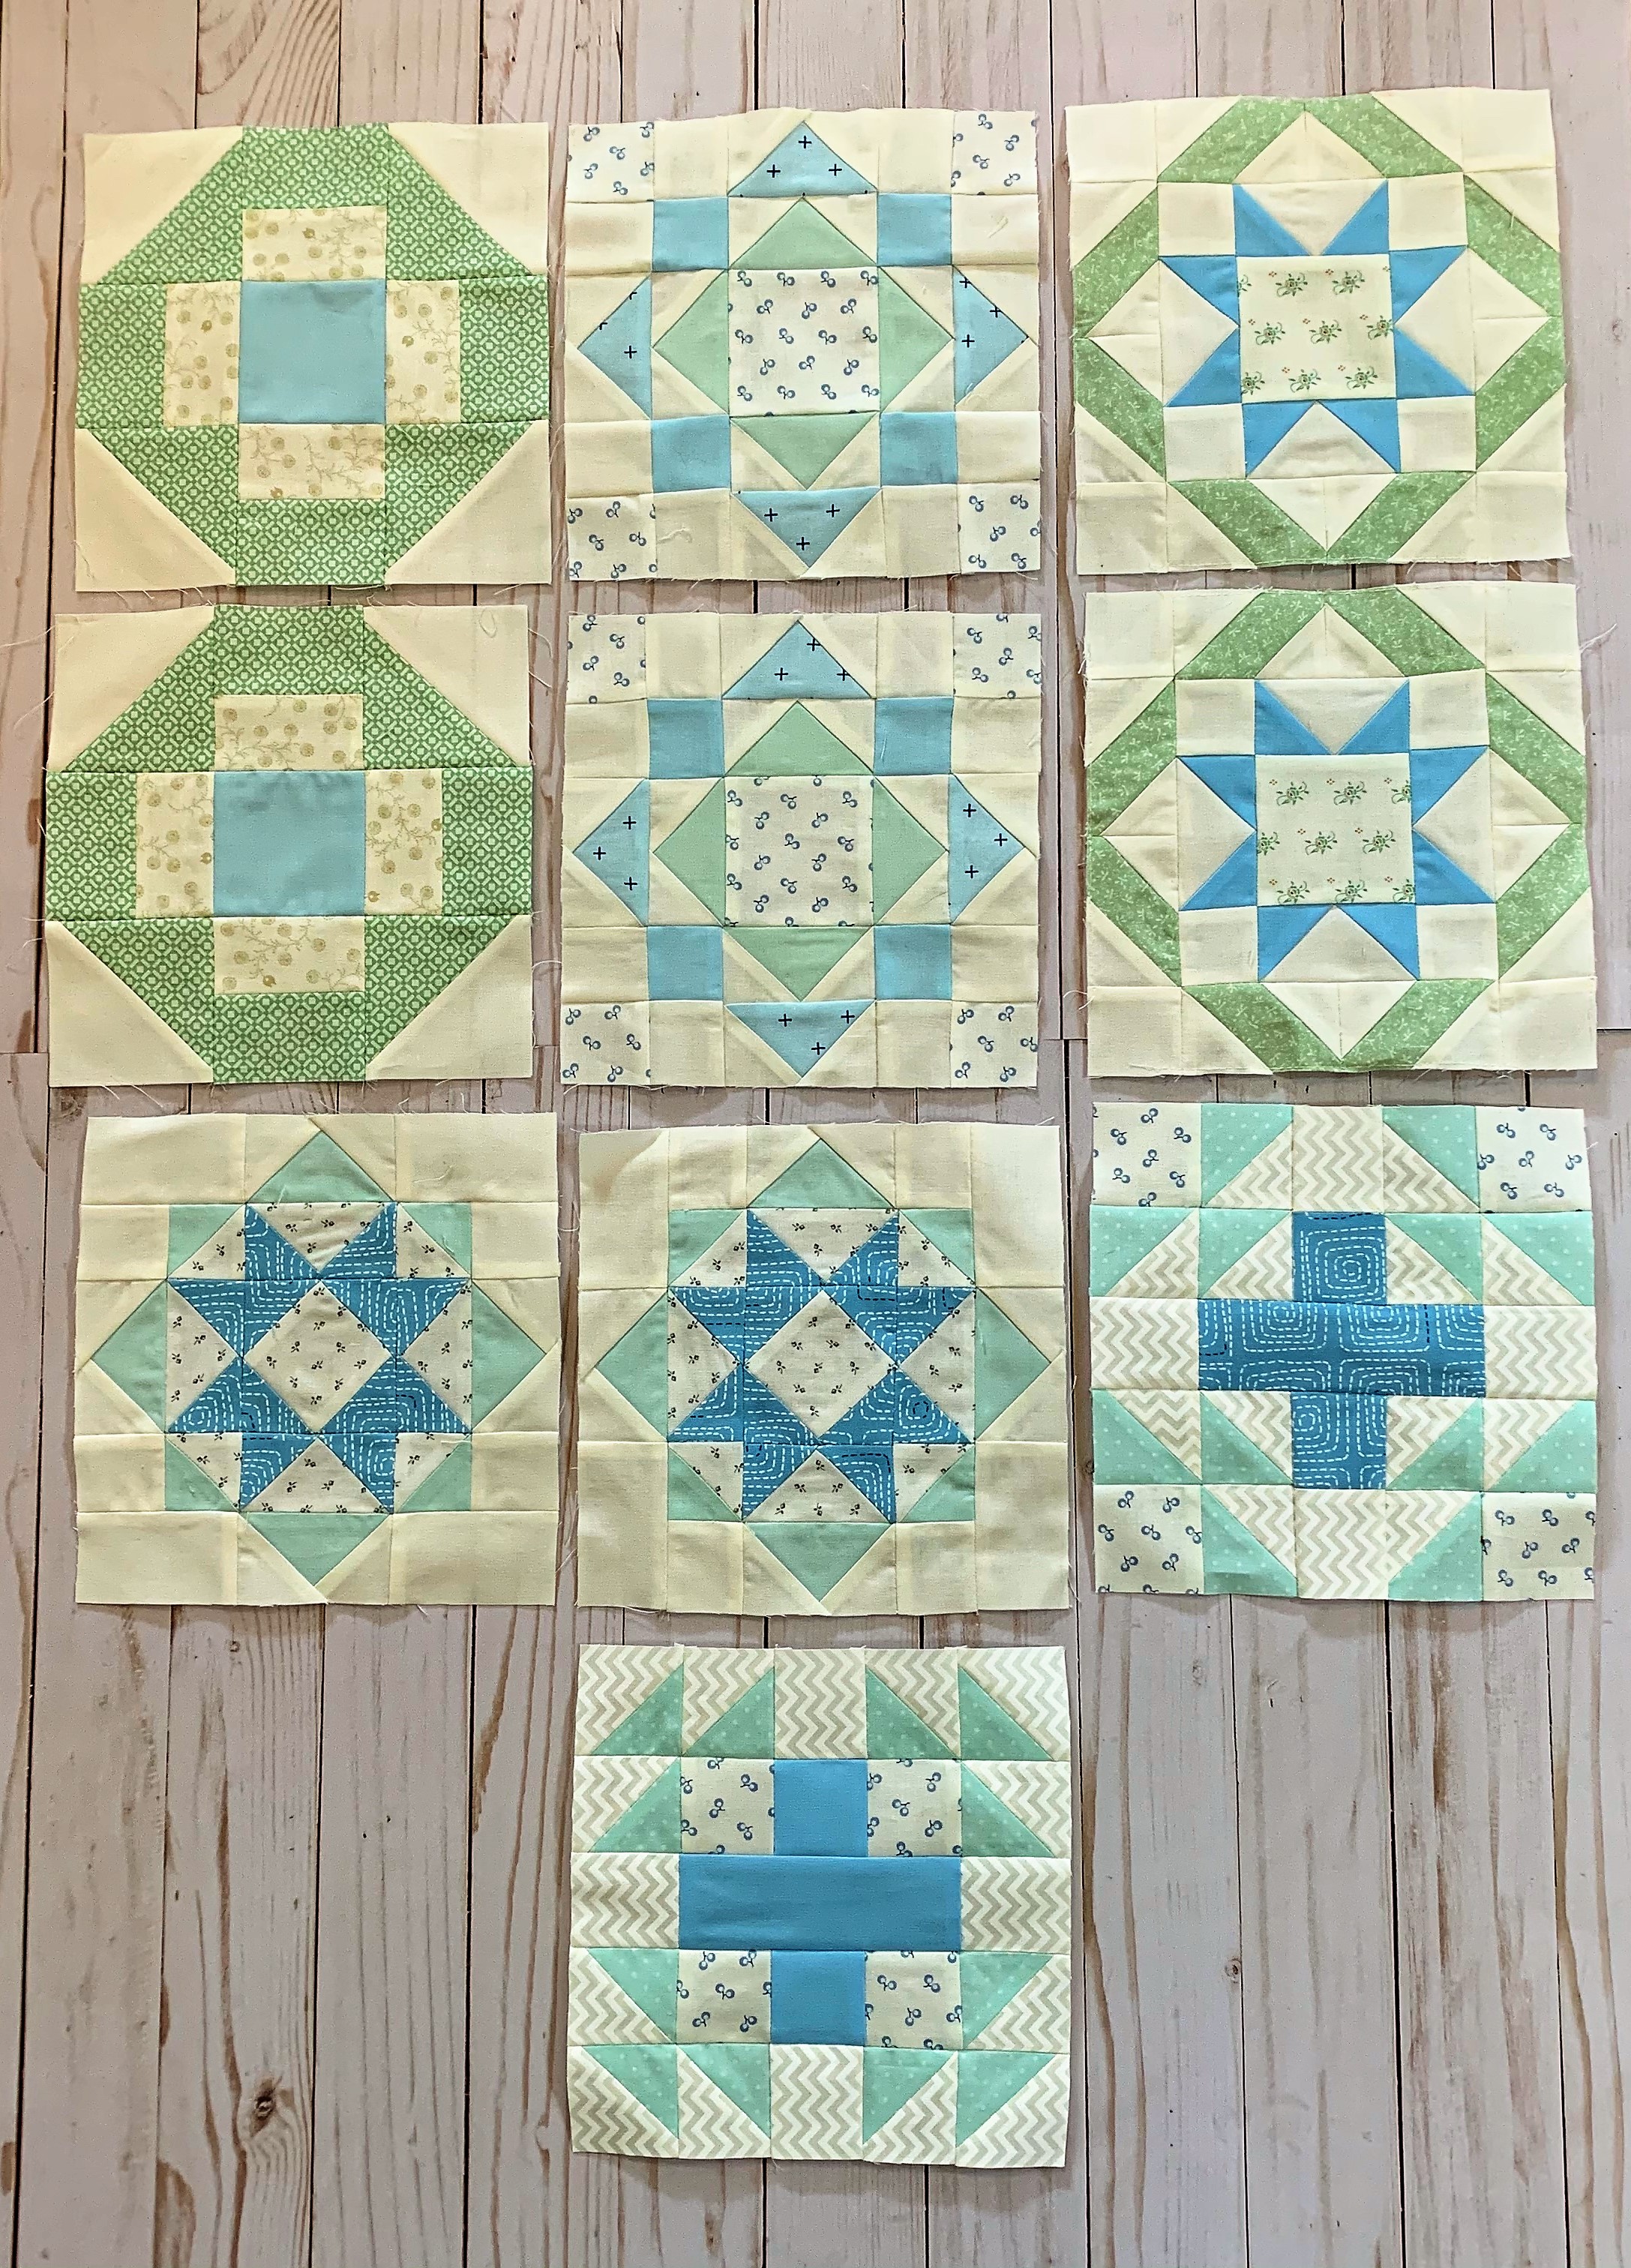
I started to feel my enthusiasm for this project coming back, and I quickly moved on to other blocks:

Gnome block and mushroom block from the Woodland Wonderland quilt

I cleared a space on my sewing room floor to place the blocks that I had completed so far, when my quilt inspector, Romeo, jumped up onto to his special chair to supervise the job:

Romeo inspects my progress on the Woodland Wonderland quilt

He could see that I still had many blocks to complete so he went back to sleep. In the meantime, I kept sewing in my free time and enlisted another one of my quilt inspectors, Pepper. She isn’t as skilled as a cat quilt inspector, but she did her best inspecting this block:

Pepper tries to be a quilt block inspector. Romeo needs to give her more training!

In January, our teen had a band retreat down at the coast. I thought that would be the perfect opportunity to get some photos of my completed quilt flimsy. It was pretty chilly and windy, which made getting good photos a bit tricky. My husband and I stayed at a cute little motel, and he held up the finished quilt top while I took a few photos in between wind gusts.

Woodland Wonderland quilt flimsy at the Oregon coast

The motel had these fun red railings that I thought accented the quilt rather nicely. It used to be a U.S. Coast Guard lookout station in the 1940s. The most recent owners have remodeled it with a vintage vibe, including turntables in each room. You can check out LPs from the front office.

Here’s a close-up look at the quilt flimsy:

Close-up of the Woodland Wonderland quilt flimsy

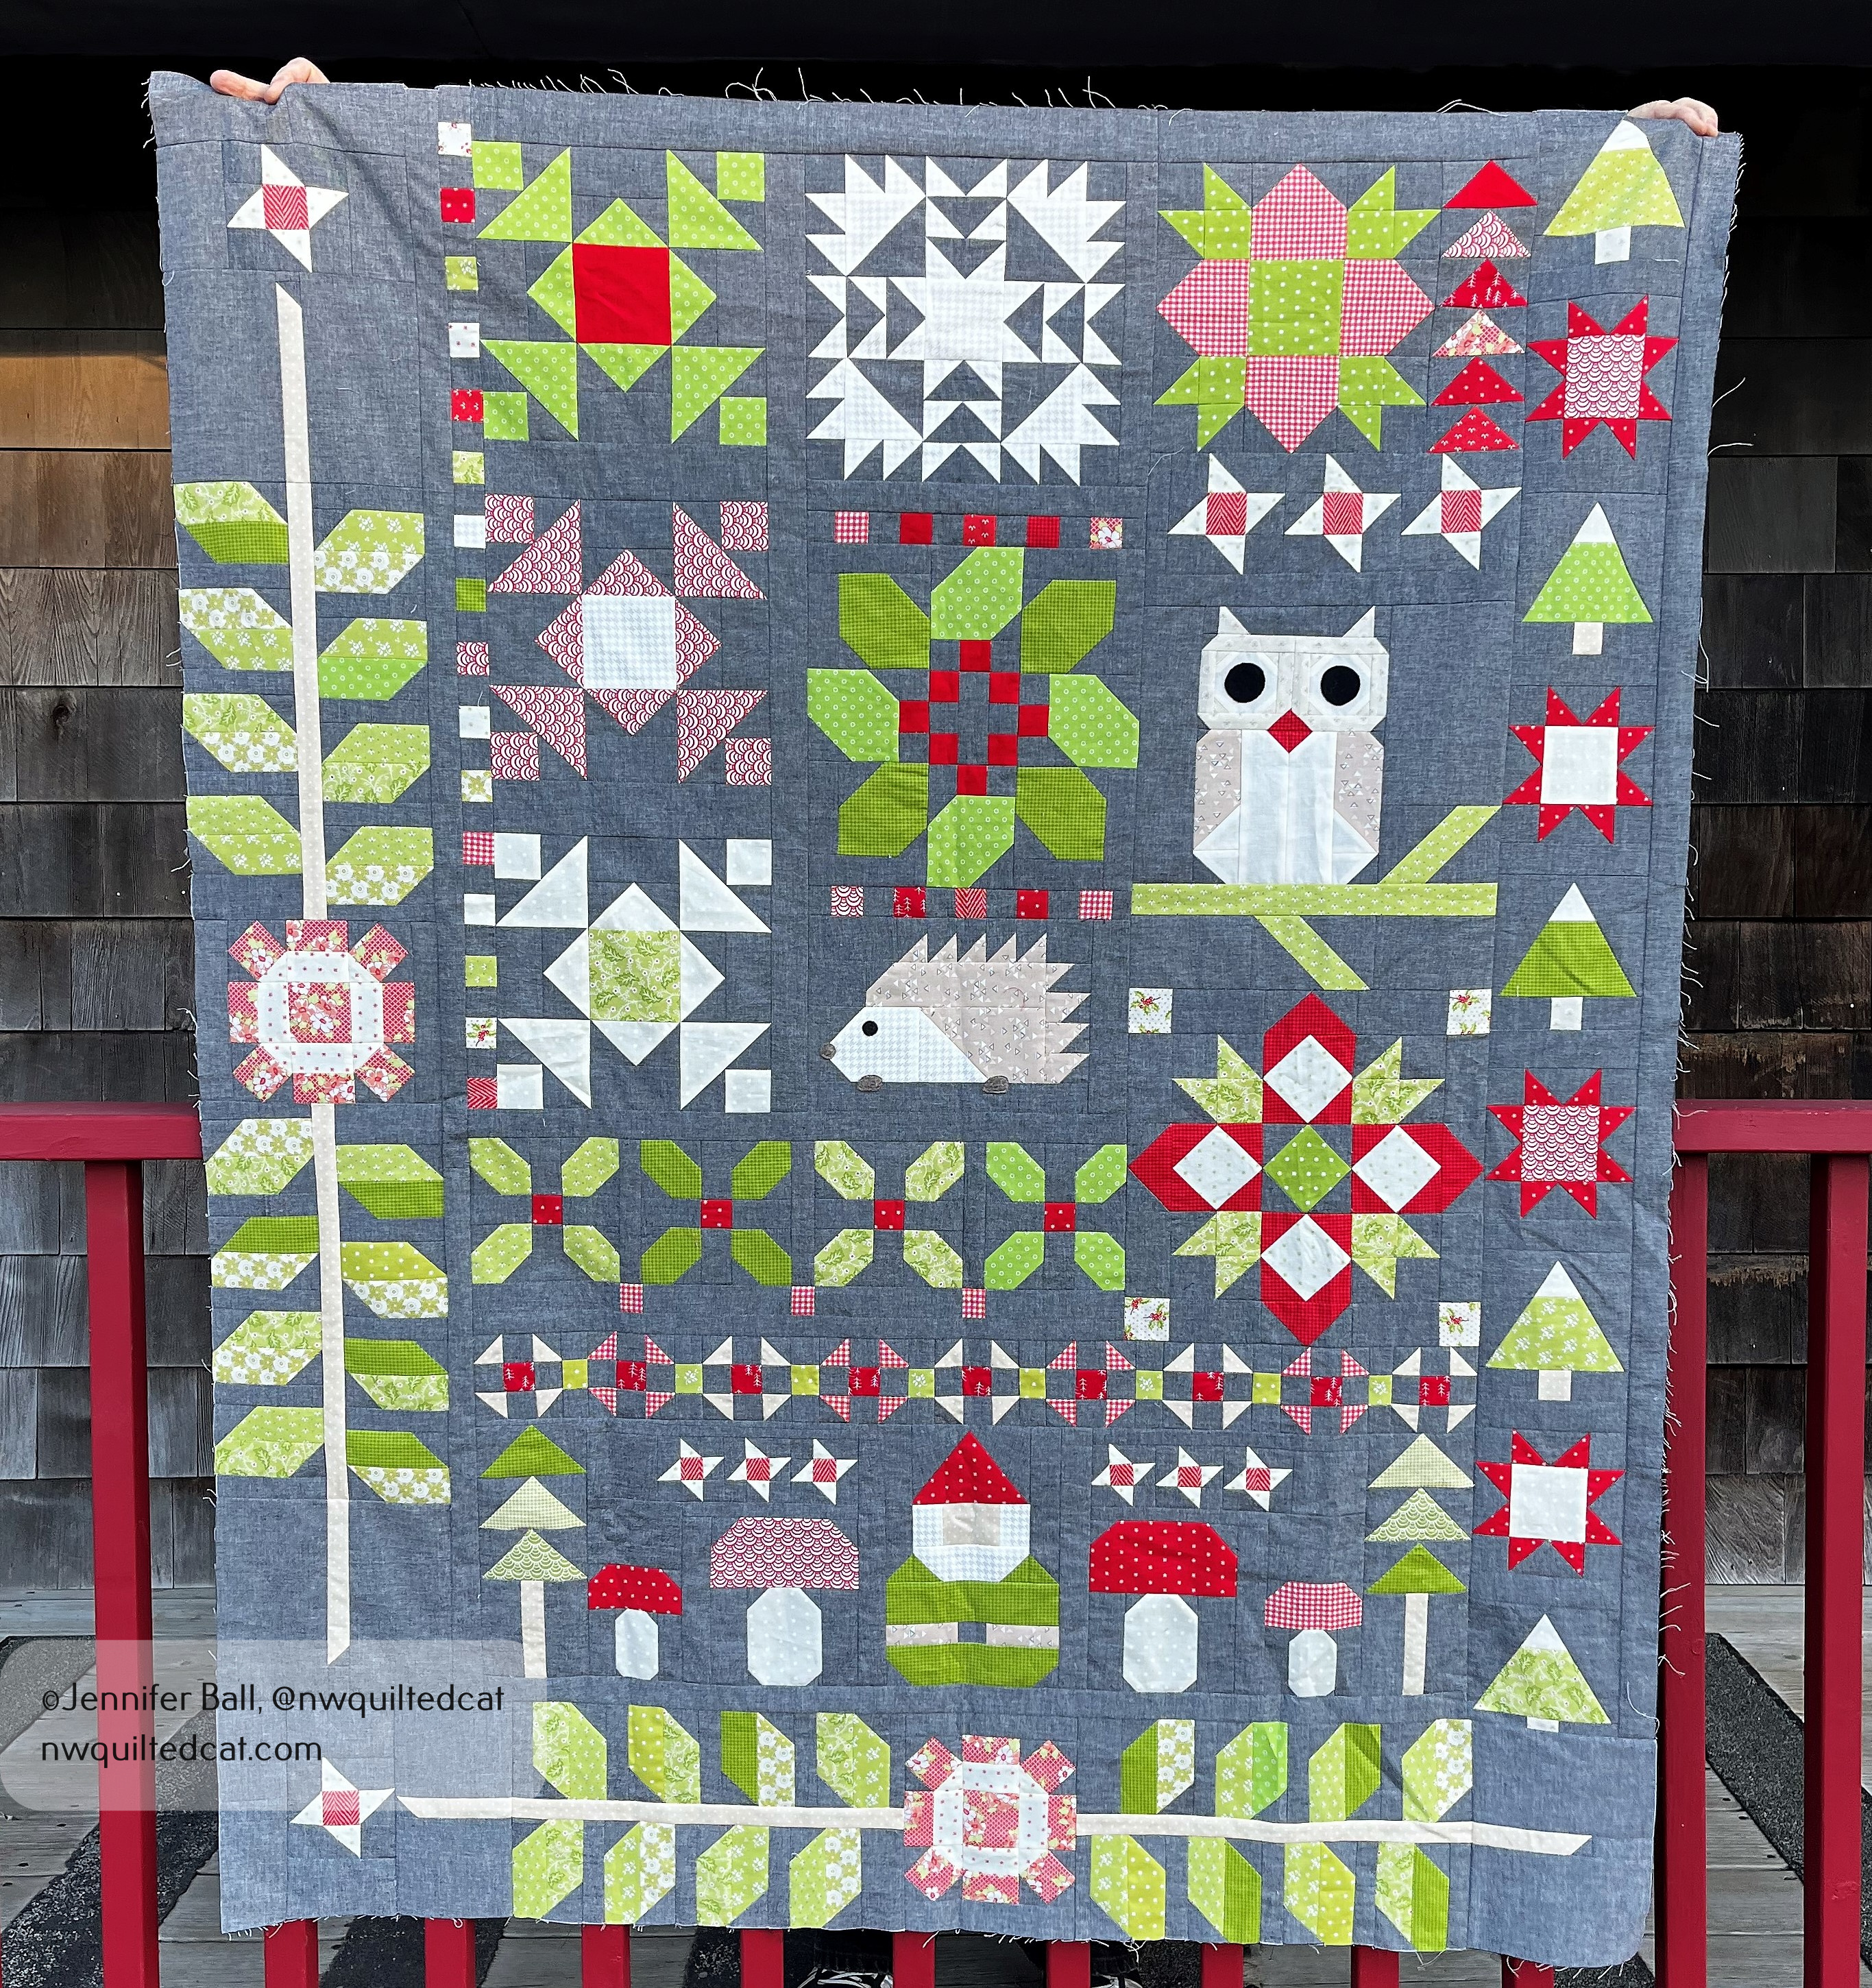
I did tweak a few things in my quilt from the original Woodland Wonderland pattern. I omitted the column of flying geese from the side next to the trees and stars. I liked the look of the quilt better without the geese. I also added little blocks above the big mushroom blocks next to the gnome. I used those some blocks, slightly larger, and added them to the ends of the long vine blocks for balance.

I really enjoyed making this quilt. It’s all traditionally pieced with only a couple of appliqued features on the owl and hedgehog. The printed fabrics are all from the original block-of-the-month, and I think they are all Fig Tree fabrics. The background is black chambray from Moda, which really sets off all the green, red, and cream fabrics wonderfully!

Next up, how to quilt it? The quilt flimsy is going into my to-be-quilted pile. I want to finish up some piecing projects before tackling this pile.

Happy quilting!

~Jen

A Cute Cat Jack O’ Lantern Block for Halloween

Are you looking for a cute and not scary block for Halloween? How about a cute little cat face on a pumpkin? This adorable block will work on trick-or-treat bags, table runners, mini quilts, and larger quilts.

Pattern

For a limited time, this cute cat jack-o-lantern quilt pattern is on sale in a favorite Halloween craft magazine. You can choose to purchase a hard copy that is mailed to you or a PDF download, which you can download to your computer.

Here’s a look at my block:

I loved using a pumpkin-themed fabric for my cat face! Aren’t those little cat-faced pumpkins with fangs just adorable? I want to make several different fabric combinations using different oranges, blacks, and low-volume backgrounds and create a lap quilt.

For my block, I used the following fabrics:

  • Background fabric: white dotted fabric from “Too Cute to Spook” by Me and My Sisters Designs.
  • Cat and handle fabric: purple/orange pumpkin fabric from “Bring Your Own Boos” by Cotton + Steel
  • Pumpkin fabric: orange fabric from “All Hallow’s Eve” by Fig Tree Quilts

This block is a great stash buster, and you can really have great fun with different fabric combinations. I love seeing a cat face block with the whiskers. It adds a nice element of whimsy to the block.

The quilt pattern in the magazine has a great layout with plus-shaped blocks added between rows of cat jack o’ lanterns and makes a finished quilt at 45″ x 48″.

Time to get started on those Halloween projects!

~Jen

Antique Table Topper or Giant Mug Rug?

My husband and I found a little table a few years ago while antiquing that we use to have our breakfast. The table faces a sliding glass door, looking out on our background. It’s relaxing to watch the birds flitting about while sipping coffee before starting work for the day.

However, we don’t want to scuff up the table’s surface more than it already is so we’ve been using various items like kitchen towels and coffee coasters as protection. Last weekend, I decided to make a table topper for this little table, but it also reminds me of a giant mug rug! When it gets dirty, we can just toss it in the wash.

Here’s what the table looks like without any topper:

Little antique table

I had some fun fabric in my stash with an outdoors theme that I thought would work well. The colors match the kitchen, and we love to be out hiking! I measured the diameter of the table, which is 25 inches. I selected 5 fabric prints, and cut out 5.5 inch squares that finish at 5 inches each. I placed them in a 5×5 grid, stitched them together, and then quilted this base shape.

Starting quilt shape for table topper

The fabrics that I used are:

  • 5130-15 (dark mountain print) from Smoke & Rust by Lella Boutique
  • 5130-14 (gray mountain print) from Smoke & Rust
  • 5135-13 (plus sign print) from Smoke & Rust
  • 5131-16 (orange text print) from Smoke & Rust
  • 55551-21 Timber Campsite Cream from Timber by Sweetwater

I quilted the project using meandering free-motion with Glide thread in Apricot Blush.

Once I had my square-shaped base, I took placed the table upside down on the back of the quilt and traced the circle. I drew a cutting line in about 3/4″ from the original tracing line so that my quilt would not extend to the edges of the table. I wanted a little peek-a-boo border of the table.

Table topper, trimmed to fit

I choose the orange text print for my binding. I needed to use bias binding to get a stretchy binding that I can easily sew to curves. It worked out so nicely!

Circular table topper, bound

Now for the reveal! Did my quick table topper project work? Does the coffee taste better while using it?? Yes, it does, because I don’t have to worry about leaving water marks anymore.

Completed table topper
Completed table topper with chairs that need to be reupholstered

We also have these 2 antique chairs to go along with the little coffee table. However, they are in sore need of reupholstering. I hope to tackle that project this year, and choose a new fabric that will go with the table topper fabrics.

Happy quilting!

~Jen

A Completed Tula Nova Quilt!

I started working on hand piecing my Tula Nova quilt during summer of 2020 and just finished the binding in October 2021. I’m going to call my quilt “Tabby Nova” because I used a great deal of Tabby Road fabric by Tula Pink (now out-of-print).

This quilt is entirely hand pieced using a method called English Paper Piecing or EPP for short. In EPP, you use paper templates and baste them to fabric, using either thread basting or glue basting. I use the glue basting method because it is much faster. I used Aurifil 50 weight threads for the piecing, in colors to match the fabrics.

Once the pieces are sewn together and stable, you remove the paper backings. The advantage to EPP over machine sewing is that this method is portable so you can take your sewing with you. I often stitch while waiting for my son at sports or other appointments. I even stitched the initial center block while camping last August.

I decided to quilt my Tabby Nova using a combination of ruler work and some free-motion swirls. I used straight lines to echo the pieced shape out into the background 5 times. Then, I quilted swirls in the remaining spaces. I used a Rainbow thread called “Lilac Bouquet” by Superior Threads, which is variegated and beautifully accents the colorful fabric.

My backing is another out-of-print wide back fabric by Tula Pink called Free Fall with large dots and birds. I had this small piece in my stash for a few years, and I thought it went pretty well with the quilt top. The backing fabric is a purple Moda grunge, and I used Tula’s True Colors in Tourmaline Mineral for the binding with a small color burst of Citrine Mineral on the lower right-hand side.

Are you ready to see this quilted explosion of color?? Here are a few pictures that I took this weekend, with the help of some very special quilting inspectors and assistants.

My “Tabby Nova” with the fall leaves and my husband’s feet!
“Tabby Nova” on a play structure at a local park
“Tabby Nova” back
“Tabby Nova” getting a quality cat scan from Cow in the dappled sunlight
“Tabby Nova” getting a second inspection by our neighbor’s cat. Do you see him?

I really enjoyed making this Tula Nova quilt. It is my first completed quilt using EPP. I have since started a second quilt called La Passacaglia using Tula Pink fabrics. This one is going to be huge and take more than a year to complete.

Enjoy and happy quilting,

Jen

A Nutty Quilt!

Hi everyone,

This past weekend, I did some traditional piecing and started work on a nut themed throw quilt for fall. What nut, you might ask? The acorn! I’m using the Acorn Woods pattern by Fig Tree Quilts, which you can get on sale at the Fat Quarter Shop this month.

I’m also using the Pumpkin & Blossoms fabric line by Fig Tree with beautiful pumpkin oranges, grays, greens, and creams. It is such a warm and cozy fabric line for the fall season so you can use it for months. I like that this fabric line isn’t Halloween-y but you could use it for Halloween-themed quilts.

I cut all my pieces and labeled them with Alphabitties so that I could just sit-and-sew all the blocks assembly-line style. The Alphabitties keep everything tidy and organized, and I don’t mix up some of the smaller sub-cut pieces when I’m at my machine.

Here’s a look at the acorn blocks. Aren’t they fun?

Acorn blocks

To add a little more fall theming, this quilt contains some leaves to sprinkle in amongst the acorn blocks. The bright green leaves add some color interest to the layout.

Leaf blocks

In addition to the leaf and acorn blocks, there are some low-volume setting blocks. The blocks come together pretty quickly, and I was able to sew them together over the weekend and on one evening after work.

Here’s a look at the quilt top outside in my backyard this afternoon:

Acorn Woods quilt top (not yet quilted)

I thought that I might have a cat come over and inspect the quilt, but they were too busy dozing in the sunshine.

This quilt top is really pretty, and I can’t wait to quilt it! I want to finish it soon so that I can take advantage of the fall sunshine and get some pictures of it on a lovely hike with beautiful leaves.

Happy quilting and happy fall!

~Jen

Sea Glass BOM – We Have a Quilt Top!

Hi everyone,

If you’ve been following me during the past year, you know that I’ve been working on a BOM by Fig Tree called Sea Glass. This BOM uses a soothing palette of sea glass: greens, blues, and creams.

In January, we received our final BOM packet to not only complete the blocks for month 12, but we also received the final setting instructions for the quilt. So exciting!

When I sew blocks together to form a quilt top, I like to arrange them all first and then take a picture so that I can remember the order in case things get messed up. Sometimes I put the blocks away into a WIP pile, and sometimes my little inspector likes to do a little rearranging!

The quilt inspector happily rearranges blocks!

I then sew my blocks together into rows, one at a time. I press each row carefully and remove stray threads. I like to use Clover Patchwork Glass Head pins because they are heat resistant and glide through the fabric easily.

I also use a fine mist spray bottle with plain water and a hot iron for pressing. I do not use water in my iron to avoid potential issues like rust stains. Plus, I do foundation paper piecing often and steam is a big no-no because it shrinks the paper.

Piecing blocks into rows, Sea Glass BOM

The Sea Glass quilt has, what I call, “feature” blocks and “spacer” blocks. The spacer blocks form a beautiful Irish chain with subtle variations between a light green color and a light aqua color. The feature blocks are all different, usually 2 per month during the BOM. They use deeper hues of blues, aquas, and greens, like beautiful sea glass found on the beach.

Here’s a look at the quilt with all the rows sewn together, but before I added any borders:

Sea Glass BOM, top without the borders

The final quilt layout contains 3 borders. The first border consists of cream-colored squares that were leftover pieces from the feature blocks. The second border uses the sawtooth flying geese units that we sewed at various stages during the BOM. The third and final border uses long pieces of the cream colored background. The quilt is roughly 72″ x 72″ before quilting.

It’s been so rainy here lately that it’s been very difficult to get a good picture of the completed quilt flimsy (top), but we finally got a bit of afternoon sunshine yesterday.

In this first picture, my husband is holding the quilt with his arms as wide as he could go!

In this second picture, I’m standing on a little ladder while my teen took the picture. The quilt is dancing in the breeze, and we can’t catch a moment of still air. Oh, the problems of taking quilt pics “in the wild!” I do like how the afternoon sun shines through the quilt, illuminating the sea glass colors.

I haven’t yet decided on quilting. I plan to use this quilt on the bed in my guest bedroom so I’m leaning towards free-hand edge-to-edge quilting rather than custom quilting.

I also plan to back it using minky fabric, possibly this Cuddle in Turquoise. It will so soft and comforting!

With a little luck, I’ll have time to quilt it this weekend.

Happy quilting!

~Jen

Sea Glass BOM, Month 7

Happy Friday, everyone!

We made it through another week, although they are starting to blur together. The warm August days are beautiful, and I do enjoy getting a little outside each day during breaks and lunch as I work from home. My little backyard vegetable garden is thriving, and we’ve enjoyed several salads from the bounty. School is starting soon for my teen, but it will so very different being online rather than in person.

I finished my month 7 blocks for the Sea Glass BOM, designed by Fig Tree. I’m really enjoying the soothing color palette of these blocks each month.

This block is called Sea Star.

Sea Star block, month 7 in the Sea Glass BOM

My blocks in the BOM are growing! I just need to go back to last month and complete the flying geese (likely for border units).

Sea Glass BOM, months 1 through 7

Pretty, pretty sea glass! These blocks just seem to sparkle.

Have a great weekend and happy quilting,

Jen

Sea Glass BOM, Month 6

Hi everyone,

Whew, it has been a warm week with temperatures in the 90s. My vegetable garden is finally starting to perk up after a cool start to our summer. We’re harvesting salad lettuces now, and the squashes are growing rapidly. I can’t wait for the tomatoes!

I recently finished my 2 blocks for month 6 of the Sea Glass block of the month by Fig Tree. The block this month is called Compass Rose.

Look at these beautiful fabrics! I think the darker aqua is so pretty.

Sea Glass BOM, Month 6 blocks, Compass Rose

I still need to sew the flying geese border units for this month so I hope to get them finished this weekend.

Here’s a look at the first 6 months of blocks together:

Sea Glass BOM, blocks from the first 6 months

Take care and happy quilting!

~Jen

Sea Glass BOM by Fig Tree, Block 5

Hi everyone,

We’ve been having an unusually rainy start to June here in the Pacific Northwest. I’m definitely looking forward to some sunshine soon!

Over the weekend, I worked on my Sea Glass BOM by Fig Tree & Co. The block this month features a cross shape in the middle, to acknowledge this strange year dealing with COVID-19. The participants in the BOM will always remember that we worked on this quilt during a pandemic.

The block is called “Ocean Cross,” and we could choose from 2 different layout options. I decided to make one block using each layout. Due to the rain, I had to take these pictures indoors so the blocks do appear a bit brighter in person.

Sea Glass BOM, block 5, Ocean Cross

Here are all of my blocks together. So pretty!

Sea Glass BOM, blocks from months 1 to 5

We have also been working on large flying geese for the BOM, which will likely form a border. Each month, we cut out extra pieces for the geese and sew a few together when instructed.

I really love this color palette!

Happy quilting,

~Jen

Finished Catalina Stars Quilt

Hi everyone,

I’m happy to share my completed Catalina Stars quilt with you. In my last post, I talked about receiving this project in my first Little Box of Figs subscription, and I showed my quilt flimsy.

I decided to keep the quilting simple on this project. I free-motion quilted a flower and swirly pattern using Glide thread in white.

Finished quilting the Catalina Stars quilt

I auditioned several choices for binding, but I kept coming back to a red striped fabric. I wanted to accent the reds in the quilt, and this binding helped to pull it all together. Yes, I do wind up my completed binding strips onto an Aurifil thread spool. I add the binding spool to my extra spool holder on my machine, and it slowly unwinds as I stitch.

Because I’m going to use this quilt as a lap quilt and a picnic quilt, I decided to complete my entire binding by machine. This not only saves time, but it holds up better with repeated machine washings.

Here is my finished Catalina Stars quilt next to a rose hedge in my yard. My trusty quilt inspector, Cow, came over right away to give it a thorough test. We had lunch together on the quilt in the sunshine!

I really love how quick and easy this quilt is to make! You can purchase a copy of this pattern from the Fat Quarter Shop. I’m thinking about making another version of it to give to a friend who is expecting a baby boy this summer.

Happy quilting!

~Jen