Star Light Star Bright QAL Fabrics

Happy Friday, everyone!

Melissa over at Happy Quilting has once again designed a great quilt-along for everyone called Star Light Star Bright. This is a weekly QAL with the cutting instructions posted this week.

For this project, I’m going to make the 3 block by 3 block baby quilt size. I found some wonderful Charley Harper fabrics that I’m going to use along with some other bird/fall themed prints that I think will work well together.

Here’s a look at my fabrics before cutting. They looked so pretty that I almost hated to cut them!

Star Light Star Bright Fabrics

Star Light Star Bright Fabrics

See the beautiful red cardinals peeking out in the back? I’m saving that piece for something special!

You know that you need to take a break from cutting fabric when your quilt inspector jumps onto your cutting table and gives you this look:

Time to Stop Cutting Fabric!

Time to Stop Cutting Fabric!

I finished cutting all my pieces this afternoon. Here they are all lined up nice and pretty:

Star Light Star Bright Pieces

Star Light Star Bright Pieces

These are the fabrics in the photo:

  • Background is Essex Yarn Dyed in Flax by Robert Kaufman.
  • Brown twiggy fabric is Bark from Birds of a Feather Nest by Michael Miller.
  • Yellow/gold fabric is Meadow of Gold from Reminisce by Bonnie Christine for Art Gallery Fabrics
  • Bird and colored dots fabric is Bank Swallow Fall from Charley Harper for Birch Fabrics.
  • Red arrows fabric is Feathers Sun Print A-7244-0 from Andover.
  • Brown with white swirls fabric is Brown Rings from Honeycrisp by Dear Stella.
  • Multi-floral fabric is Flea Market Fancy Posie in Grey for Freespirit.
  • White with brown swirls fabric is Cream Rings from Honeycrisp by Dear Stella.
  • Grey floating floral is Twig Fall Shroom by Charley Harper for Birch Fabrics.
  • Colored leaves fabric is Octoberama Fall by Charley Harper for Birch Fabrics.
  • I really hope that these fabrics work well together!

    There is still time to join the QAL and follow along. We’ll start sewing beginning next week so come join in on the fun.

    Happy rotary cutting!
    ~Jennifer

    Celtic Solstice Part 1 + Cat Approved Quilt Fabric Confetti Tutorial

    Greetings everyone!

    I had that nasty stomach bug this weekend that seems to be going around. Ugh! The good news is that I finally managed to finish piecing, pressing, and trimming my pieces for part 1 of Bonnie Hunter’s Celtic Solstice mystery quilt! You can read about this mystery quilt in my earlier post here. Many people have already finished their quilts and you can see some beautiful finishes on Bonnie’s blog.

    I’m making the smaller version of the quilt so I have 96 neutral (cream) units and 92 orange units:

    Celtic Solstice Part 1 Units

    Celtic Solstice Part 1 Units

    For this quilt, I’m using leftover scraps from other projects plus random fat quarters and half-yard pieces in my stash. I used 7 different oranges, 5 different creams, and 7 different blues to make the units in part 1.

    Once these units are finished, the next step is to trim off all the little left-over dog ears.

    You end up with a pile of quilty fabric confetti!

    Quilt Fabric Confetti

    Quilt Fabric Confetti

    Now, you may be thinking that this fabric confetti isn’t too useful in future quilty projects, and I agree! However, if you have a cat quilt inspector, you can use this leftover material to make a cat-approved project.

    Cat Approved Quilt Fabric Confetti Tutorial (aka a catnip toy)

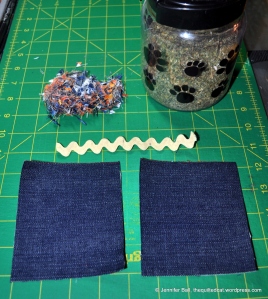
    • Cut two rectangles at 4 inches by 4.5 inches from denim, canvas, or other sturdy material.
    • Cut a 6-inch piece of rick rack (for the tail).
    • Catnip Toy Materials

      Catnip Toy Materials

    • Pin the fabric pieces, wrong-sides together.
    • Sew using a 1/4-inch seam allowance and make sure to leave a small opening along one edge.
    • (Optional): Sew a zig-zag stitch around the outside edge for extra reinforcement. Remember to leave a small opening for stuffing.
    • Stuff the quilt fabric confetti and dried catnip into the opening.
    • Insert rickrack about 1-inch into the opening and pin close.
    • Stuff the Catnip Toy

      Stuff the Catnip Toy

    • Stitch opening closed with a 1/4-inch seam and optional zig-zag stitch. Be careful! This is a step where your quilt inspector will try to help.
    • Tiger "Helping" Me Finish the Catnip Toy

      Tiger “Helping” Me Finish the Catnip Toy

    • Clip any loose threads and present the quilt fabric confetti project (aka catnip toy) to your quilt inspector for approval!
    • Tiger loves it!

      Tiger loves it!

      Catnip Toy is Approved!

      Catnip Toy is Approved!

      I’ve made a few of these catnip toys for my quilt inspectors, and they are pretty sturdy. I have one cat that picks it up and carries it around like prey, meowing all the while. My orange cat loves to grab the tail in tight and then hold onto the body of the toy while rubbing his face all over it. He becomes very affectionate!

      I hope you enjoy this little project and have a quilty week!
      ~Jennifer

    Giveaway Winner and Aurifil January BOM Block

    Hi everyone,

    I drew a random number from all the comments on my Wake Up to Kona blog post . . . drum roll please . . .

    The winner is Diane from my studioQ. Congratulations! I have sent you an email and will be mailing your 4 Kona fat quarters soon.

    I hope everyone enjoyed the blog hop and a big thank you to Madame Samm and Carol, our cheerleader!

    I’m participating in several BOMs this year, one of which is the Aurifil BOM starting this month! I use Aurifil cotton 50 wt thread exclusively for all of my piecing because of the high quality and consistency of the thread. It sews like a dream in my Bernina!

    January’s block is designed by Brigitte Heitland of Zen Chic.

    I had a nice piece of Kona Cotton Shadow in my stash that I originally had planned to use on another project. I’ve moved onto a different background piece (which I’ll post about soon), so decided to use this lovely light gray for this BOM. The red and black fabrics are pulled from my stash and come from different fabric lines. I really love how the black and red pop against the gray background.

    Aurifil January BOM

    Aurifil January BOM

    To get the pattern and to learn more about the Aurifil BOM, please visit their blog here.

    Happy quilting and hope you get a chance to sew this weekend!
    ~Jennifer

    Wake Up to Kona on the Beach + Giveaway!

    Happy Monday, everyone!

    Today is my day to share the project that I made for the Wake Up to Kona blog hop, and I’m so excited! I’d like to give a big thanks to Madame Samm, our wonderful hostess and supporter of all things quilty and our great cheerleader, Carol, who inspires us all.

    We have great sponsors for this blog hop – Amanda Murphy (author of Quilt Essentials), Robert Kaufman (all those delicious Kona solids), and Aurifil threads that keep us in stitches!

    For my project, I started with Kona black as my background color and added this delicious grouping of colors:

    Beautiful Kona solids!

    Beautiful Kona solids!


    The colors are: #110 Peony, #141 Carnation, #1062 Candy Pink, #1066 Cerise, #24 Petunia, #1484 Lupine, #1383 Violet, #188 Hibiscus, #1005 Aqua, #1009 Azure, #442 Capri, and #1064 Caribbean.

    Next, I selected the Night Sky pattern by Jaybird Quilts for its striking beauty! This quilt uses her sidekick ruler to create the triangle and diamond shapes that are used in the construction of the quilt. Each starbust (or starfish?) has 4 different shades of a color group.

    I pieced the entire quilt top using Aurifil threads, 50 wt (#2000 light sand color and #2692 black color).

    I used Superior Threads So Fine #50 in Genoa Gray because I really wanted the quilting to stand out against the black background.

    We took the finished quilt to the beautiful Oregon Coast this weekend to take some photographs. I had my hubby and son be my scouting location/photography assistants, and I think they did a wonderful job.

    Since my cats aren’t too keen on traveling, my dog (and best hiking buddy) became my cat quilt inspector stunt-double. (Yes, he earned extra dog cookies for his hard work!).

    Here are some pictures of my finished Night Sky quilt using Kona cotton solids:

    Me and Hubby Holding Night Sky (dog legs too)

    Me and Hubby Holding Night Sky (dog legs too)

    Night Sky with My Dog (cat quilt inspector stunt-double)

    Night Sky with My Dog (cat quilt inspector stunt-double)

    Me holding the quilt in the wind!

    Me holding the quilt in the wind!

    Night Sky Quilt - starbursts resemble starfish!

    Night Sky Quilt – starbursts resemble starfish!

    Night Sky Quilt - backside

    Night Sky Quilt – backside

    These last two pictures show the free-motion quilting that I did using the Genoa Gray thread. The quilting alone took me 12 hours! I did a swirly pattern in the black background and did some straight-edge echo quilting in the colored starbursts.

    While I was doing the quilting, I ran out of thread – yikes! I called local quilt stores within an hour of my house, but no one had the same thread in stock. Fortunately, I was able to order the thread from Superior Threads directly via 2-day shipping and completed it in time.

    I really love how the free-motion swirls accent the Night Sky stars:

    Night Sky Quilting Detail

    Night Sky Quilting Detail

    Closeup of the quilting

    Closeup of the quilting

    I hope you enjoyed my project and please check out the other bloggers on the last 2 days of the hop!
    January 20th
    More Stars in Comanche
    Buzzing and Bumbling
    Quilting Quietly
    Grammie Q’s
    The Quilted Cat (you are here!)
    The Quilting Queen Online
    Lauraluvsloons
    Sew Incredibly Crazy

    January 21st
    Just Sew Sue
    Pigtales and Quilts
    Miss Priss Quilts
    Charlottes Creation
    Childlike Fascination
    Renee Luvs Quilting
    Cherry Blossoms
    Sew We Quilt

    I am giving away 4 Kona cotton solid fat quarters! Just leave me a comment to enter. If you follow my blog, let me know how you follow for a second entry. I will ship internationally.

    Wake Up to Kona Giveaway

    Wake Up to Kona Giveaway

    Happy quilting!
    ~Jennifer

    A Downton Abbey Table Topper

    Hello everyone!

    Today, I’d like to share with you a charm friendly table topper that you can make quickly but with stunning results!

    For me, it all started with this delicious fat quarter stack of fabrics from Andover’s Downton Abbey line:

    The Downton Abbey - Dowager Countess Fat Quarter Bundle

    The Downton Abbey – Dowager Countess Fat Quarter Bundle

    Yummy! I just love these colors. In my pattern stash, I had a great pattern by Jaybird quilts called Rock Candy. This is a fun table topper pattern that you make using her side kick ruler and a charm pack plus background fabric. I used my Downton Abbey fat quarter stack and a white-on-white print for the background that I had in my stash.

    Here’s the completed top taken outside on my porch (the only place without rain!!):

    Rocky Candy Table Topper

    Rocky Candy Table Topper

    I took another picture indoors on my coffee table so you can get a feel for the size of the table topper. On the top of the quilt sits a handmade wooden bowl that my grandfather made for me. He was a master craftsman who passed away last fall so I really treasure this bowl.

    Rock Candy with Handmade Wooden Bowl

    Rock Candy with Handmade Wooden Bowl

    I did all the quilting on my domestic Bernina. For the colored diamond shapes, I echoed quilted a slightly curved diamond shape with purple Aurifil thread.

    I did more involved stitching on the white background sections using Superior Threads So Fine #50 in pearl. I straight-line echo quilted around each of the patterned fabric points. I then filled in each white triangle shape with a curvy, snake-like pattern and each white diamond shape with swirls. Next, I did 2 rows of straight-line stitching in the white border, followed by a 3/4-inch section of swirls, and followed by 2 more rows of straight-line stitching.

    In person, the stitching really adds some nice dimension and texture!

    Rock Candy Quilting Detail

    Rock Candy Quilting Detail

    Don’t forget to visit the Wake Up to Kona blog hop going on now! My day to display my project is Monday, January 20th.

    See you then and happy quilting,
    ~Jennifer

    Vice Versa BOM: January Blocks

    Hi everyone,

    AnneMarie over at Gen X Quilters has designed a very creative BOM using traditional blocks juxtaposed with inverse blocks! Come check out her blog and join the fun!

    For my colors, I really wanted to incorporate Pantone’s color of the year – radiant orchid.

    I took this pic using my camera phone so the quality is not great, but gives you an idea of the colors I’m using. I’ve listed the fabrics below the photo.

    Vice Versa BOM - Fabrics

    Vice Versa BOM – Fabrics


    A: Kona solid in Snow
    B: Kona solid in Lupine
    C: Mesh Texture Taupe (03437-70) from Cachet by Benartex
    D: Suede Violet by P&B Textiles
    E: Studio Stash in Pistachio (AJS-13573-52) by Jennifer Sampou for Robert Kaufman
    F: Small Flower Pink Taupe (03435-70) from Cachet by Benartex

    The small flower print is a larger scale print that I hope will work with this project. I’m fussy-cutting pieces from my yardage (which I got on sale for 1/2 price at a LQS!!).

    The January blocks came together pretty quickly and AnneMarie’s instructions are a perfect balance between text descriptions and photo diagrams.

    I’ve decided to make the 9″ blocks to make a lap sized quilt.

    Here are my two January blocks: the traditional block and its inverse.

    Vice Versa BOM January Blocks

    Vice Versa BOM January Blocks

    And another shot with my block inspector:

    Cat Inspector with Jan Vice Versa Blocks

    Cat Inspector with Jan Vice Versa Blocks

    Thanks again to AnneMarie for designing and hosting this BOM. I hope to see you join us!

    Happy quilting!
    ~Jennifer

    A Modern Cat Finish for the New Year!

    Hello everyone!

    While much of the country is getting hammered with winter storms, we woke up to a clear and sunny skies with temperatures reaching 48 degrees this afternoon. We took the opportunity to take a family walk in the sunshine, and I brought my first quilt finish of the year along with my camera.

    After the past several weeks, I finished piecing the cat blocks from the catevent hosted by Elizabeth of Oh Fransson! I modified the end quilt slightly by adding a calico cat print border and a small outer gray border.

    This cat quilt is made from scraps and pieces from my stash. Each cat block is from numerous different fabric scraps. The gray background is Painter’s Canvas by Michael Miller in gray (#CJ-4816) and the calico cat print border is Happy Hills Calico Cat by Michael Miller in white (DY-784). I used Kona cotton in slate for the binding. It is entirely pieced with Aurifil thread.

    For quilting, I used some shiny Sulky thread in a silvery/gray blended mix to give a nice sheen to the quilt top. I did straight-line stitching using my Bernina.

    The quilting took almost 8 hours, and I couldn’t have done it without the help from my Machingers gloves!

    Straight line quilting

    Straight line quilting

    Here’s a look at the quilt flimsy with one of my cat inspectors:

    Romeo Inspects the Cat Quilt

    Romeo Inspects the Cat Quilt

    Here’s a look at another cat inspector sitting on the quilt sandwich. Only part of the quilting is completed here!

    Tiger Likes the Cat Quilt!

    Tiger Likes the Cat Quilt!

    And, finally, here are some shots of the finished quilt in the Oregon sunshine:

    Catevent Completed Quilt

    Catevent Completed Quilt

    Me, holding the completed cat quilt!

    Me, holding the completed cat quilt!

    My 8-year-old with the completed cat quilt!

    My 8-year-old with the completed cat quilt!

    My thanks to Elizabeth for designing these happy little cat blocks and for generously posting the instructions on her blog. I had so much fun making this project!

    Wishing you much health, happiness, and quiltiness in the new year!
    ~Jennifer