I last blogged in January, but I have been working on various projects to submit to the Sisters Outdoor Quilt Show. I have some quilt tops that have been pieced for a while and need to be quilted plus I wanted to submit some post cards for the annual fundraiser at the show.
For the tiny house project, I had to decide how to piece the top because there is no pattern for the final layout.
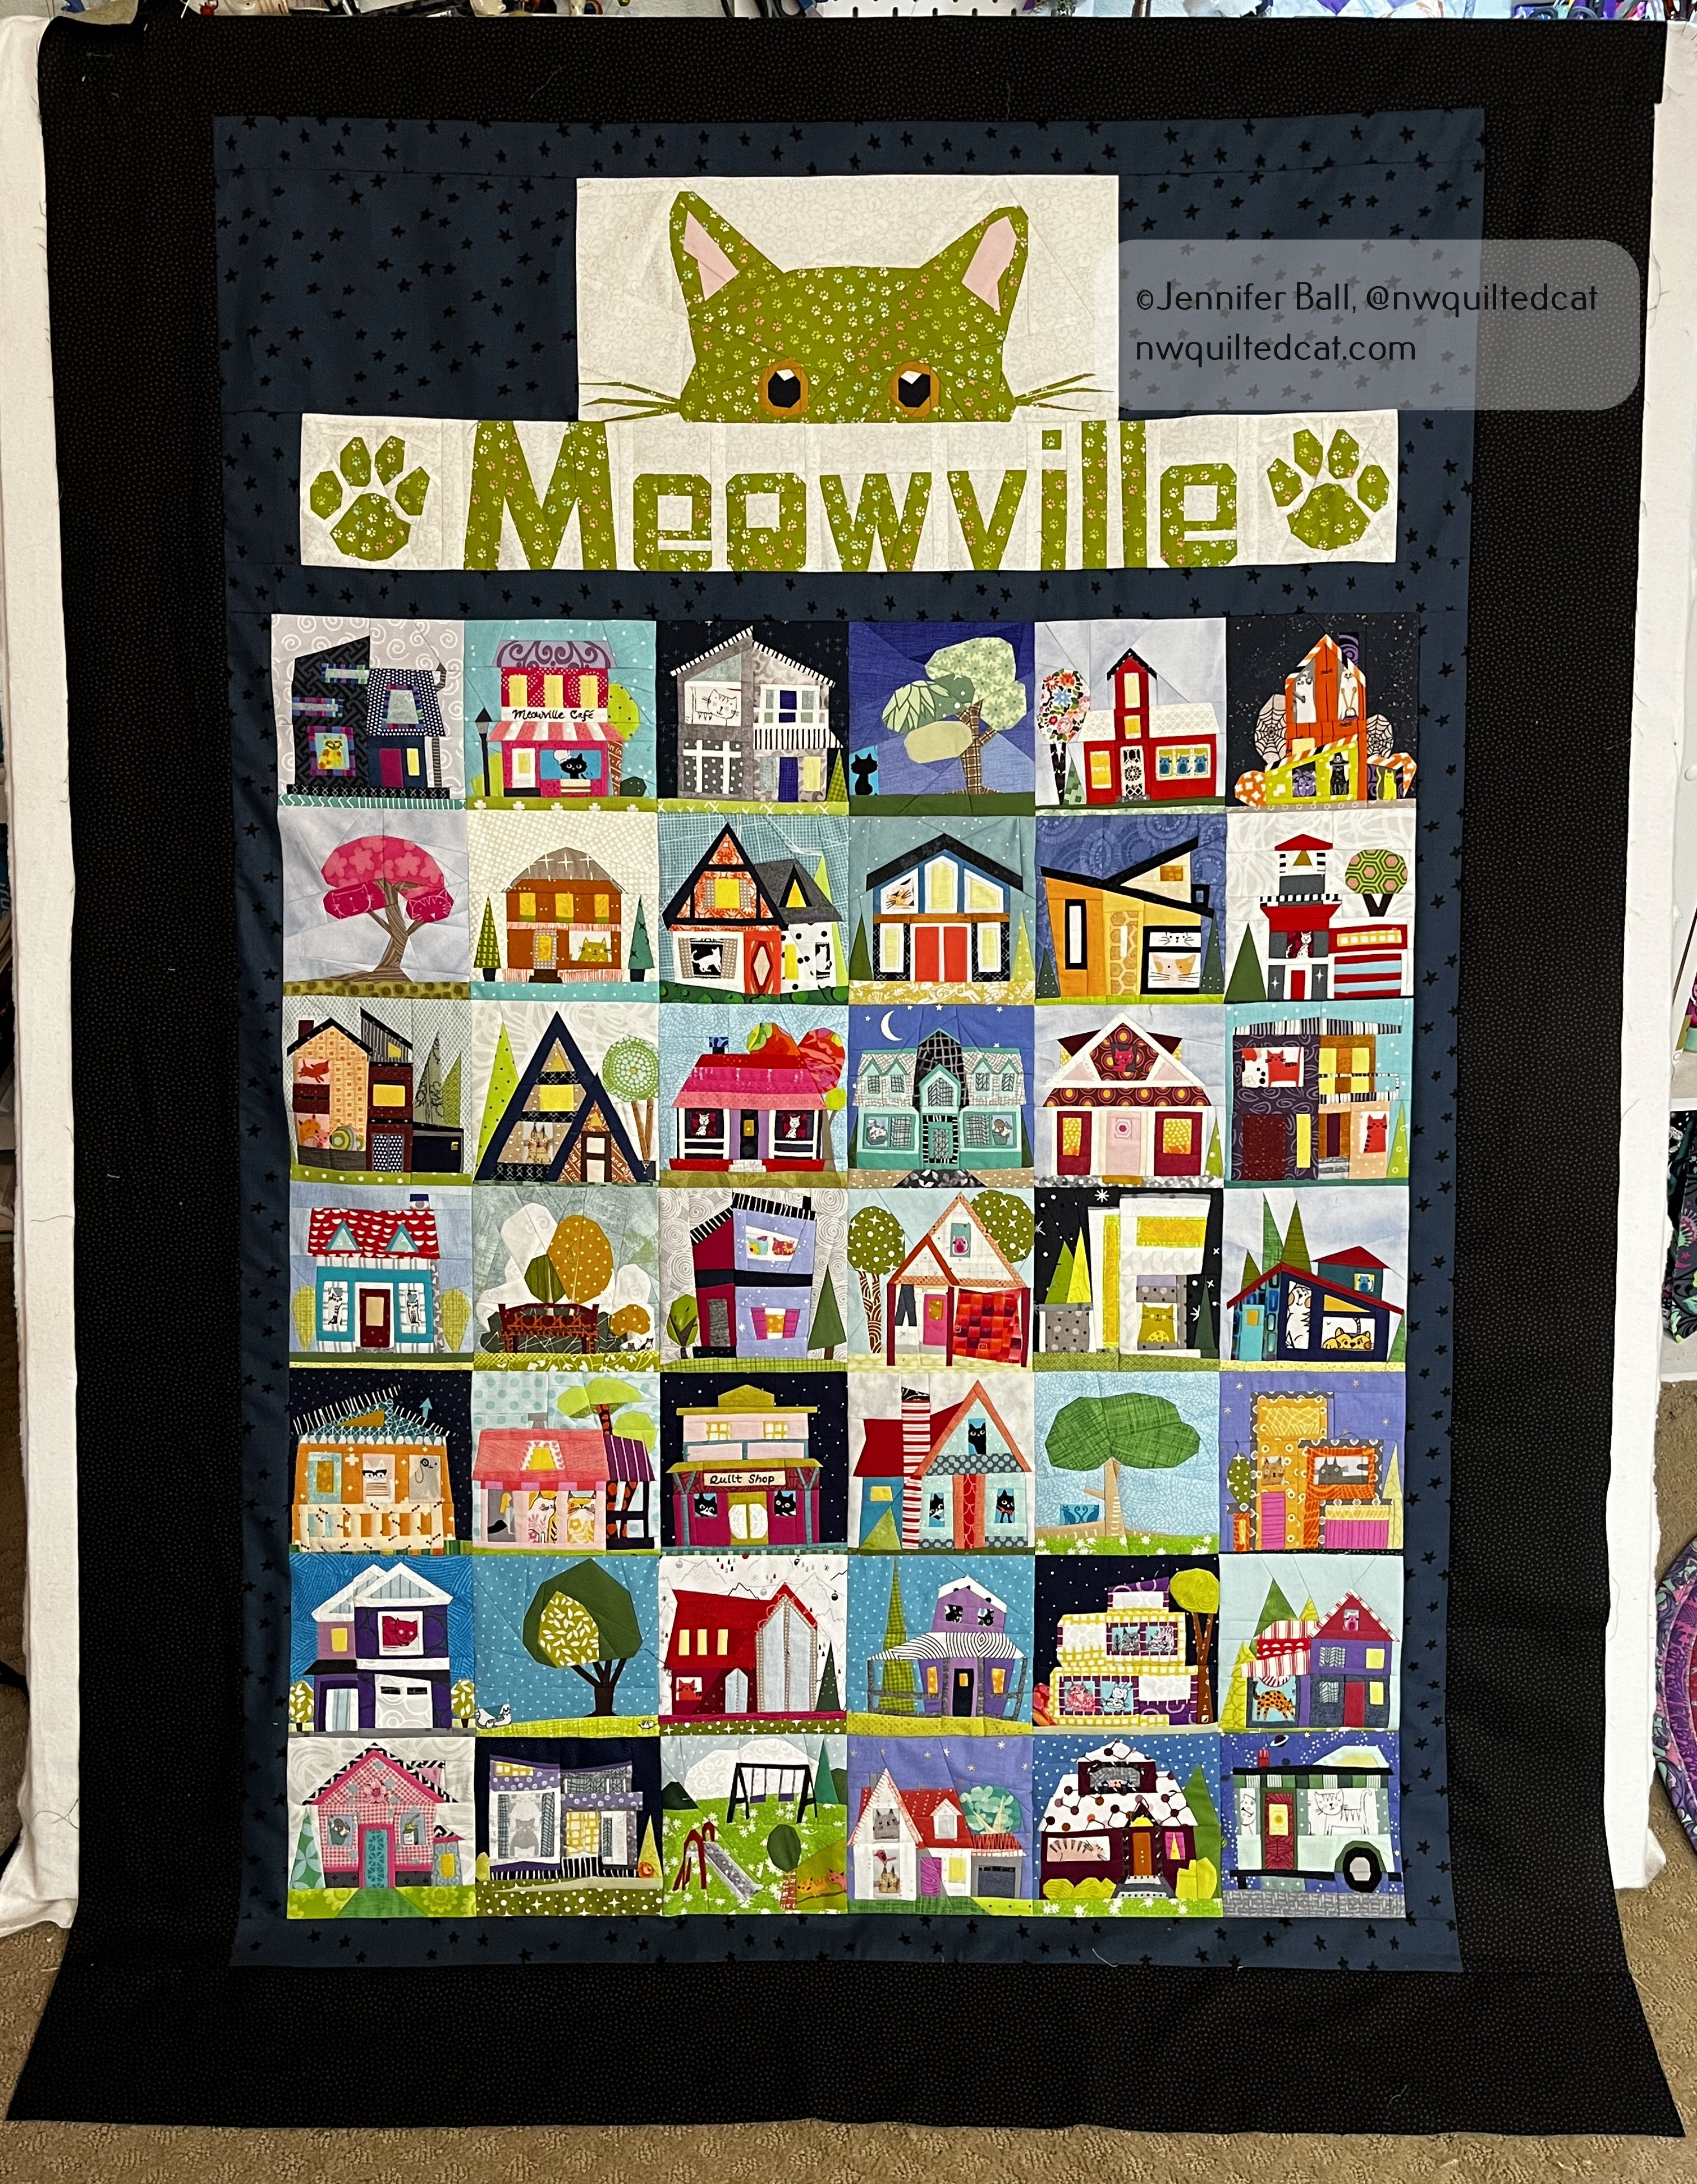
I decided that my “Meowville” quilt needed the pieced name to be on the top, but the quilt was still missing something. Hmm, what could I add? How about a giant cat face peeking out at the viewers? I found a great pattern from Quilt Art Design called “Cat Helper” that would fit my idea with a few modifications.
The cat’s eye is always watching!A partial cat head, perfect for mischievously peering down at the Meowville tiny houses
I now had the final blocks of my quilt assembled and ready to be set into a layout! I thought about a layout for a few weeks, and decided to place my tiny houses in rows without sashing strips. I set the blocks using a fun Ruby Star Society from their Starry line. I used Starry in the Smoke colorway, which is a beautiful deep blue with black stars. Finally, I added an outer border using a black print from my stash to give the quilt a nice frame and to meet the minimum width requirements for the quilt show.
Meowville quilt flimsy
Last weekend, I loaded Meowville onto my frame to start quilting. I’m using Glide thread in Celery in the giant cat head and letters, and using Glide thread in black for the remainder of the quilt. I’m going to keep the quilting very simple to keep the focus on all of those wonderful tiny houses!
Time for quilting!A cute heart quilted into a paw
I’m about 2/3 of the way finished with the quilting, and I expect to finish this week. I’ll post a picture of the completed quilt soon! I have 2 more quilt tops ready to be quilted for the show so I need to get to it!
My husband and I found a little table a few years ago while antiquing that we use to have our breakfast. The table faces a sliding glass door, looking out on our background. It’s relaxing to watch the birds flitting about while sipping coffee before starting work for the day.
However, we don’t want to scuff up the table’s surface more than it already is so we’ve been using various items like kitchen towels and coffee coasters as protection. Last weekend, I decided to make a table topper for this little table, but it also reminds me of a giant mug rug! When it gets dirty, we can just toss it in the wash.
Here’s what the table looks like without any topper:
Little antique table
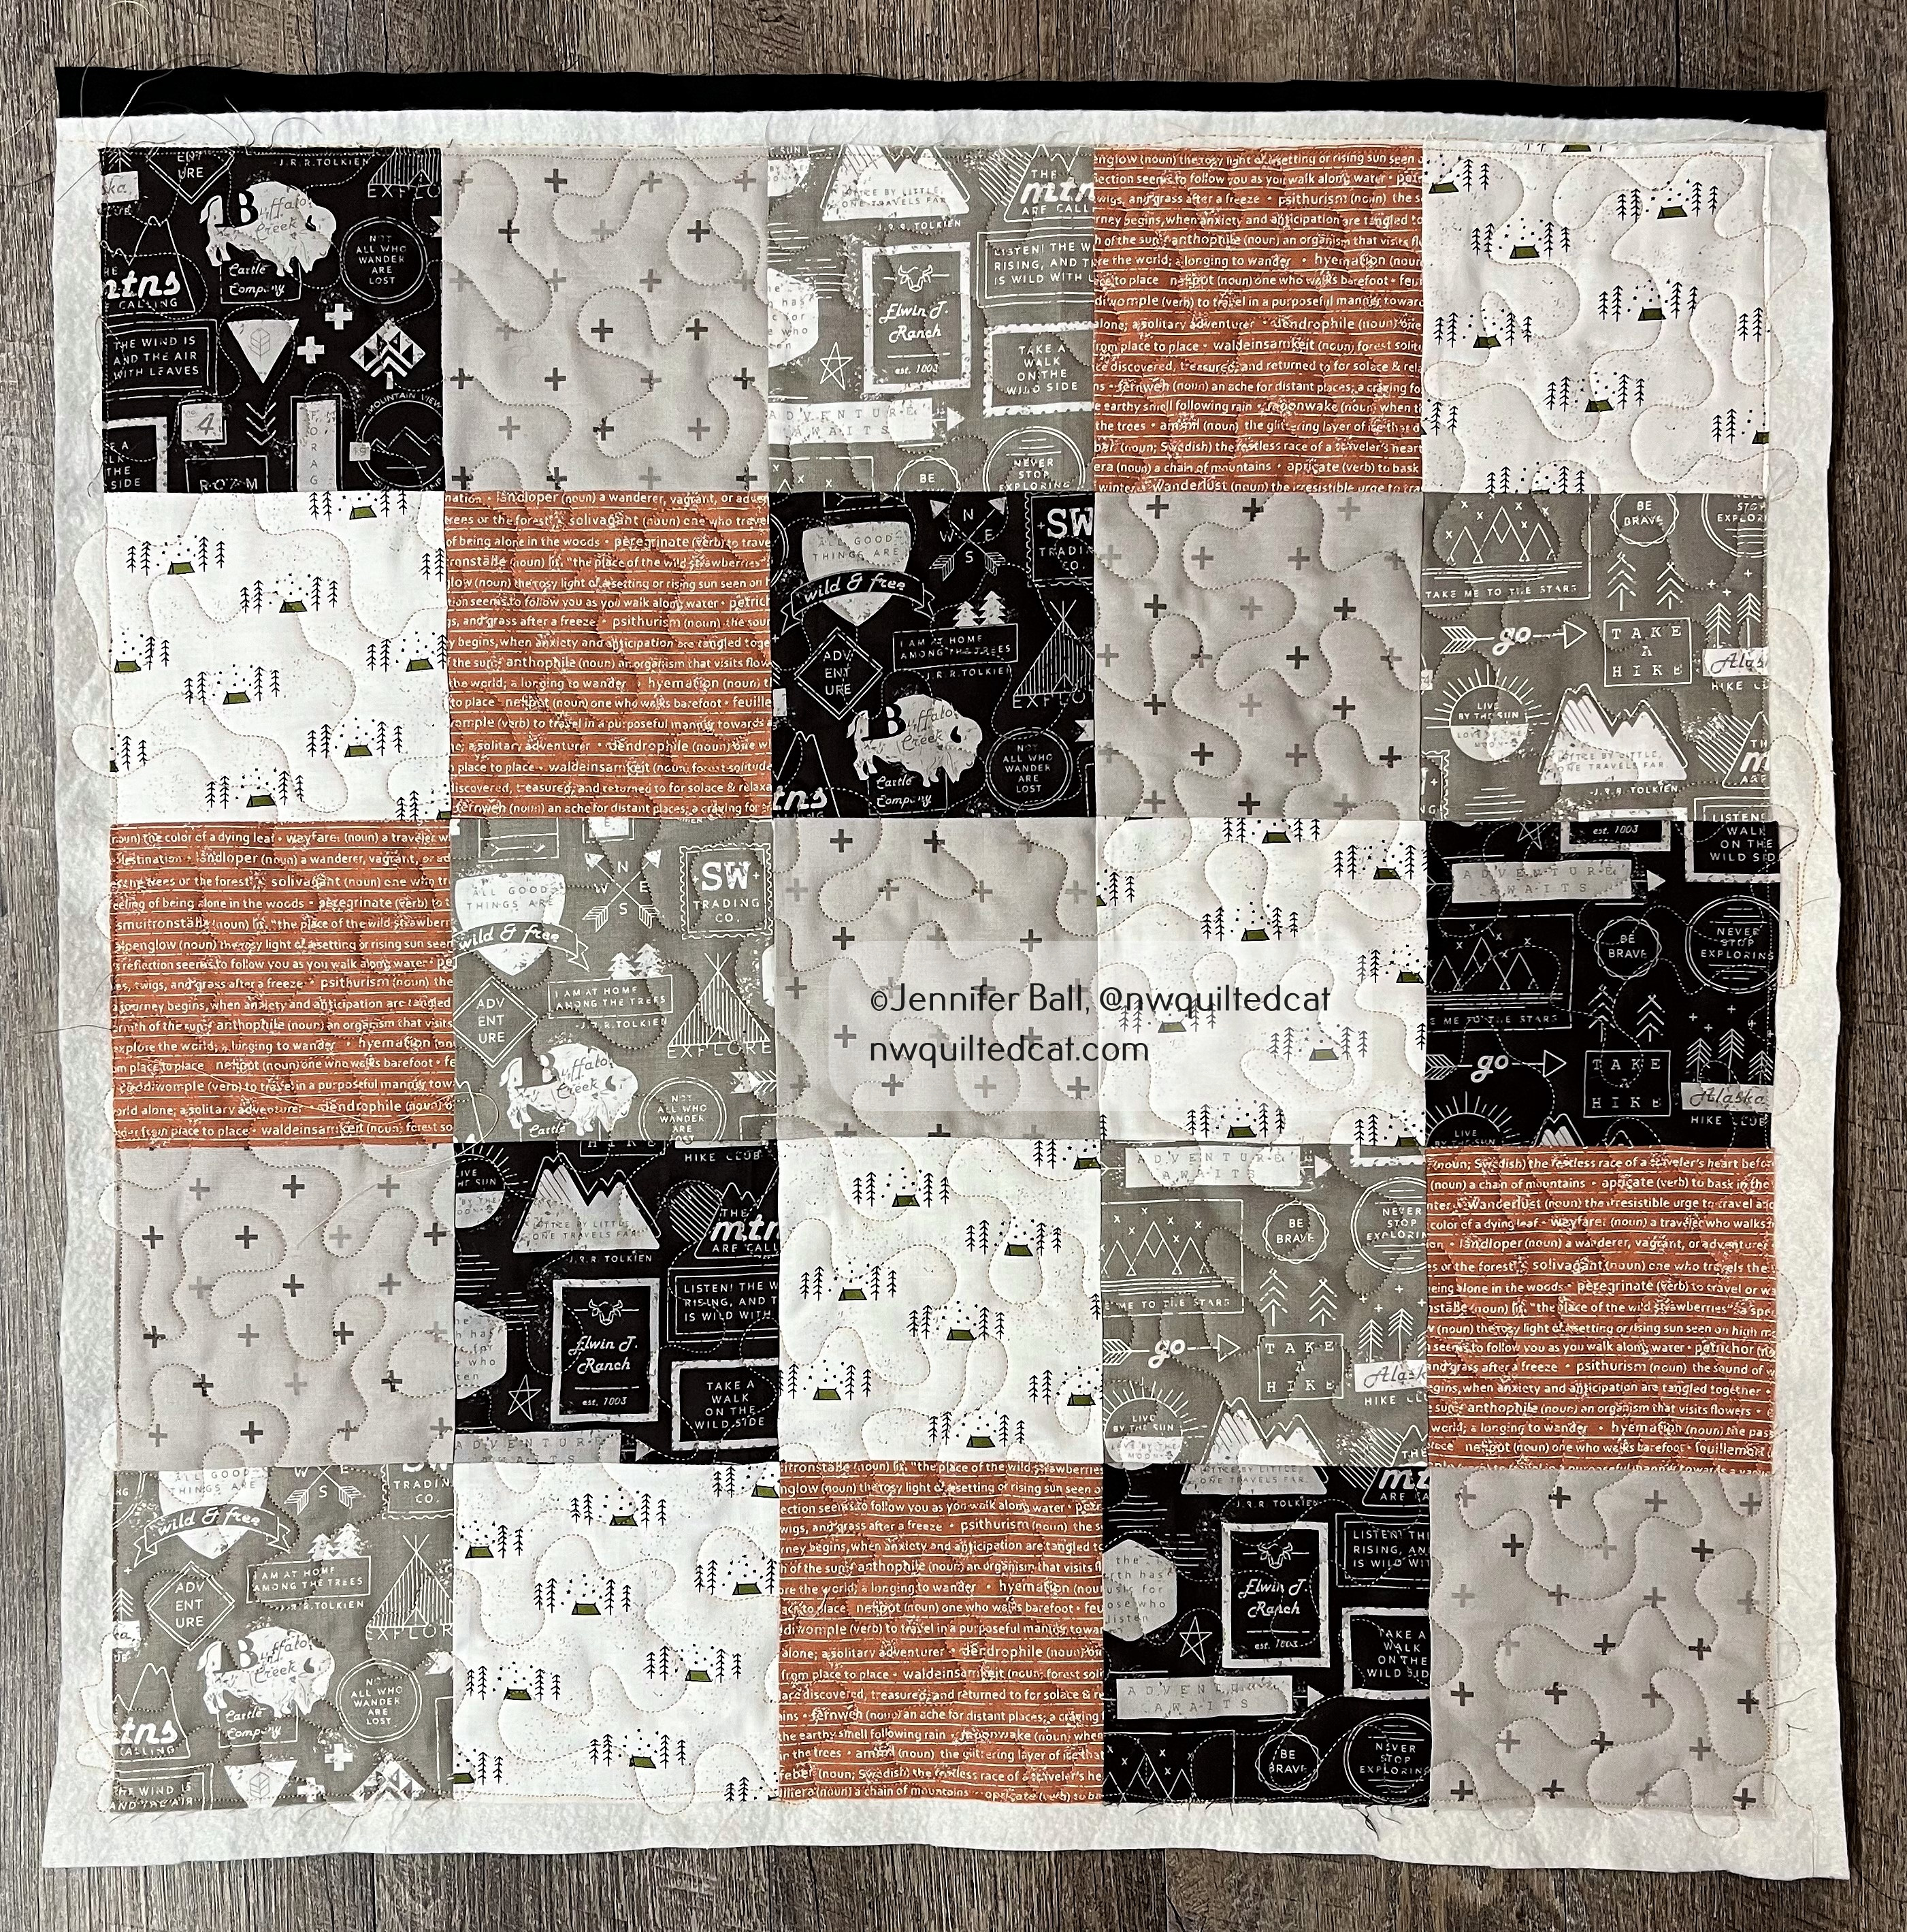
I had some fun fabric in my stash with an outdoors theme that I thought would work well. The colors match the kitchen, and we love to be out hiking! I measured the diameter of the table, which is 25 inches. I selected 5 fabric prints, and cut out 5.5 inch squares that finish at 5 inches each. I placed them in a 5×5 grid, stitched them together, and then quilted this base shape.
Starting quilt shape for table topper
The fabrics that I used are:
5130-15 (dark mountain print) from Smoke & Rust by Lella Boutique
5130-14 (gray mountain print) from Smoke & Rust
5135-13 (plus sign print) from Smoke & Rust
5131-16 (orange text print) from Smoke & Rust
55551-21 Timber Campsite Cream from Timber by Sweetwater
I quilted the project using meandering free-motion with Glide thread in Apricot Blush.
Once I had my square-shaped base, I took placed the table upside down on the back of the quilt and traced the circle. I drew a cutting line in about 3/4″ from the original tracing line so that my quilt would not extend to the edges of the table. I wanted a little peek-a-boo border of the table.
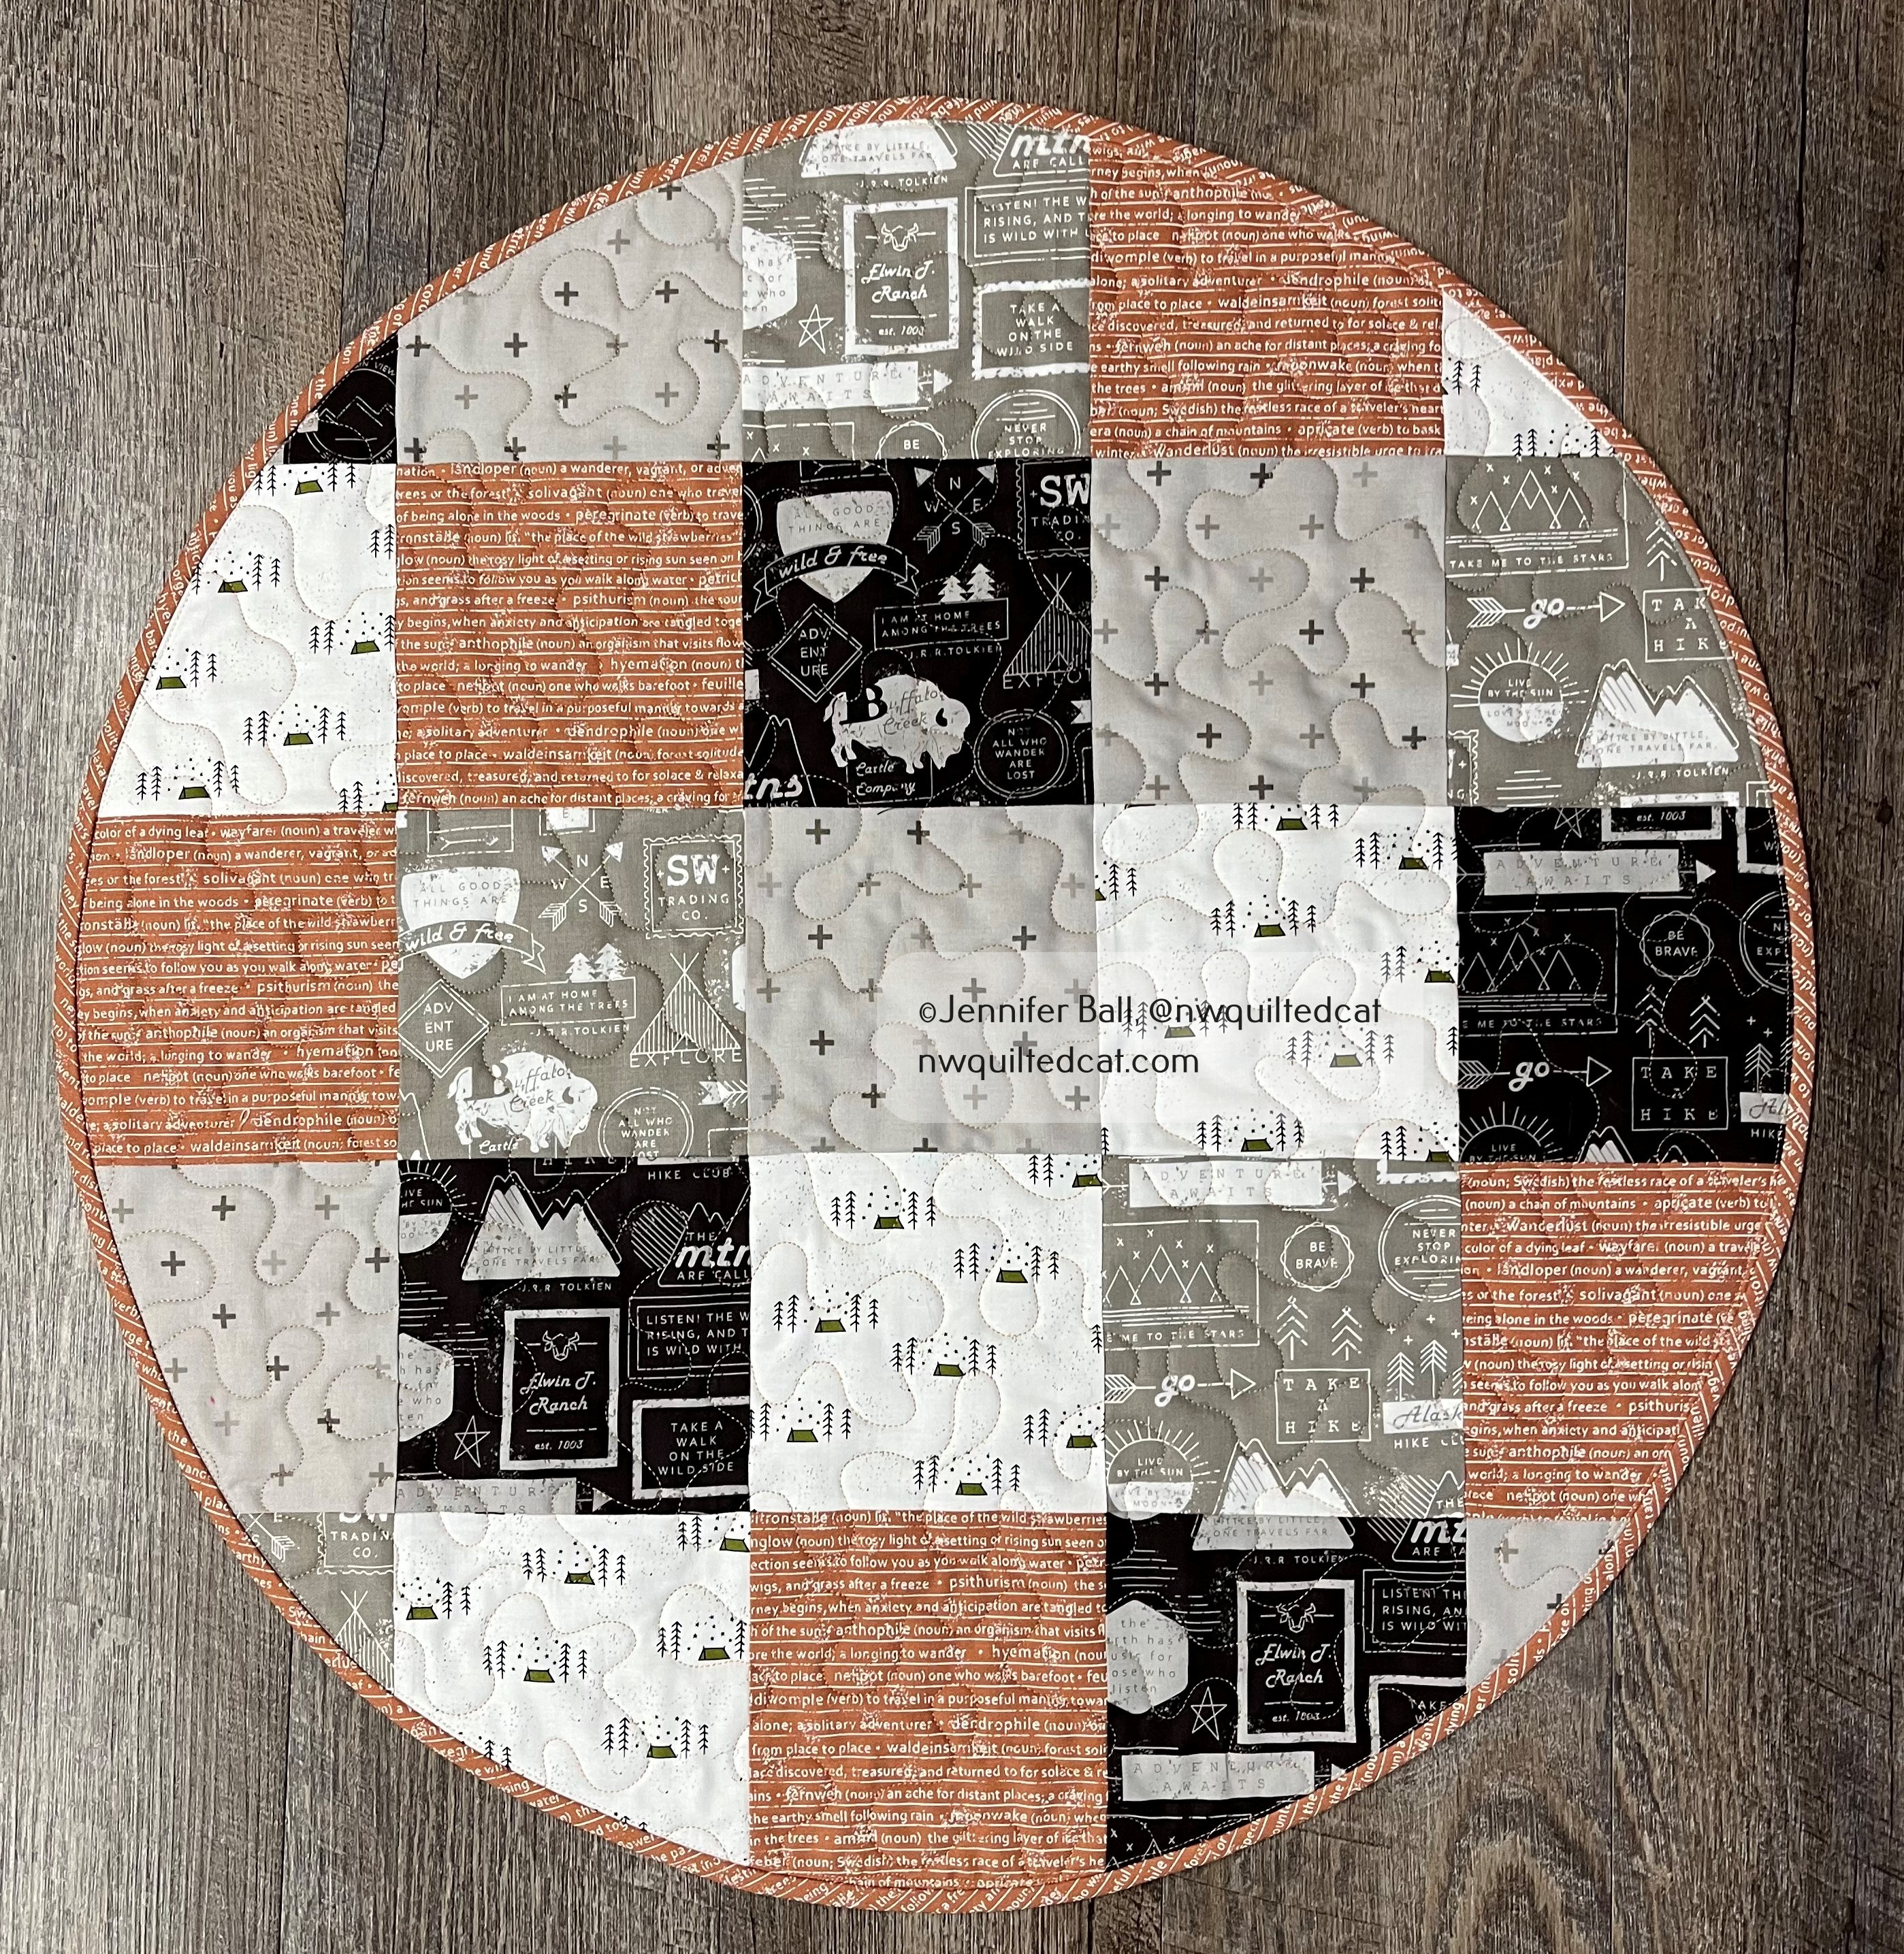
Table topper, trimmed to fit
I choose the orange text print for my binding. I needed to use bias binding to get a stretchy binding that I can easily sew to curves. It worked out so nicely!
Circular table topper, bound
Now for the reveal! Did my quick table topper project work? Does the coffee taste better while using it?? Yes, it does, because I don’t have to worry about leaving water marks anymore.
Completed table topper
Completed table topper with chairs that need to be reupholstered
We also have these 2 antique chairs to go along with the little coffee table. However, they are in sore need of reupholstering. I hope to tackle that project this year, and choose a new fabric that will go with the table topper fabrics.
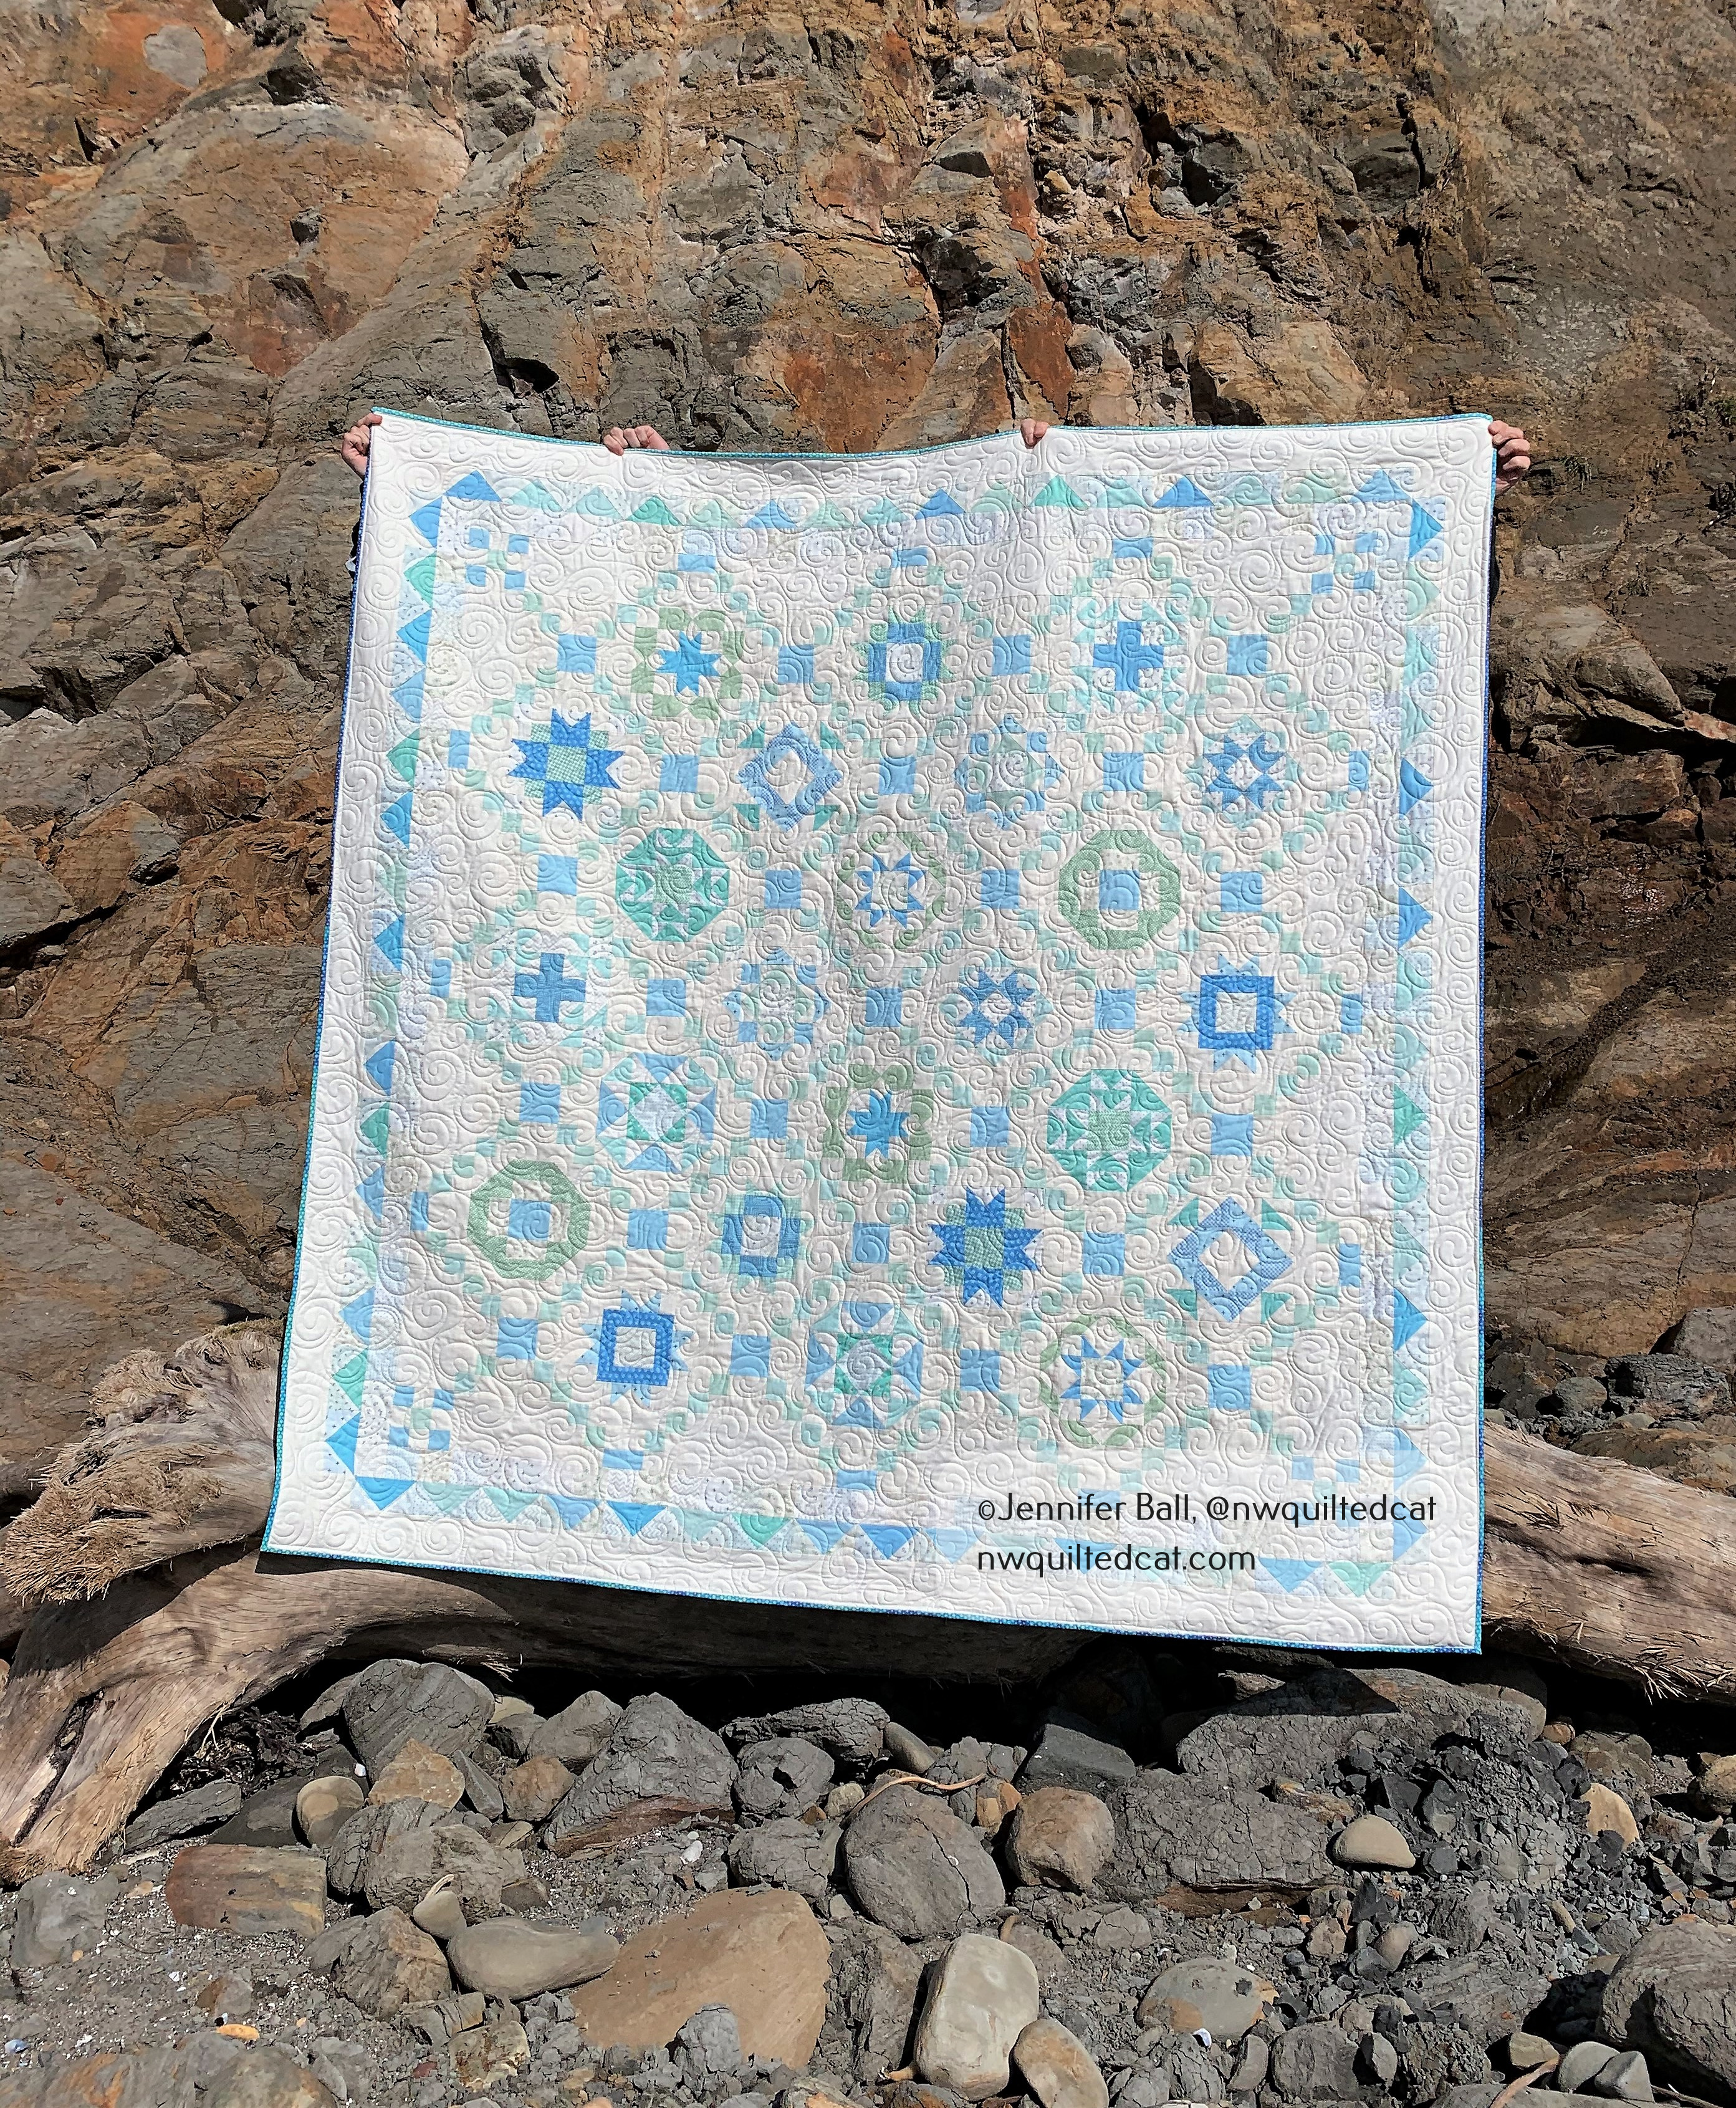
I took my completed Sea Glass quilt to the ocean for a few pictures several weekends ago. It was beautiful weather, although the wind made it pretty tricky to get good pictures. We rented a yurt for camping and had a great time! We were so glad to be in a yurt instead of our tent because it did get below freezing at night. Brrr!
I did free-motion quilting using Glide thread in Cool Mint. I used large, open swirls that reminded me of the beach. For the backing, I used Luxe Cuddle in Seal Aqua Sea. My HQ Avante handled the cuddle backing perfectly!
Free-Motion Quilting on My Sea Glass Quilt
For binding, I opted to use a fabric that wasn’t part of the BOM. I had some Zuma High Tides in Aquamarine by Tula Pink in my stash that complements the blues and turquoises in the quilt. I think it really accents and frames the quilt very nicely. Those little anchors are too cute!
Sea Glass Binding
I did machine stitch the binding to both the front and the back because it is pretty difficult to hand sew through the cuddle fabric. I knew that this quilt was going on a bed so I also liked the extra durability of machine stitching.
Here’s a look at the completed quilt with the Pacific Ocean in the background:
Completed Sea Glass Quilt at the Ocean
We found some interesting cliffs a little farther down the coast so I asked my hubby and son climb up on a log to hold the quilt for a picture. It really helps having a teen who is now taller than me!
Sea Glass Quilt Near Cliffs
I have a full size futon bed in my guest room so this quilt will make a nice covering. The luxe cuddle backing is so soft and feels so good against your skin. I’m sure my guest (aka my sister) will love sleeping under this quilt during a future visit.
This Sea Glass quilt finish is the result of a year long block-of-the-month program through Fig Tree & Co. Although the BOM program is over, you may be able to purchase a pattern on their website.
I really enjoyed making a quilt with this soothing color palette, and I’m really glad to have another WIP completed!
Grab a cup of coffee because this post will be longer than usual with a few more pictures! I’m so happy to cross off my first official quilty finish of 2021 by completing a WIP that started its journey in 2018.
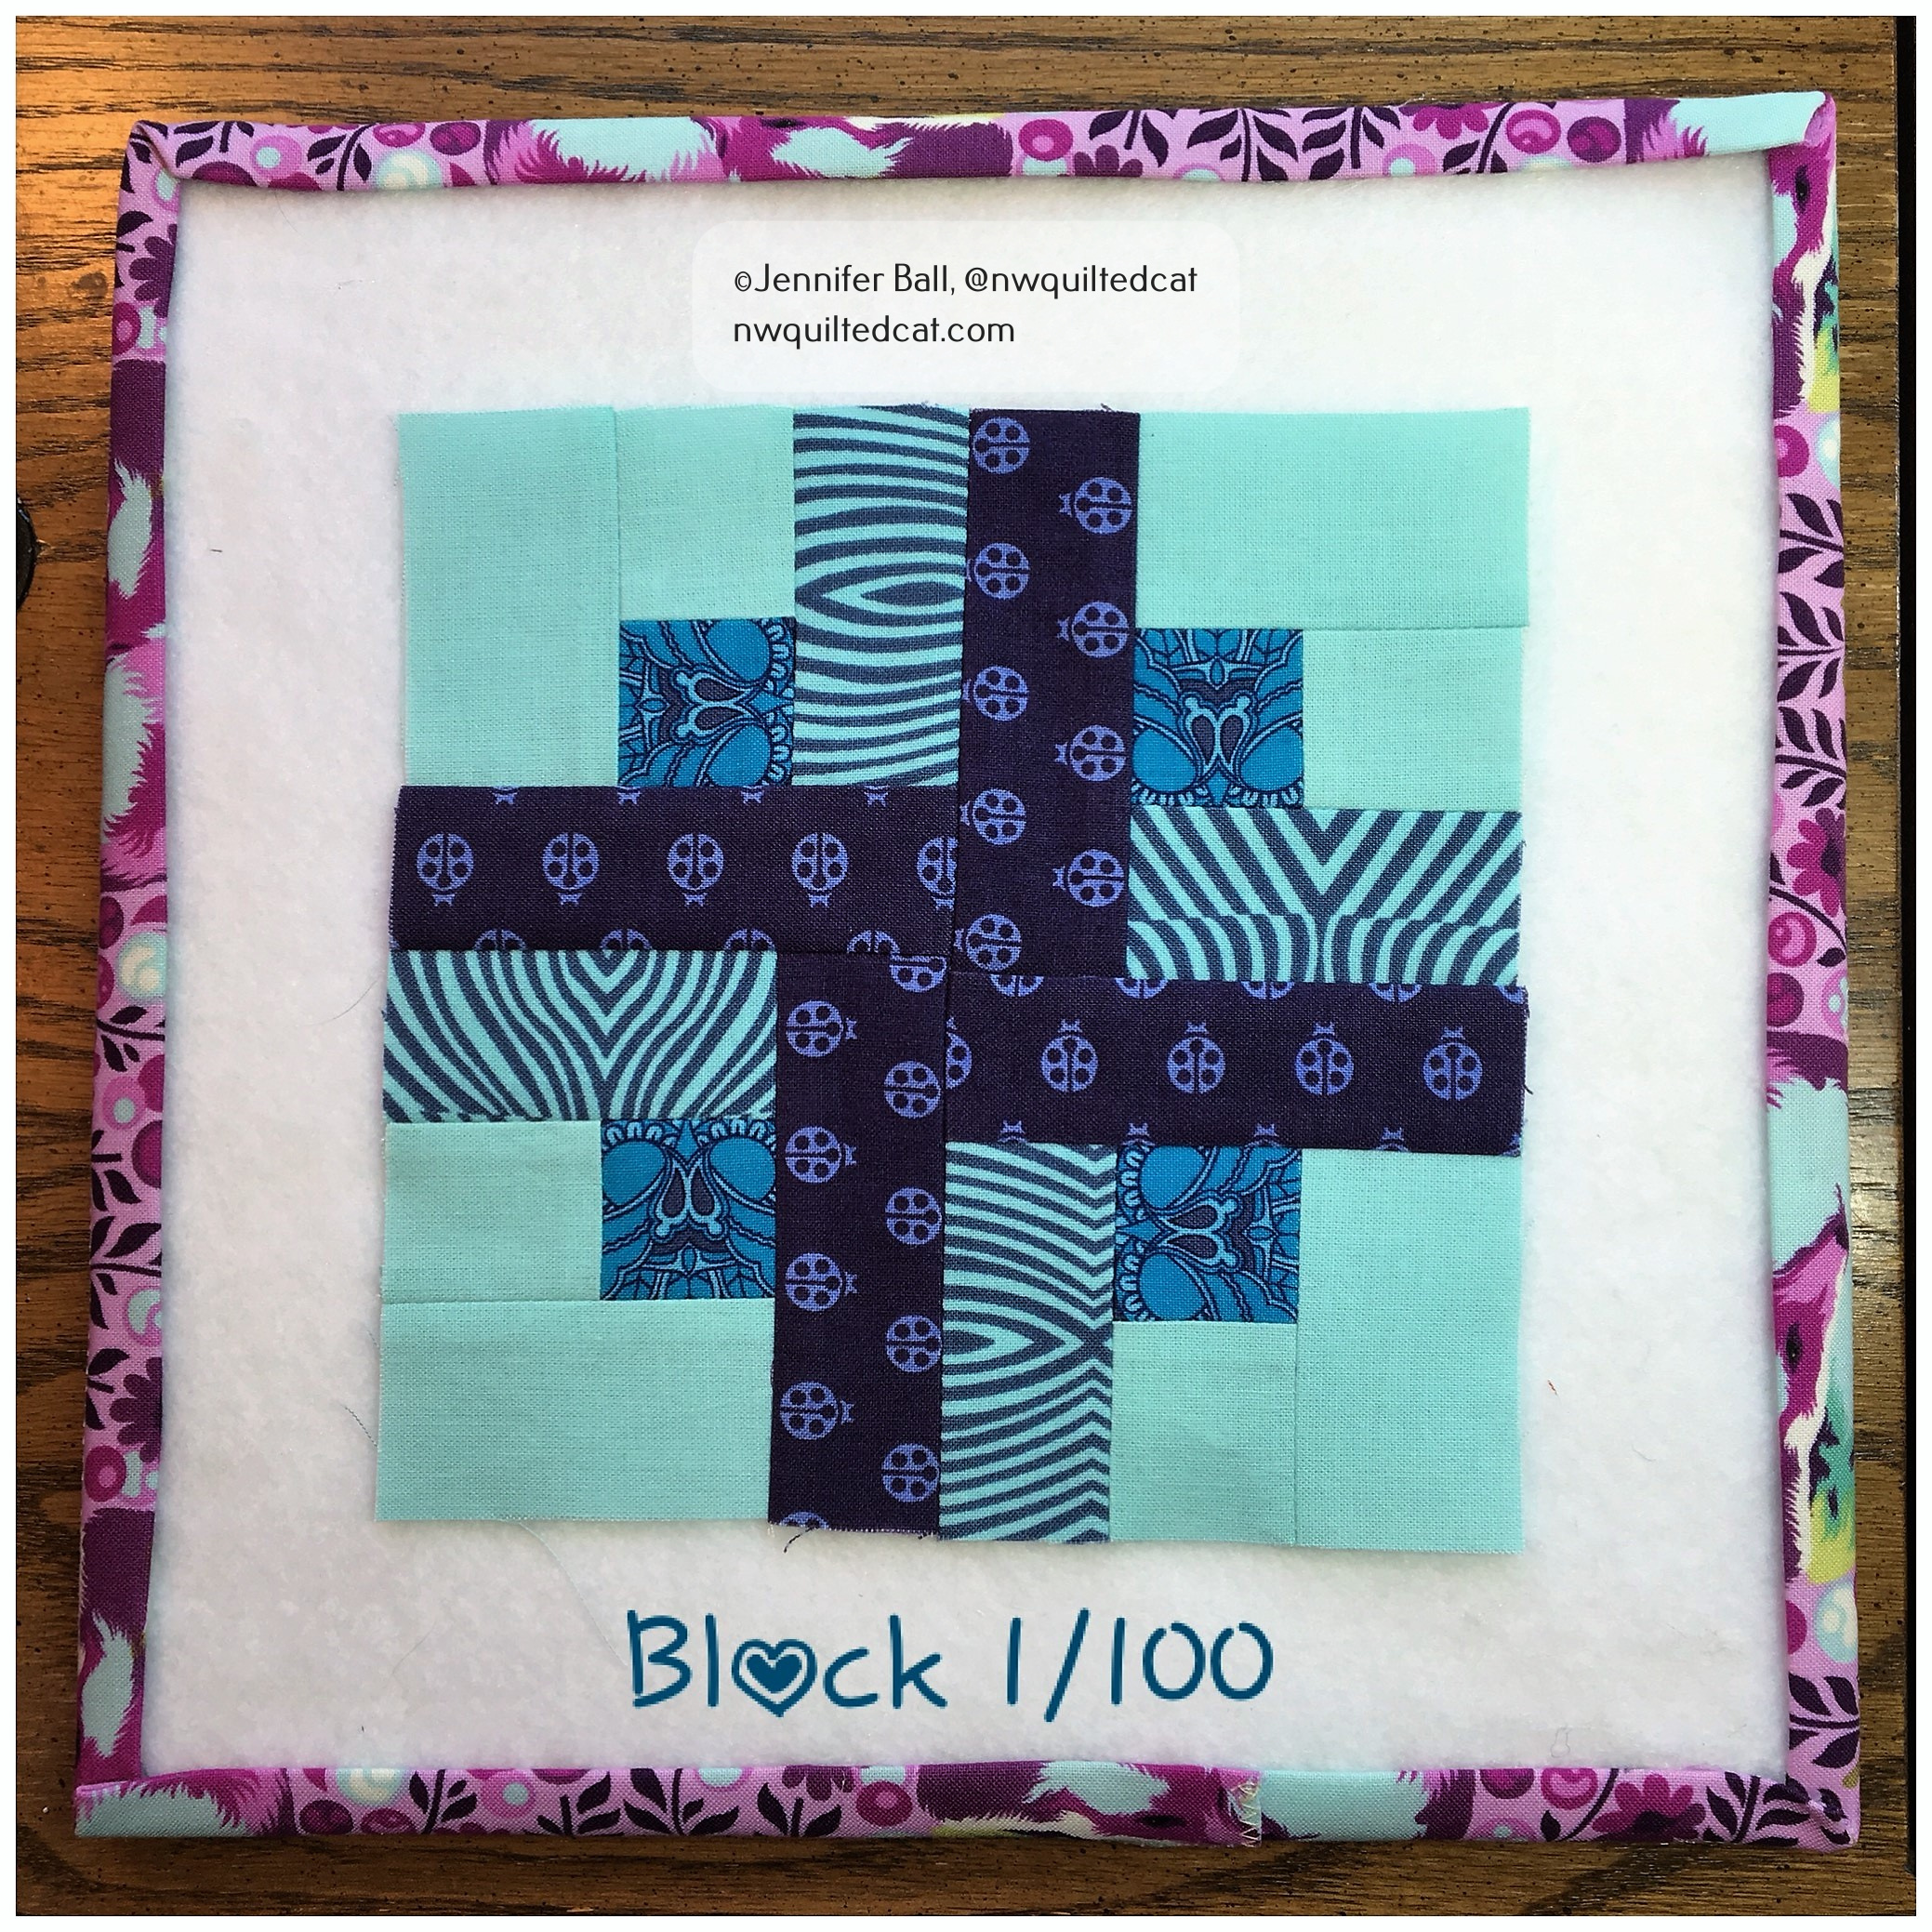
In 2018, I signed up to do a 100 blocks in 100 days project, hosted by @gnomeangel on Instagram. The goal was to make each block from the book, Tula Pink’s City Sampler Book: 100 Modern Quilt Blocks. Each day, starting in July 2018, and for 100 days in a row, we posted the designated block for that day. We could make the blocks in advance, but we had to post the blocks in order on the specified day.
Here’s a look at my first and last blocks (on little design boards). You can find all my blocks by searching the hashtag #nwquiltedcat100blocks on Instagram.
Once I finished all 100 blocks, I put the project aside for awhile. In January 2020, I was lucky enough to secure a spot in a Tula Pink class set for July of 2020 at the Quilter’s Affair event, which takes place the week before the Sisters Outdoor Quilt Show. Little did we know that a pandemic was looming!
In February 2020, I decided to pull out all the blocks, arrange them, and decide on a setting layout.
Each of my blocks stuffed into the book!
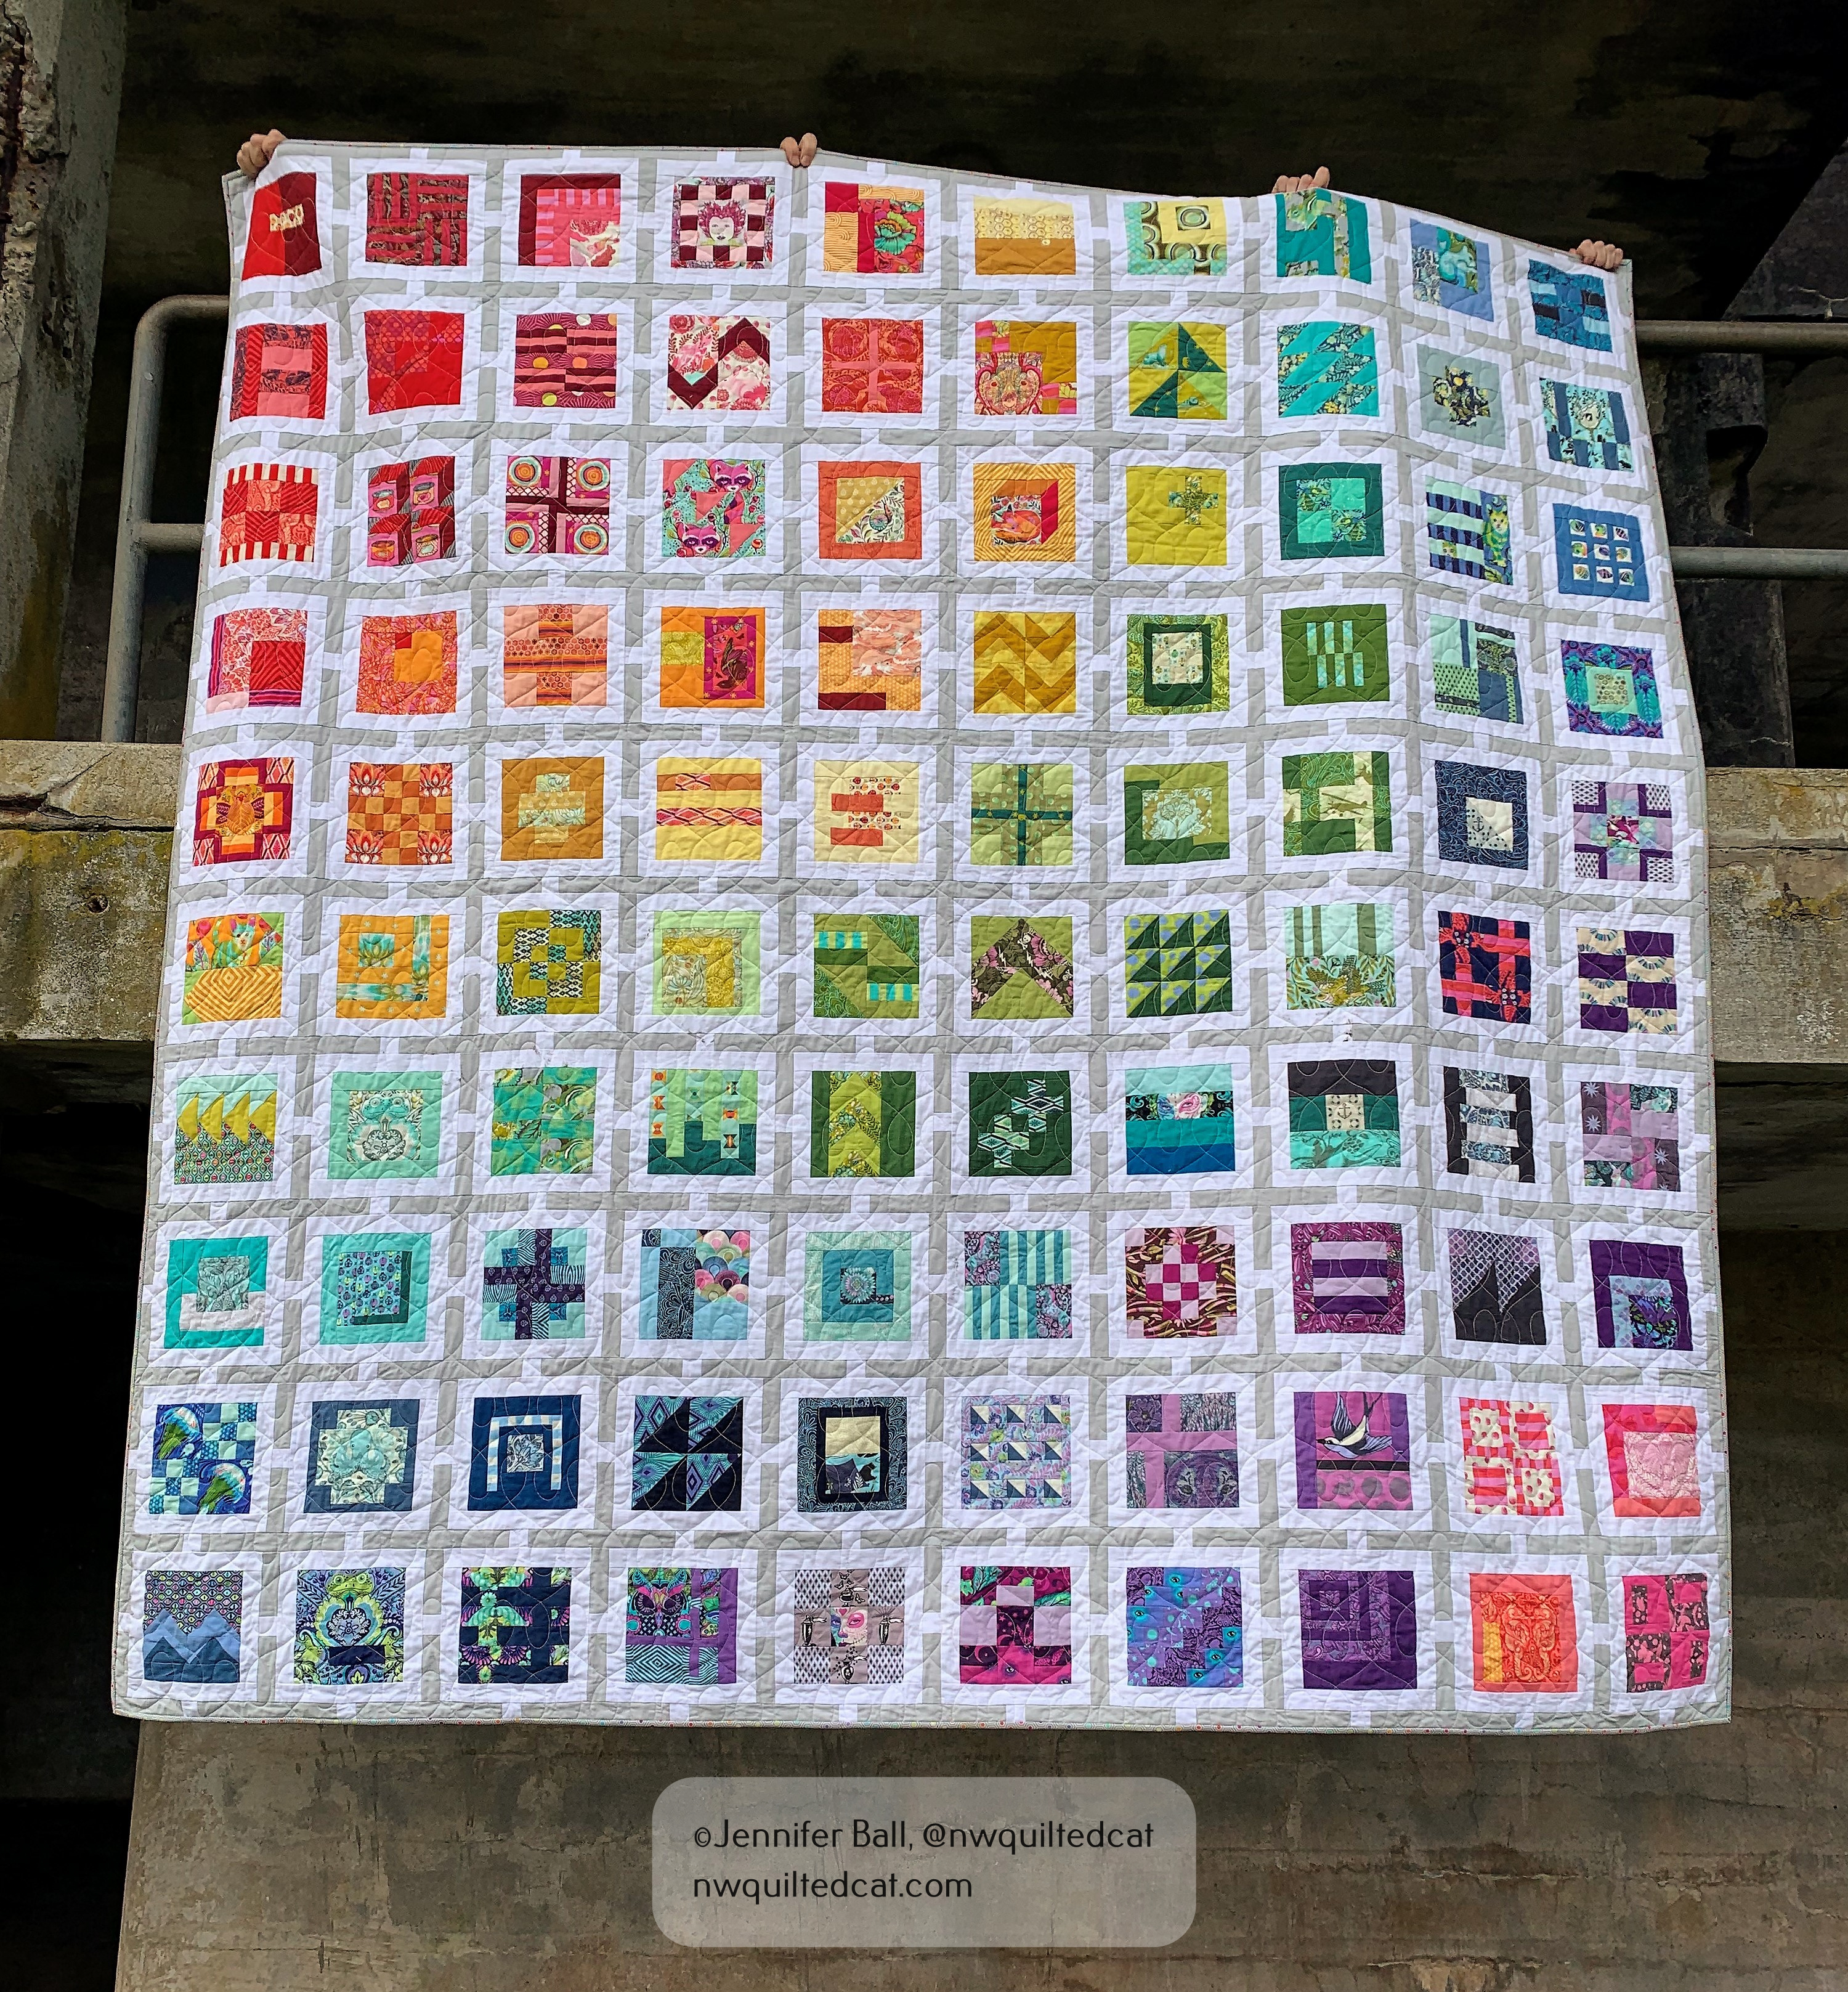
I decided to use all 100 blocks with Kona White and Kona Lighthouse for the sashing. I started piecing in March 2020 and finished in April 2020, still with the hope that I would be attending Tula’s class in July.
100 Modern Quilt blocks layout, light gray and white sashing with quilt inspector, Romeo100 Modern Quilt Blocks, the quilt grows while quilt inspector, Romeo, approves!
Of course, we all know that all quilting shows and events did get canceled for the rest of 2020. Once I had finished piecing the top, I lost my enthusiasm for the project as I knew I wouldn’t be able to ask Tula to sign my quilt in July. However, most of the instructors, including Tula, agreed to postpone their classes for July 2021! Yeah, hope renewed my ambition to get this quilt finished.
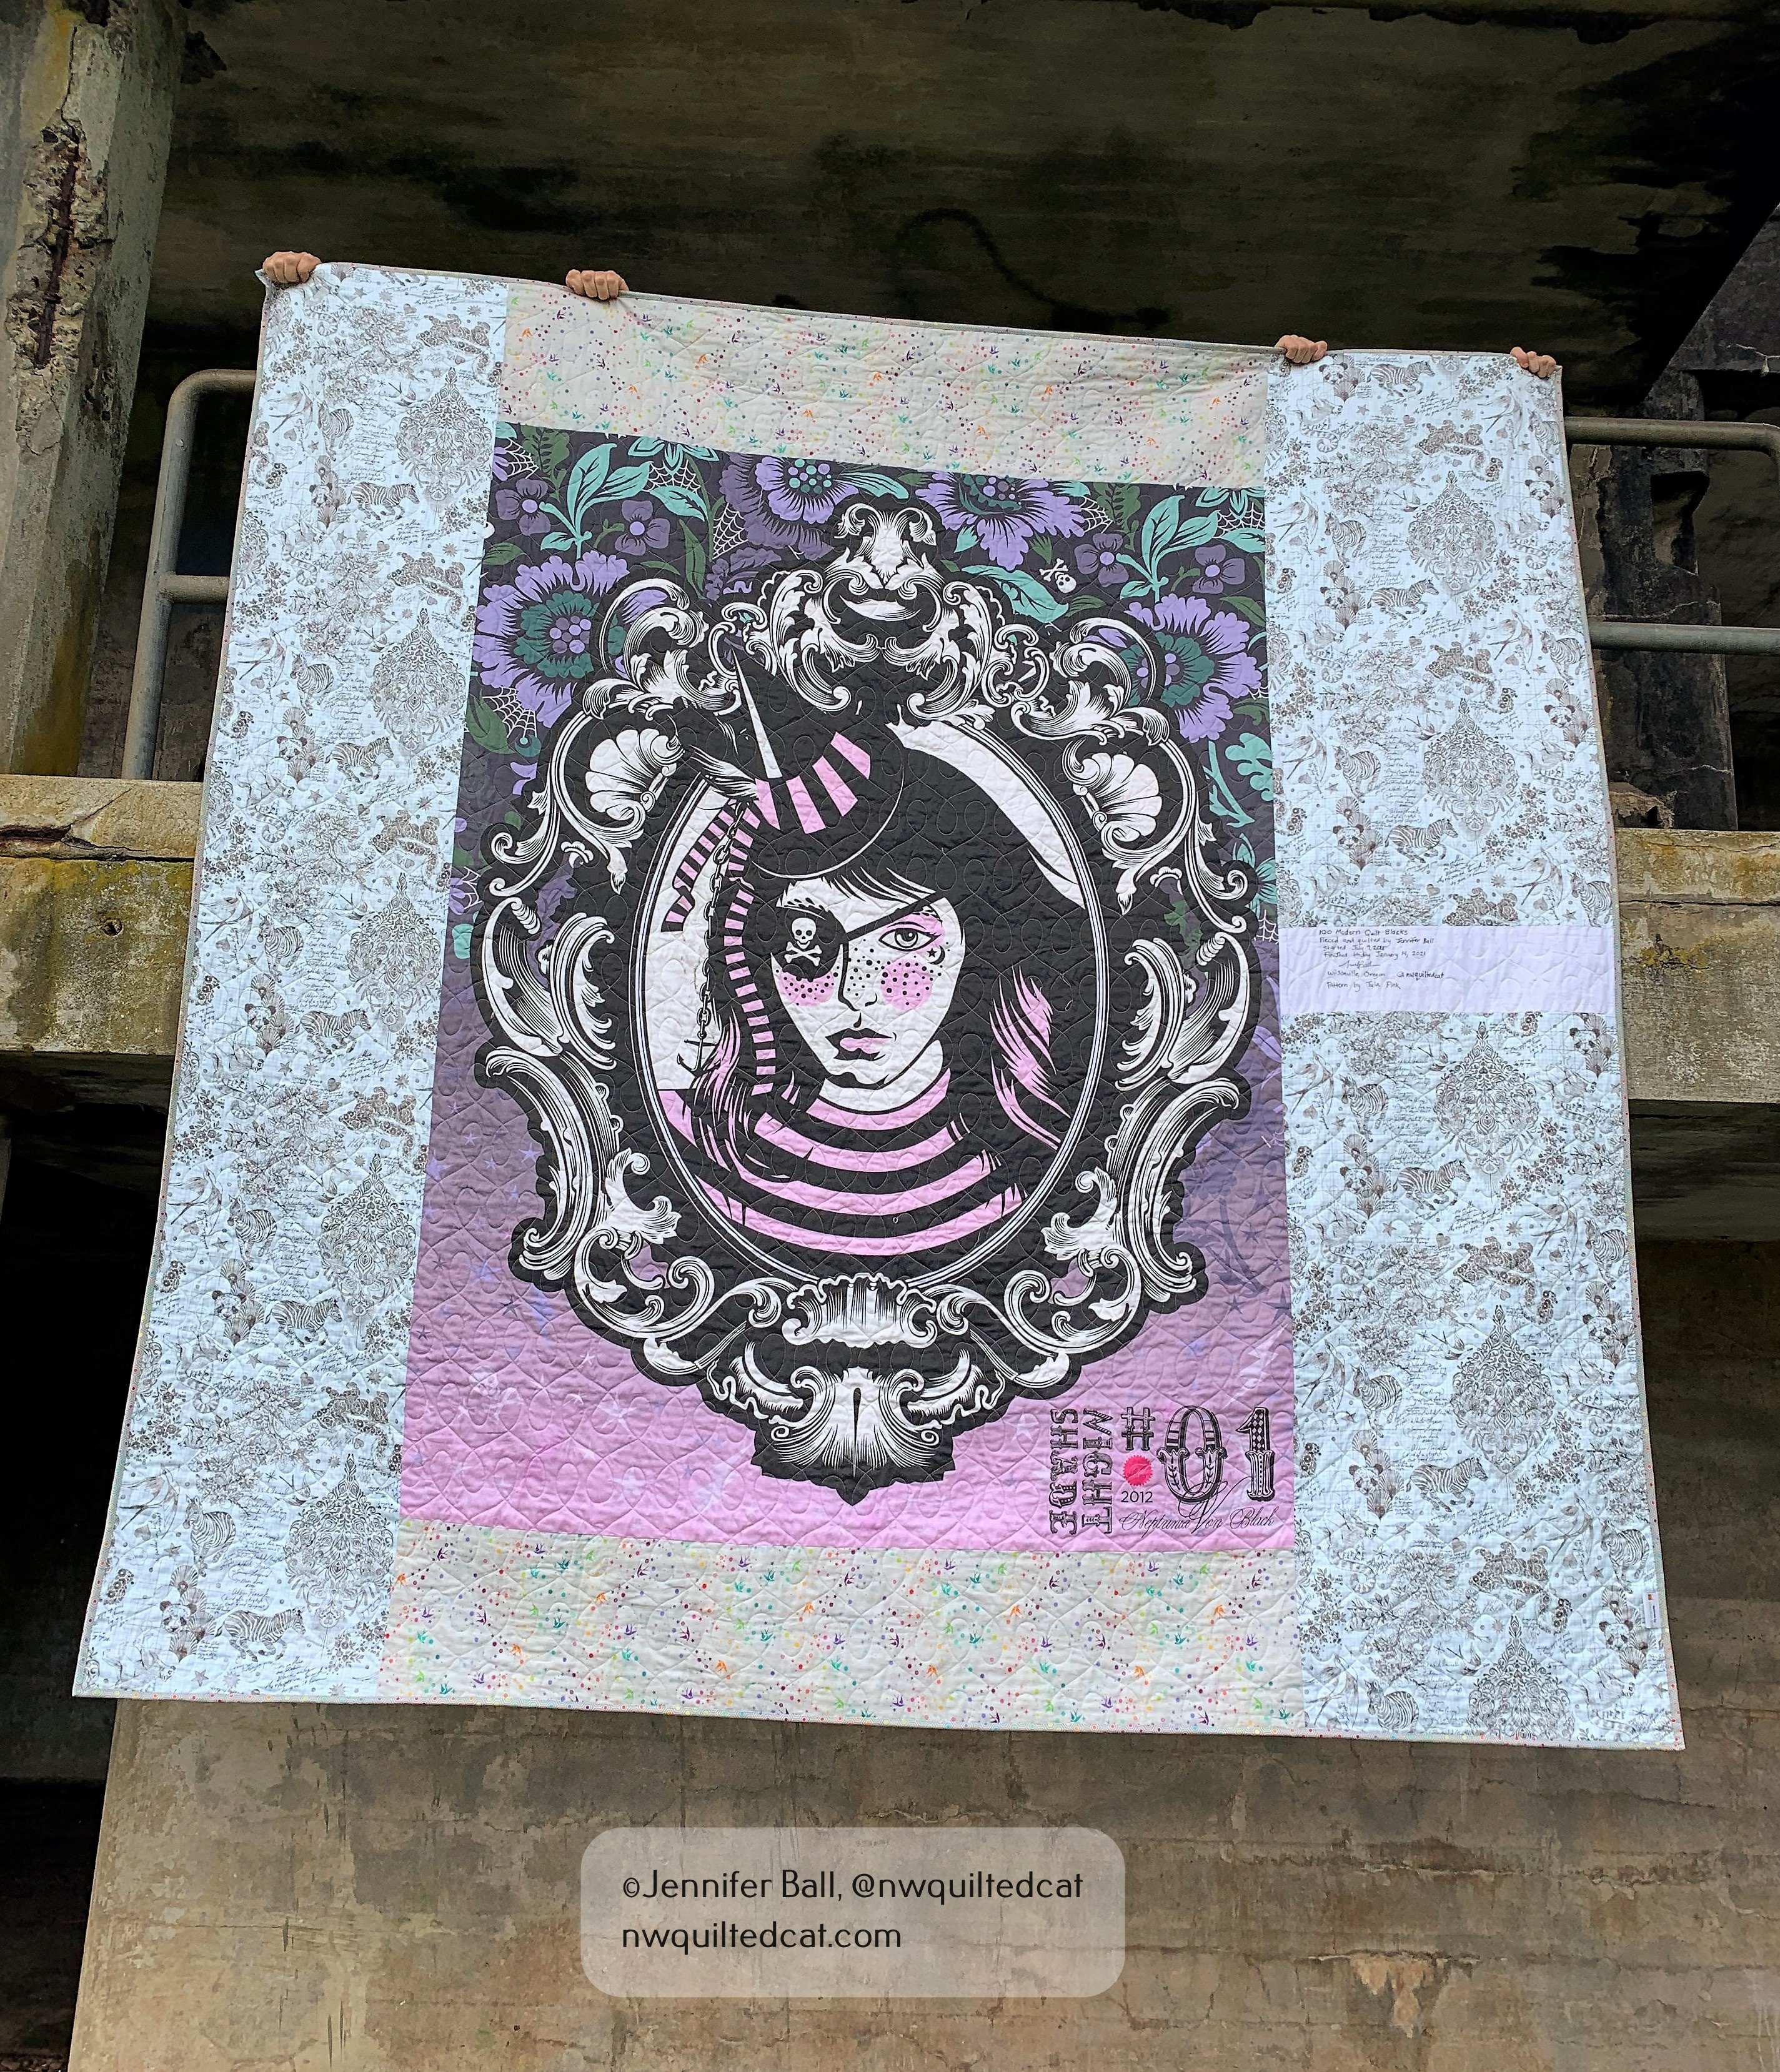
This is a large quilt, maybe queen size plus, but not quite king size. I had to piece the backing so I used a beautiful Neptunia Von Black portrait (from the Nightshade line) backing from I Heart Tula Pink at 54″ x 72″. I then added some of Tula’s 108″ backing from her Linework line called Sketchyer Paper along with some Fairy Dust in Whisper from her True Colors line. My label is a scrap of Kona White fabric, pieced directly into the backing. I left a large open space on the label where I hope to get Tula’s autograph eventually.
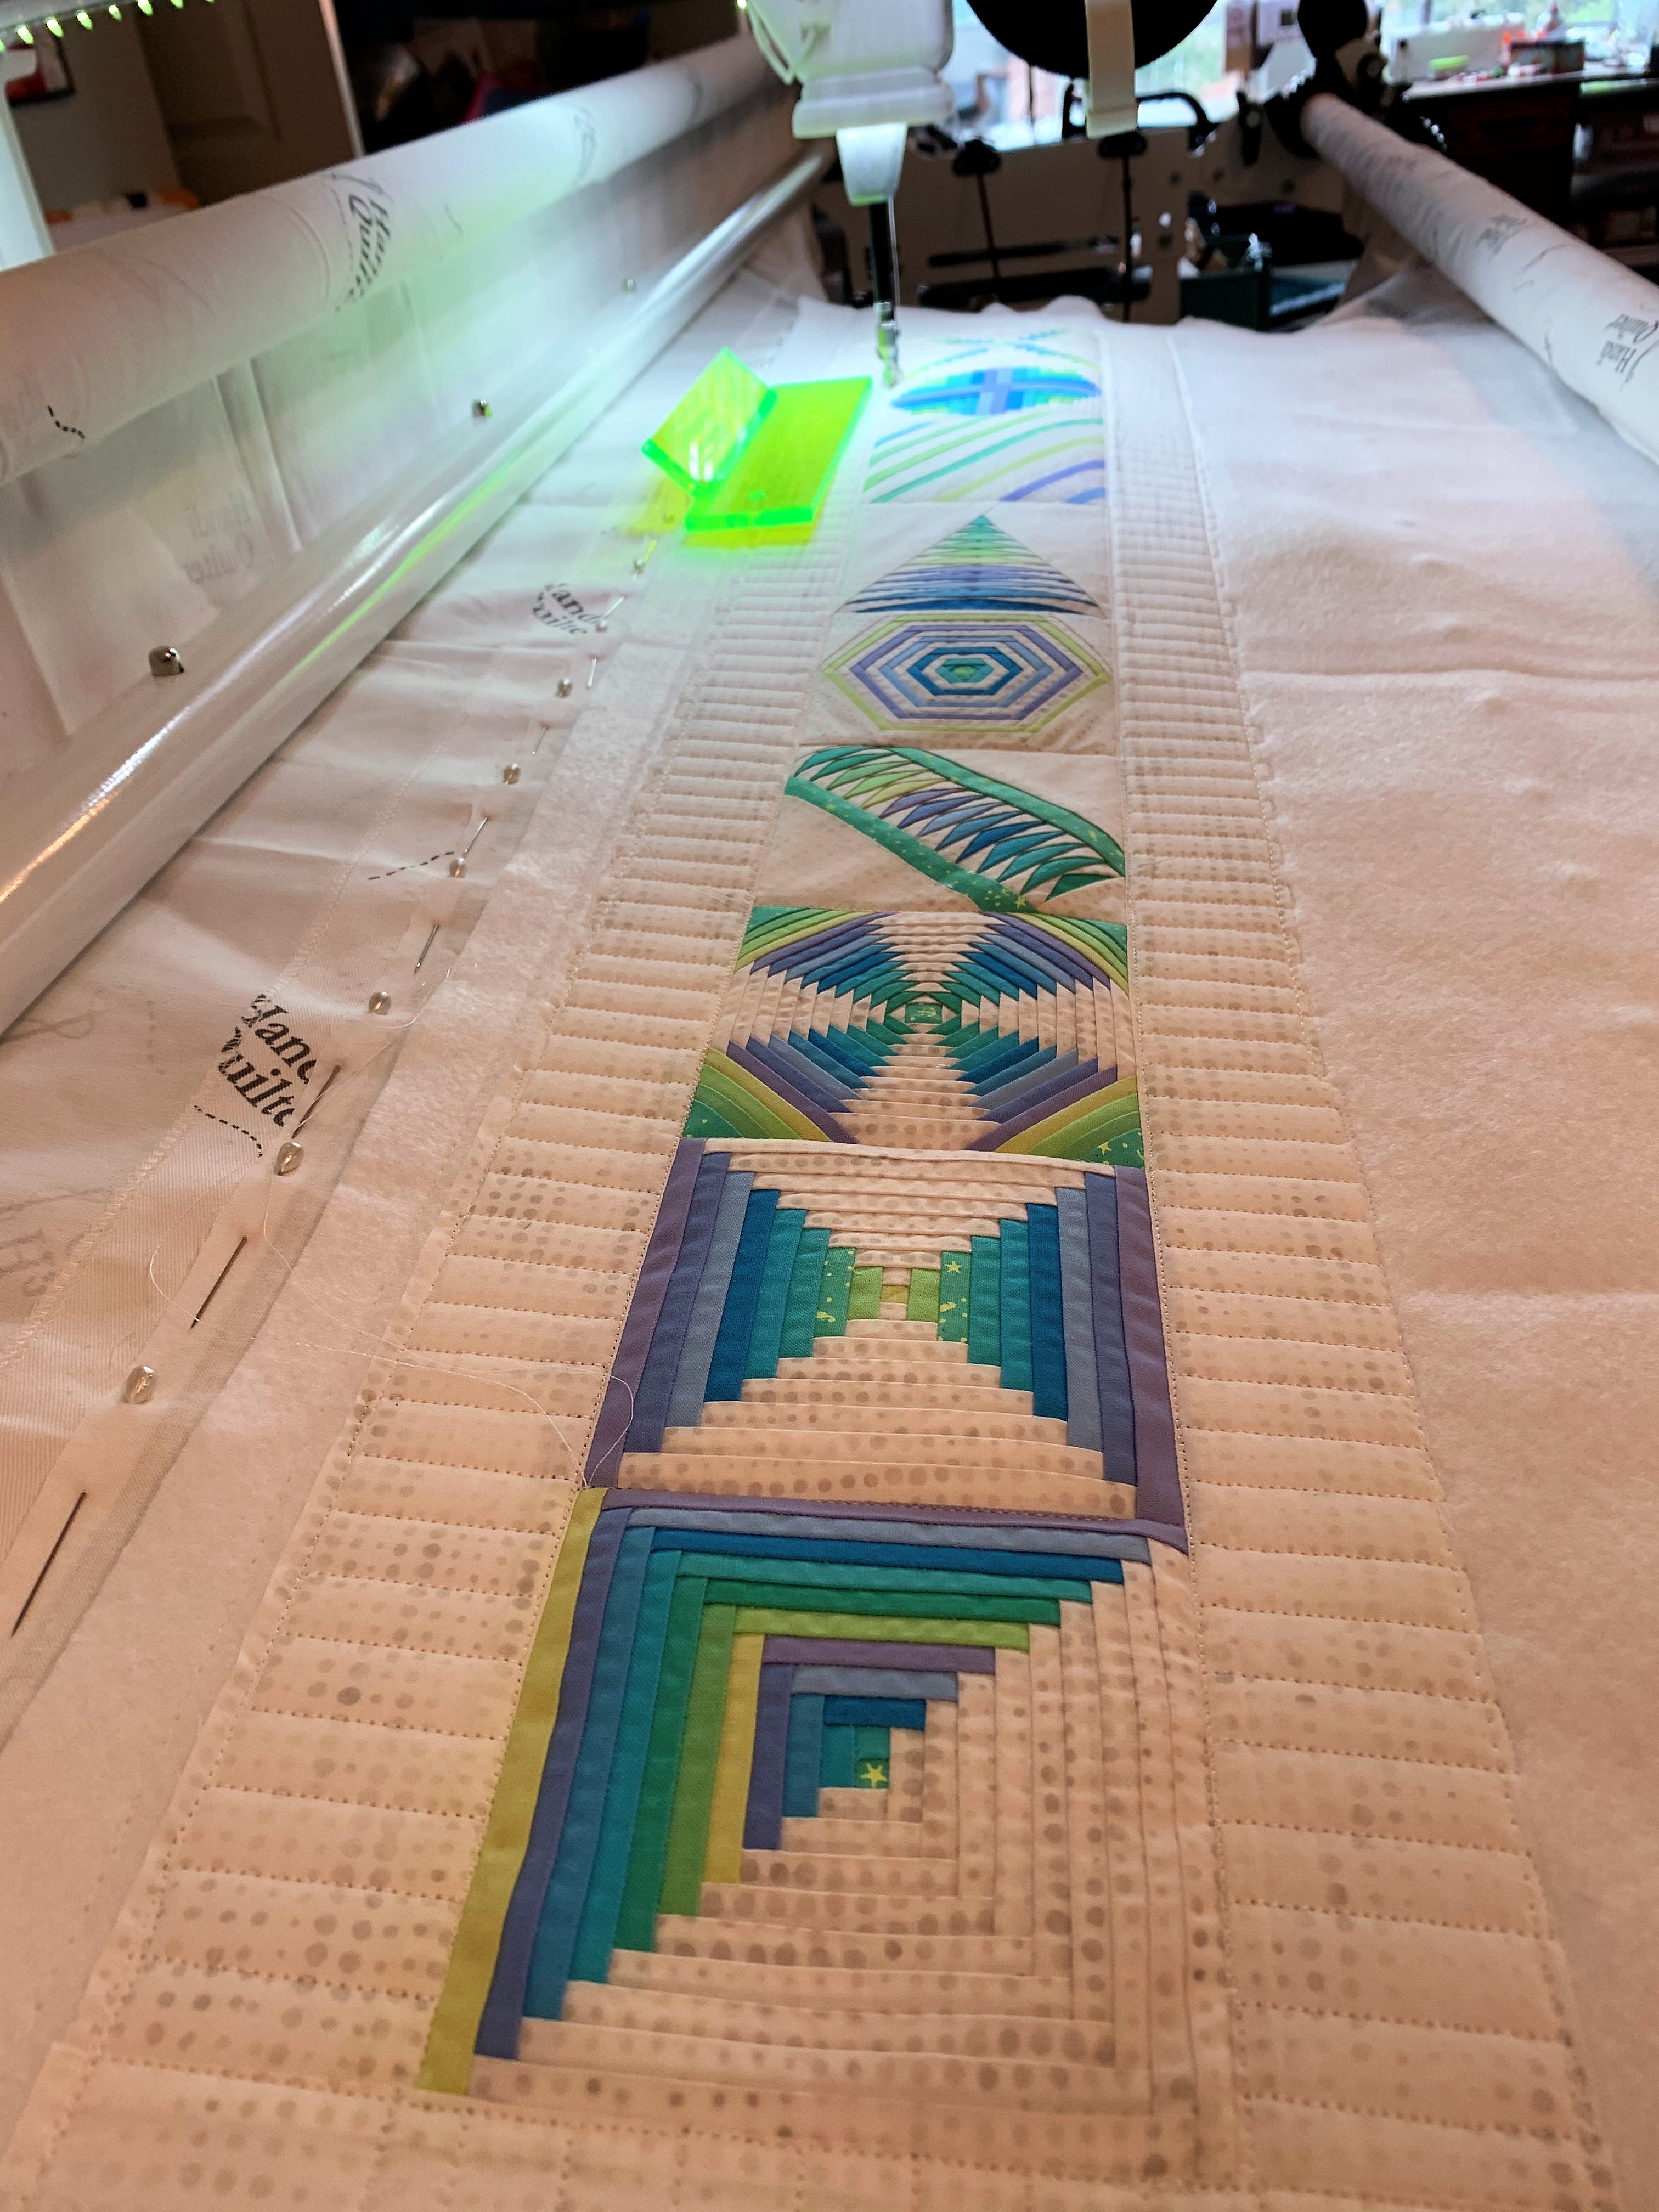
In December of 2020, I decided to quilt it using Glide thread in Bone and a hand-guided pantograph called Modern Twist by Urban Elementz on my HQ Avante. I selected this simple panto to keep the quilting in the background and the focus on the blocks.
Finally, I was ready to bind this giant quilt! I went with the same Fairy Dust in Whisper that I used on the backing. It picks up all the colors in the quilt without detracting from any of the blocks.
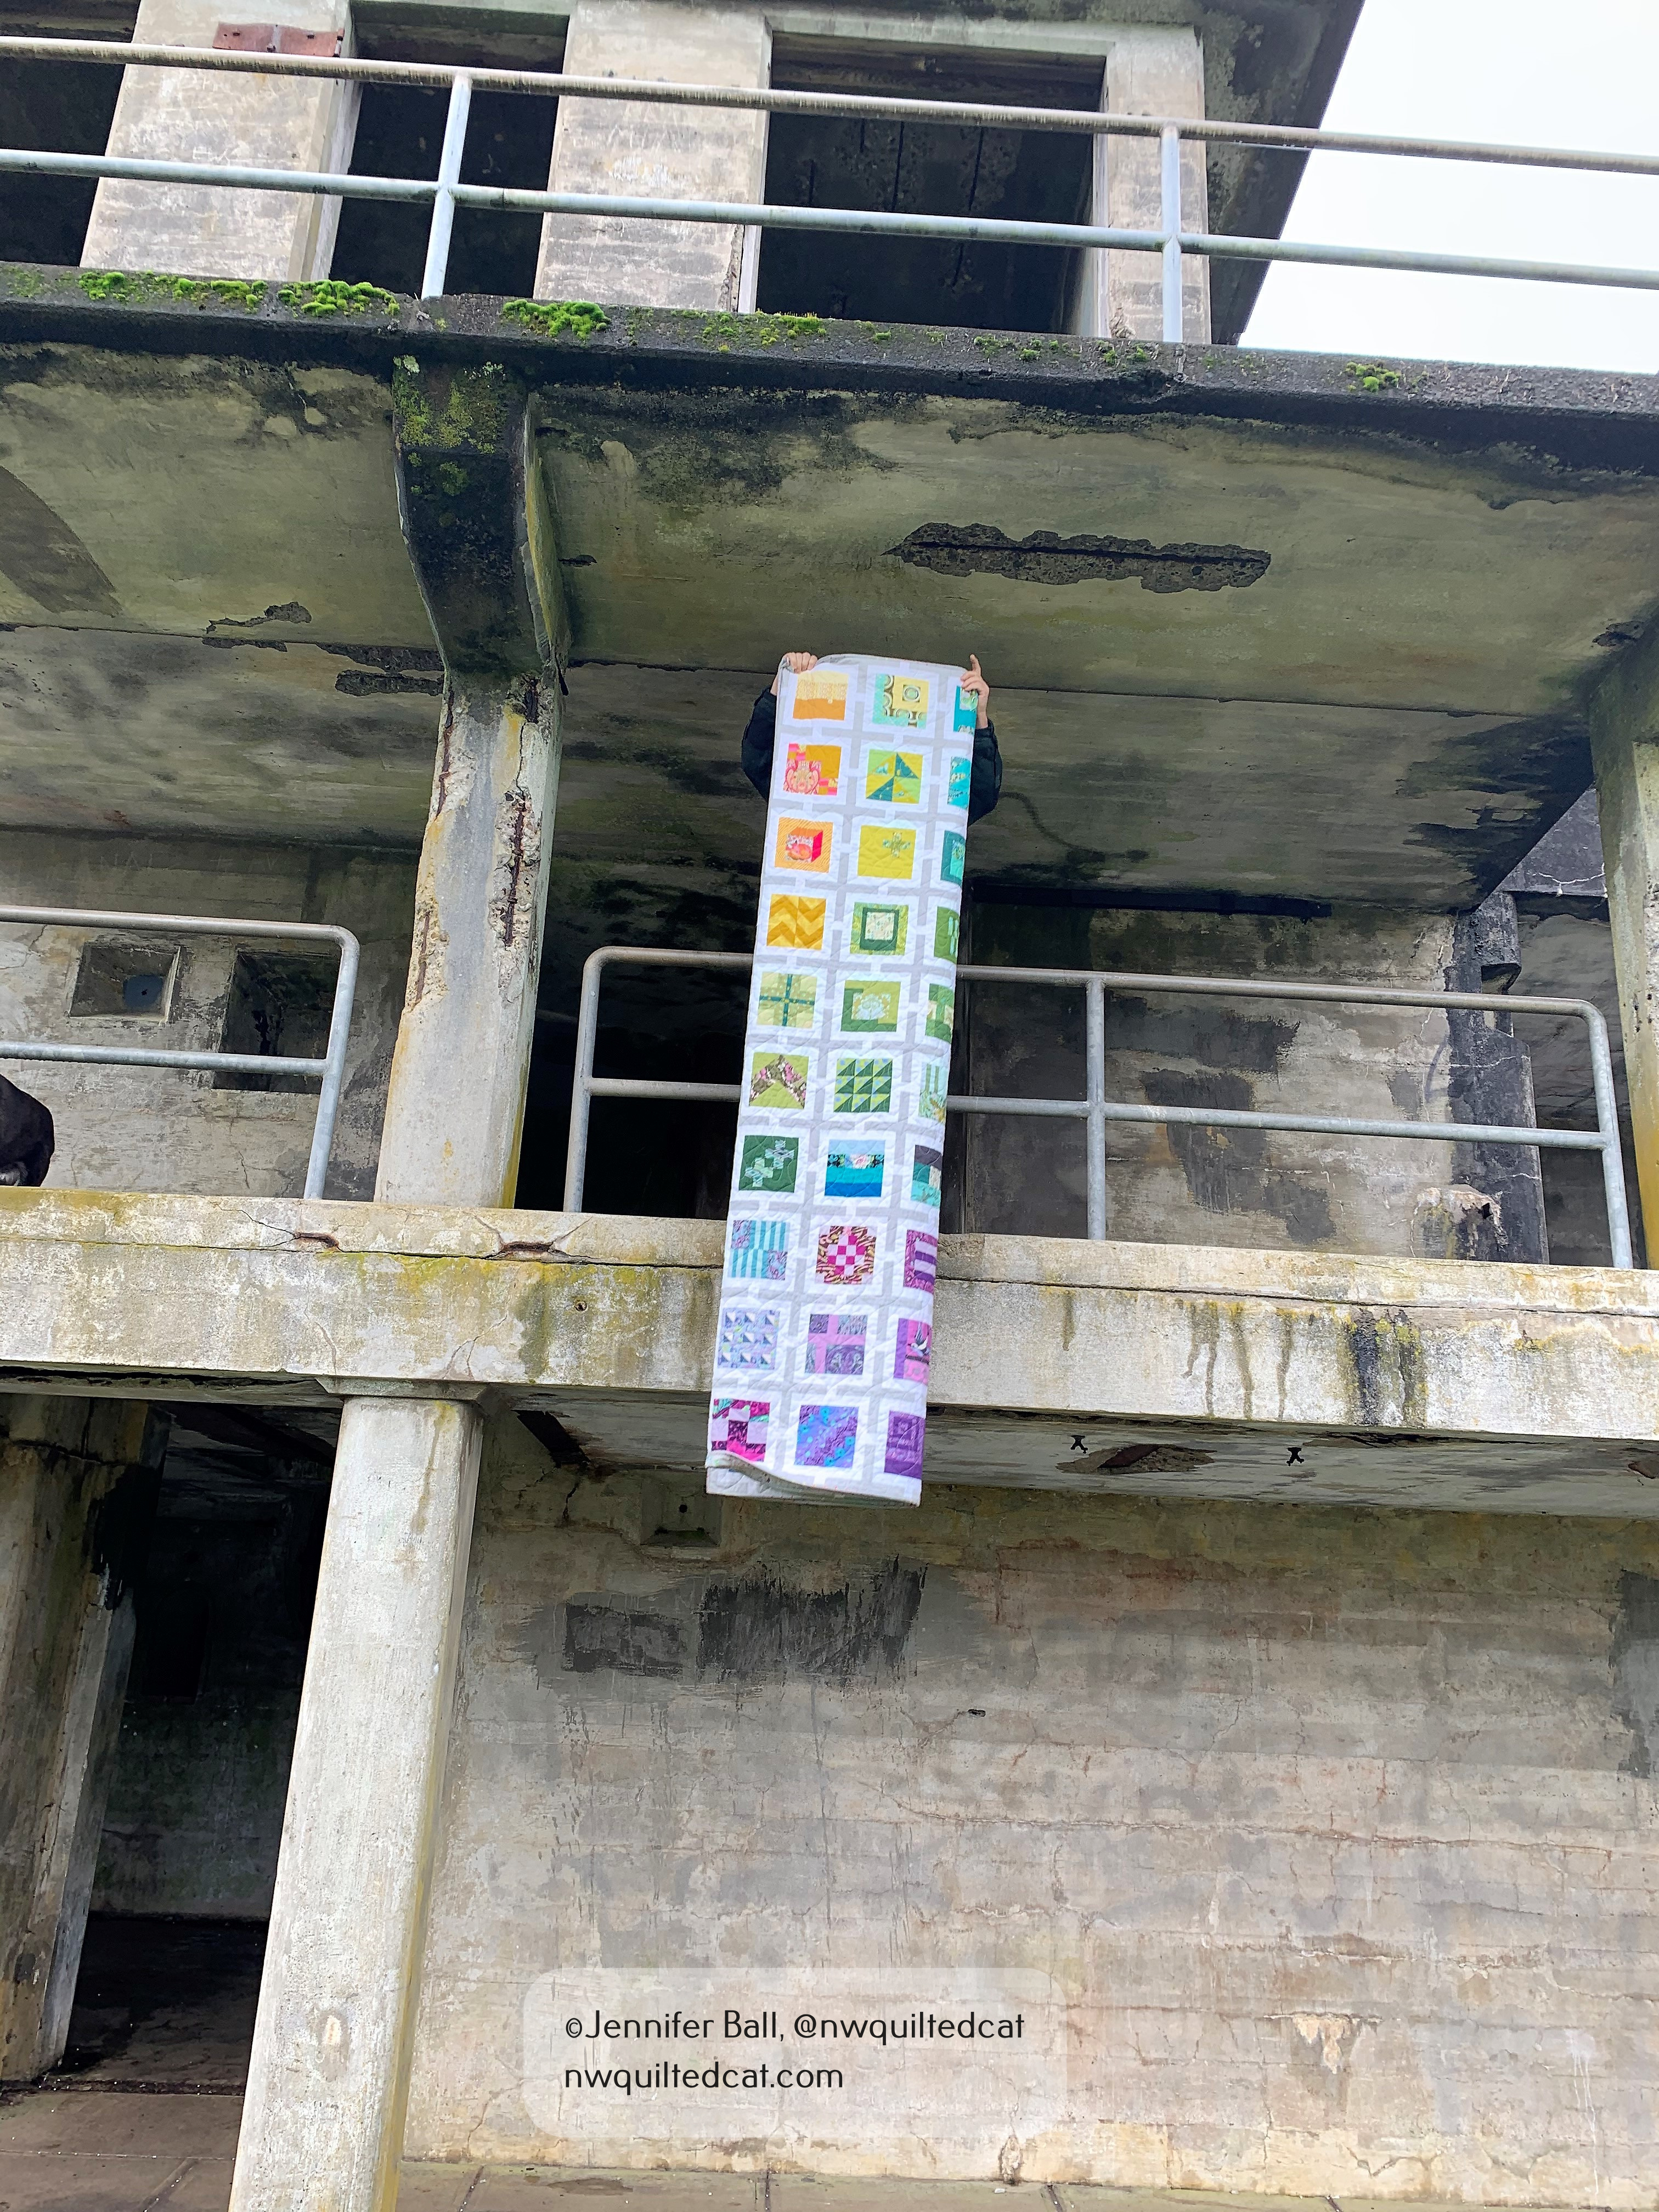
This past weekend, we took the completed quilt for a little photoshoot to Battery Russell at Ft. Stevens State Park at the Oregon coast. My hubby and son held the quilt while I took the photos. Our dog, Pepper, helped too!
Unfolding the quilt for pictures, January 2021100 Modern Quilt Blocks quilt front at Battery Russell, January 2021100 Modern Quilts Blocks back at Battery Russell, January 2021A close-up view of my 100 Modern Quilt Blocks quilt at Battery Russell, January 2021A close-up view of my pieced backing at Battery Russell, January 2021
I love this quilt! It is so bright and cheerful, and the backing is just as fun as the front. With a little luck, we’ll be able to have in-person quilt events this summer, and I just might get to take my class with Tula and show her this completed quilt.
I’ll leave you with one last picture from our day trip. We also stop to visit the Peter Iredale shipwreck when we visit Ft. Stevens. It is ever so slowly eroding away and, with this visit, we really noticed that a larger piece of the bow had disappeared since our last visit. I really need to dig up some of the pictures of this ship when I visited as a little kid to compare the differences.
Now I’m on to my next WIP, which is my Sea Glass BOM by Fig Tree. I will post an update soon!
A family member just had a baby this past week, and I wanted to send her a little gift to welcome the precious little one.
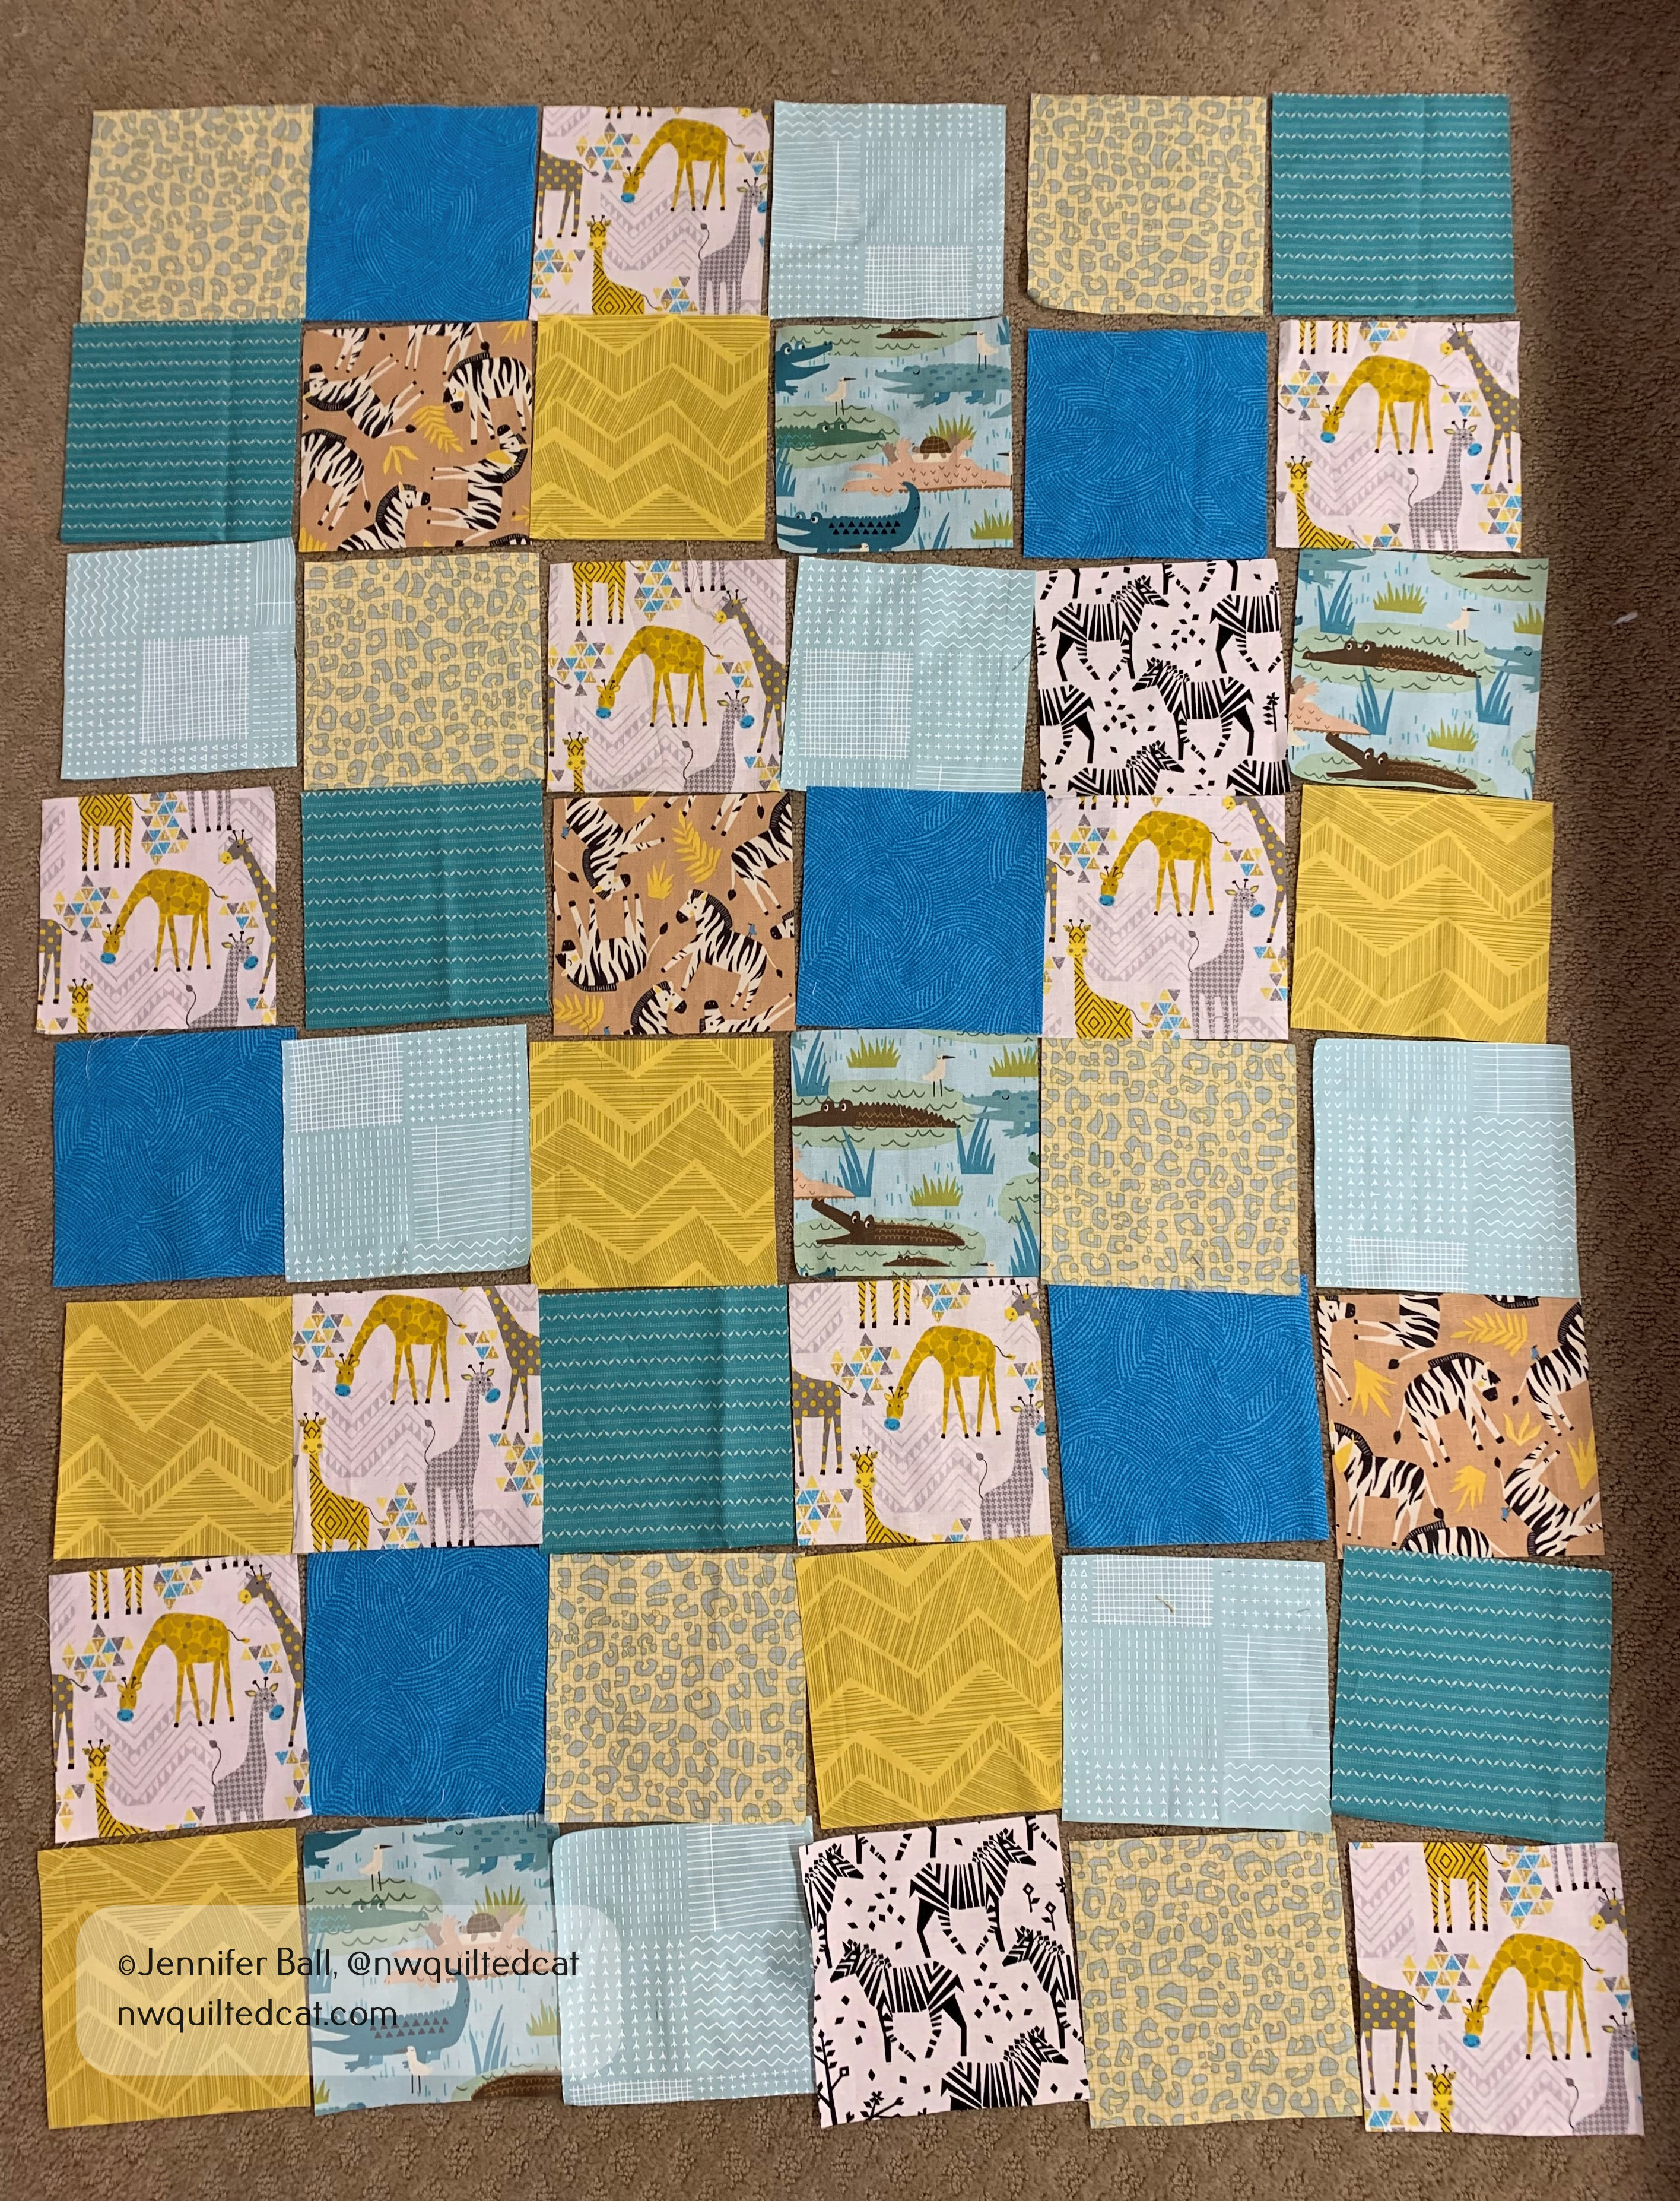
I decided to put together a simple and quick baby quilt using fat quarters and scraps from my stash. I had some super cute safari themed fabric with giraffes, zebras, and alligators that I thought would be perfect for a baby boy.
I cut out 48 squares at 5.5 inches unfinished, and then set them out in 8 rows of 6 blocks each.
Arranging the blocks
It’s was a pretty quick process to sew these blocks together, and then sew the rows together. Once I had assembled the top, I decided to add borders. However, I only had fat quarters and odd scraps, so I had to piece the borders together. I used 3″ borders all around the quilt, with giraffes down the sides and zebras on the top and bottom.
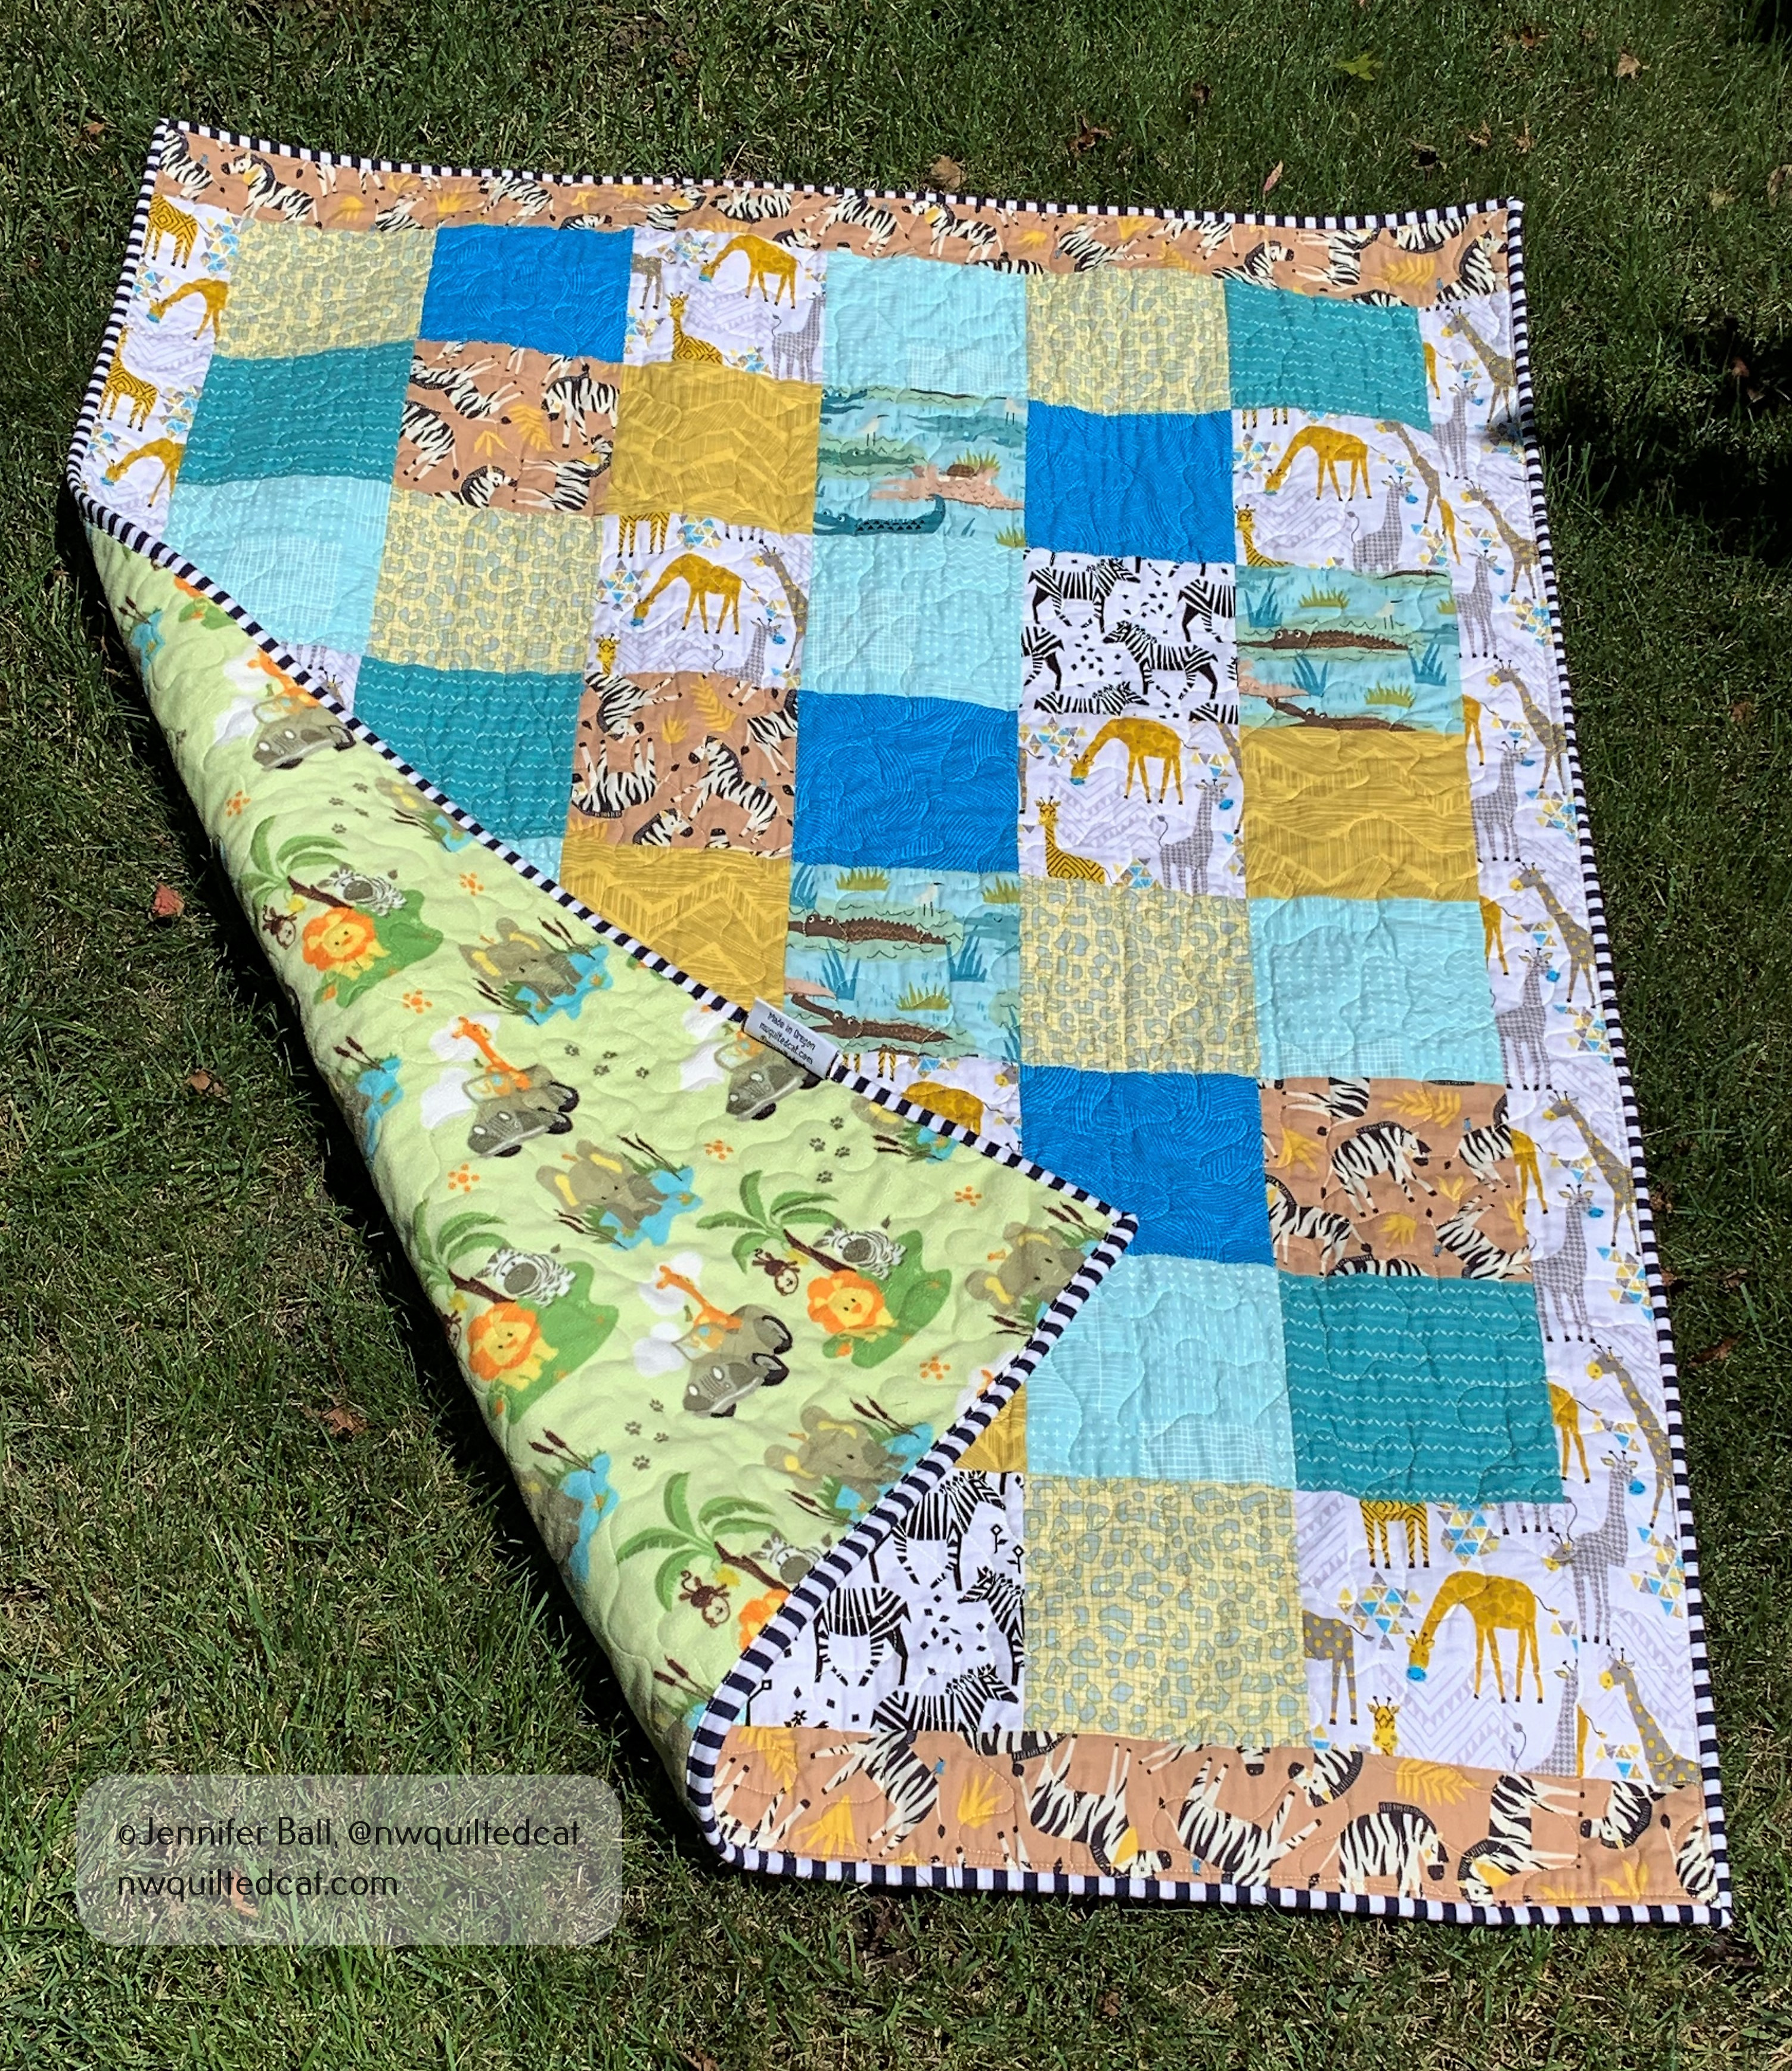
For the backing, I used a piece of minky called “Safari Jeep” by Michael Miller Fabrics. I did purchase this piece from a local quilt shop because I wanted the softness of minky, but I didn’t have any in my stash.
I did a simple stippling for quilting using Glide thread in Lemon Ice. I loved the look of the yellow thread against the quit. The minky back quilted up beautifully on my HQ Avante. The binding is a navy blue and white striped fabric.
I forgot to measure the finished quilt before I mailed it off to the new mom and baby yesterday. I think it is close to a crib size.
Here’s a look at the finished quilt, with my inspector helping:
Cow inspects the baby quilt
The completed baby quilt
I hope the mom and little one enjoy this quilt for years to come!
Last week would have been the 45th anniversary of the Sisters Outdoor Quilt show. I had planned to take classes the week before with my sister, but the classes are postponed until 2021. We decided to have a mini retreat together for some sewing and hiking.
We had fun sewing on small projects in our hotel room, visiting local quilt shops while maintaining social distancing protocols and wearing masks, and hiking in the great outdoors.
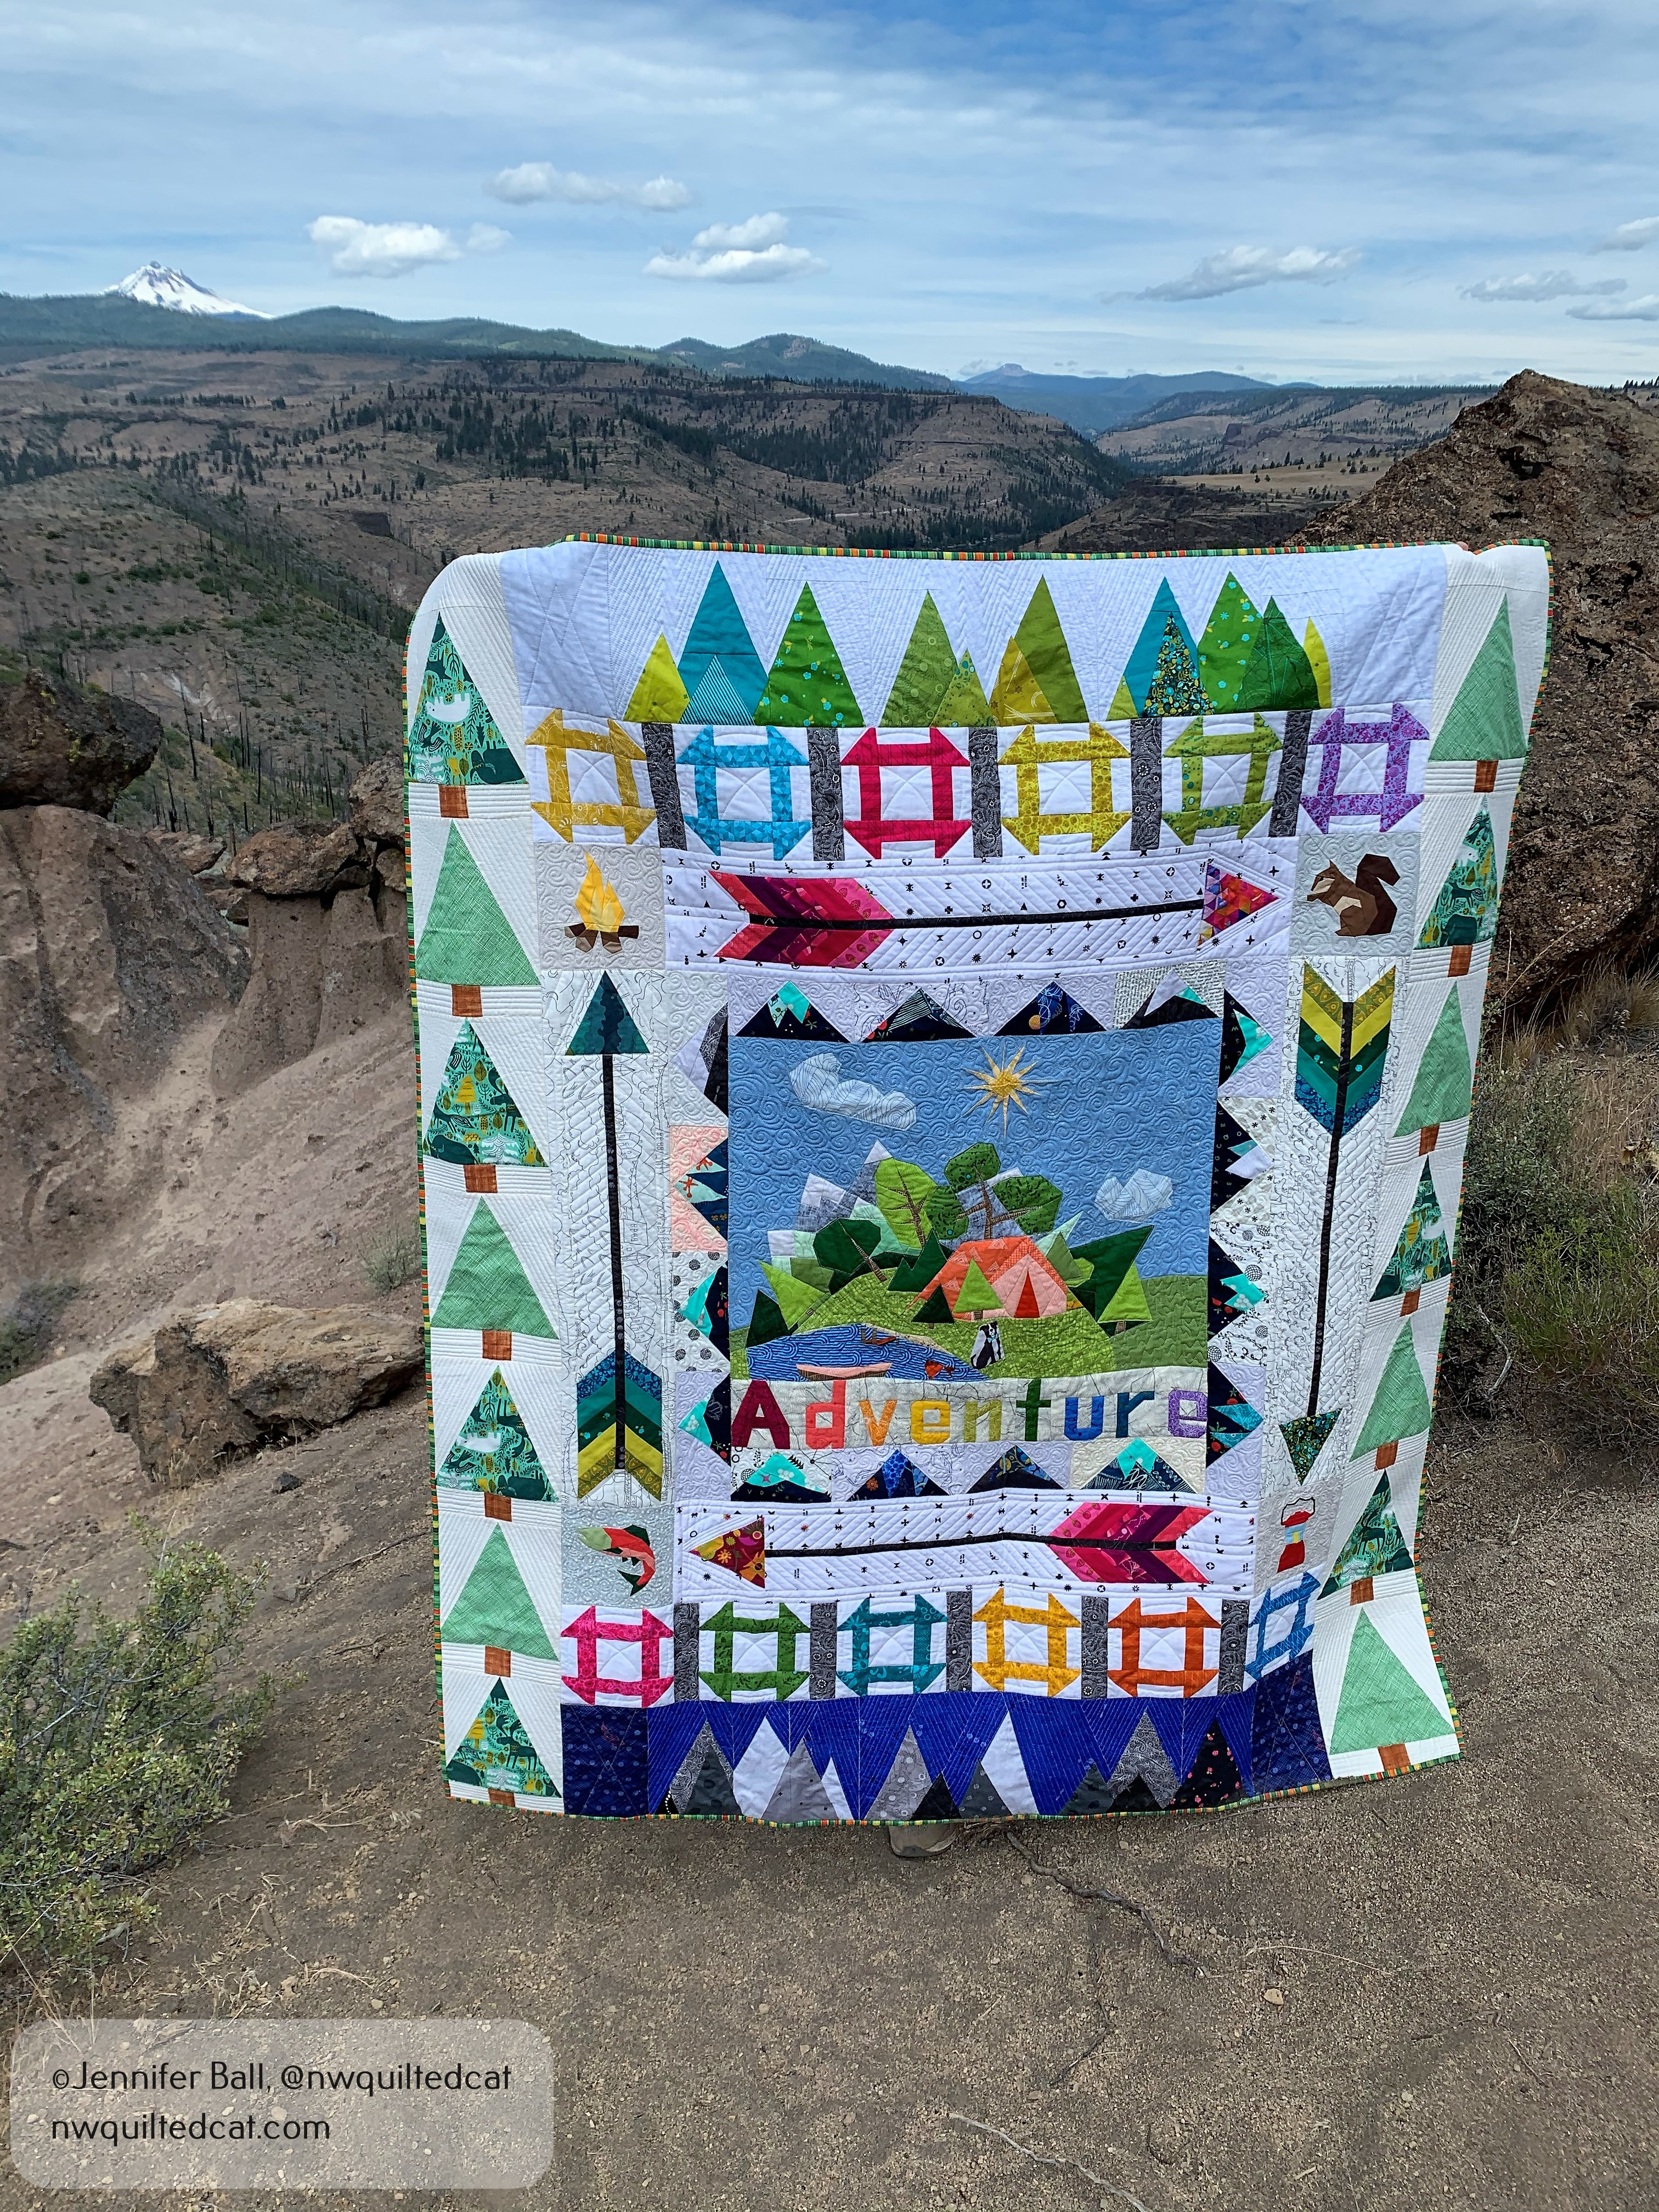
I took my Adventure themed traveling quilt with me. I made the center foundation paper pieced block from a pattern called “Camping” by Quilt Art Designs, but without the road and camper van. I also paper pieced the word “Adventure.” My quilt then traveled for about a year around the United States, where 5 different quilters added sections. In return, I added sections to the other quilters’ traveling quilts, all with different themes ranging from Harry Potter to books to gnomes.
Here’s a look at my center block, with and without the word, Adventure:
“Camping” center block
“Camping” center block with “Adventure”
Each quilter was free to add her own ideas to the quilt, keeping with my theme of travel and adventure.
Marianne added an inner border of foundation paper pieced mountains
Katie added the next border of foundation paper pieced arrows, a squirrel, a campfire, a fish, and a lantern
Kitty added churn dash blocks (one of my favorite blocks) to the top and bottom
Gigi added a mountain range in the day to the top and a mountain range in the night to the bottom
Jenn added the final left and right borders of trees
I received the quilt back this spring, and then decided to custom quilt it using ruler work and free-motion.
Quilting close-up
More quilting
Here is a look at the finished quilting with my dog quilt inspector:
Completed quilting on Adventure quilt with Pepper “helping”
My sister then helped me to photograph this quilt while in central Oregon last week. It was quite windy so it was difficult to hold the quilt still and get a good picture.
We took these pictures at Balancing Rocks, which are volcanic tuffs.
Adventure quilt at Balancing Rocks with Mt. Jefferson in the background
Adventure quilt near a volcanic tuff
I really enjoyed my first experience as part of a traveling quilt/round robin group. I even got to meet one of the quilters in person in July 2019 at the Sisters Outdoor Quilt Show, where she brought me the next quilt in line for my additions. I hope to participate in another one in the future.
I’m so excited to introduce you to Alfie the alpaca! I designed this cute alpaca block for a mini quilt exchange with my sister.
Alfie is foundation paper pieced, suitable for quilters with some paper piecing experience. The block size is about 16.5 inches by 8 inches before adding borders. The pattern does include instructions for adding the same size borders as shown in my finished quilt.
You can purchase Alfie for just $4 on my Etsy store, QuiltedCatPatterns!
Let’s take a closer look at Alfie the alpaca! I based this pattern on a photo that I took of a cheeky little alpaca in Sisters, Oregon during summer 2019. I used Cherrywood fabrics for the alpaca body, and Pie Making Day in Key Lime from RJR fabrics for the background. I pieced each section of the pattern, and then pinned the sections to a design board before stitching them together. This process helps you to catch any fabric placement mistakes before the whole block is stitched together.
The picture on the left shows all of the individual foundation sections pieced. The picture on the right shows the sections as I started to sew them together into units. I love watching foundation paper piecing patterns come together!
Alfie the alpaca, separate foundation sections
Alfie the alpaca, starting to sew sections together
Alfie the alpaca block without borders
After I sewed all of the sections together, I decided to add some off-set borders to the Alfie block. I used a very narrow inner border from a peach colored Grunge fabric on the left side and along the bottom side. This peach fabric matches the peach tone of the blankets on the llamas in the outer green border.
I knew that I would add the dark green outer border before ever designing this block. My sister picked out this fabric as our challenge fabric for our mini quilt swap. We each had a fat quarter to use in our mini quilt somewhere. The llama fabric is called Llama Life Faraway Places by Cloud 9 Fabrics.
I also auditioned many fabrics for the bottom border, and finally settled on a black and white square print that I had in my stash.
I did simple quilting with an all-over meander on Alfie’s face and body using Glide thread in Linen and Bone, free-motion swirls using Glide in Celery in the light green background print, and some diamond shapes in the dark green border. I also free-motion quilted “Alfie” in Glide Apricot Blush on the bottom border.
Alfie the alpaca block without hair
I thought Alfie might be missing something, some integral part of his cheeky self. I figured that he needed some hair!! I went to a local alpaca farm and purchased some alpaca yarn in a shade to match Alfie’s head.
I used a couching foot on my Bernina to sew the yarn to Alfie’s head in little swirls. I love the texture and dimension that the yarn added to this mini quilt. I think it brings Alfie to life!
Adding alpaca yarn to make hair
Here’s a look at my Alfie completed mini quilt from a recent day hike with his fluffy head and shorn body:
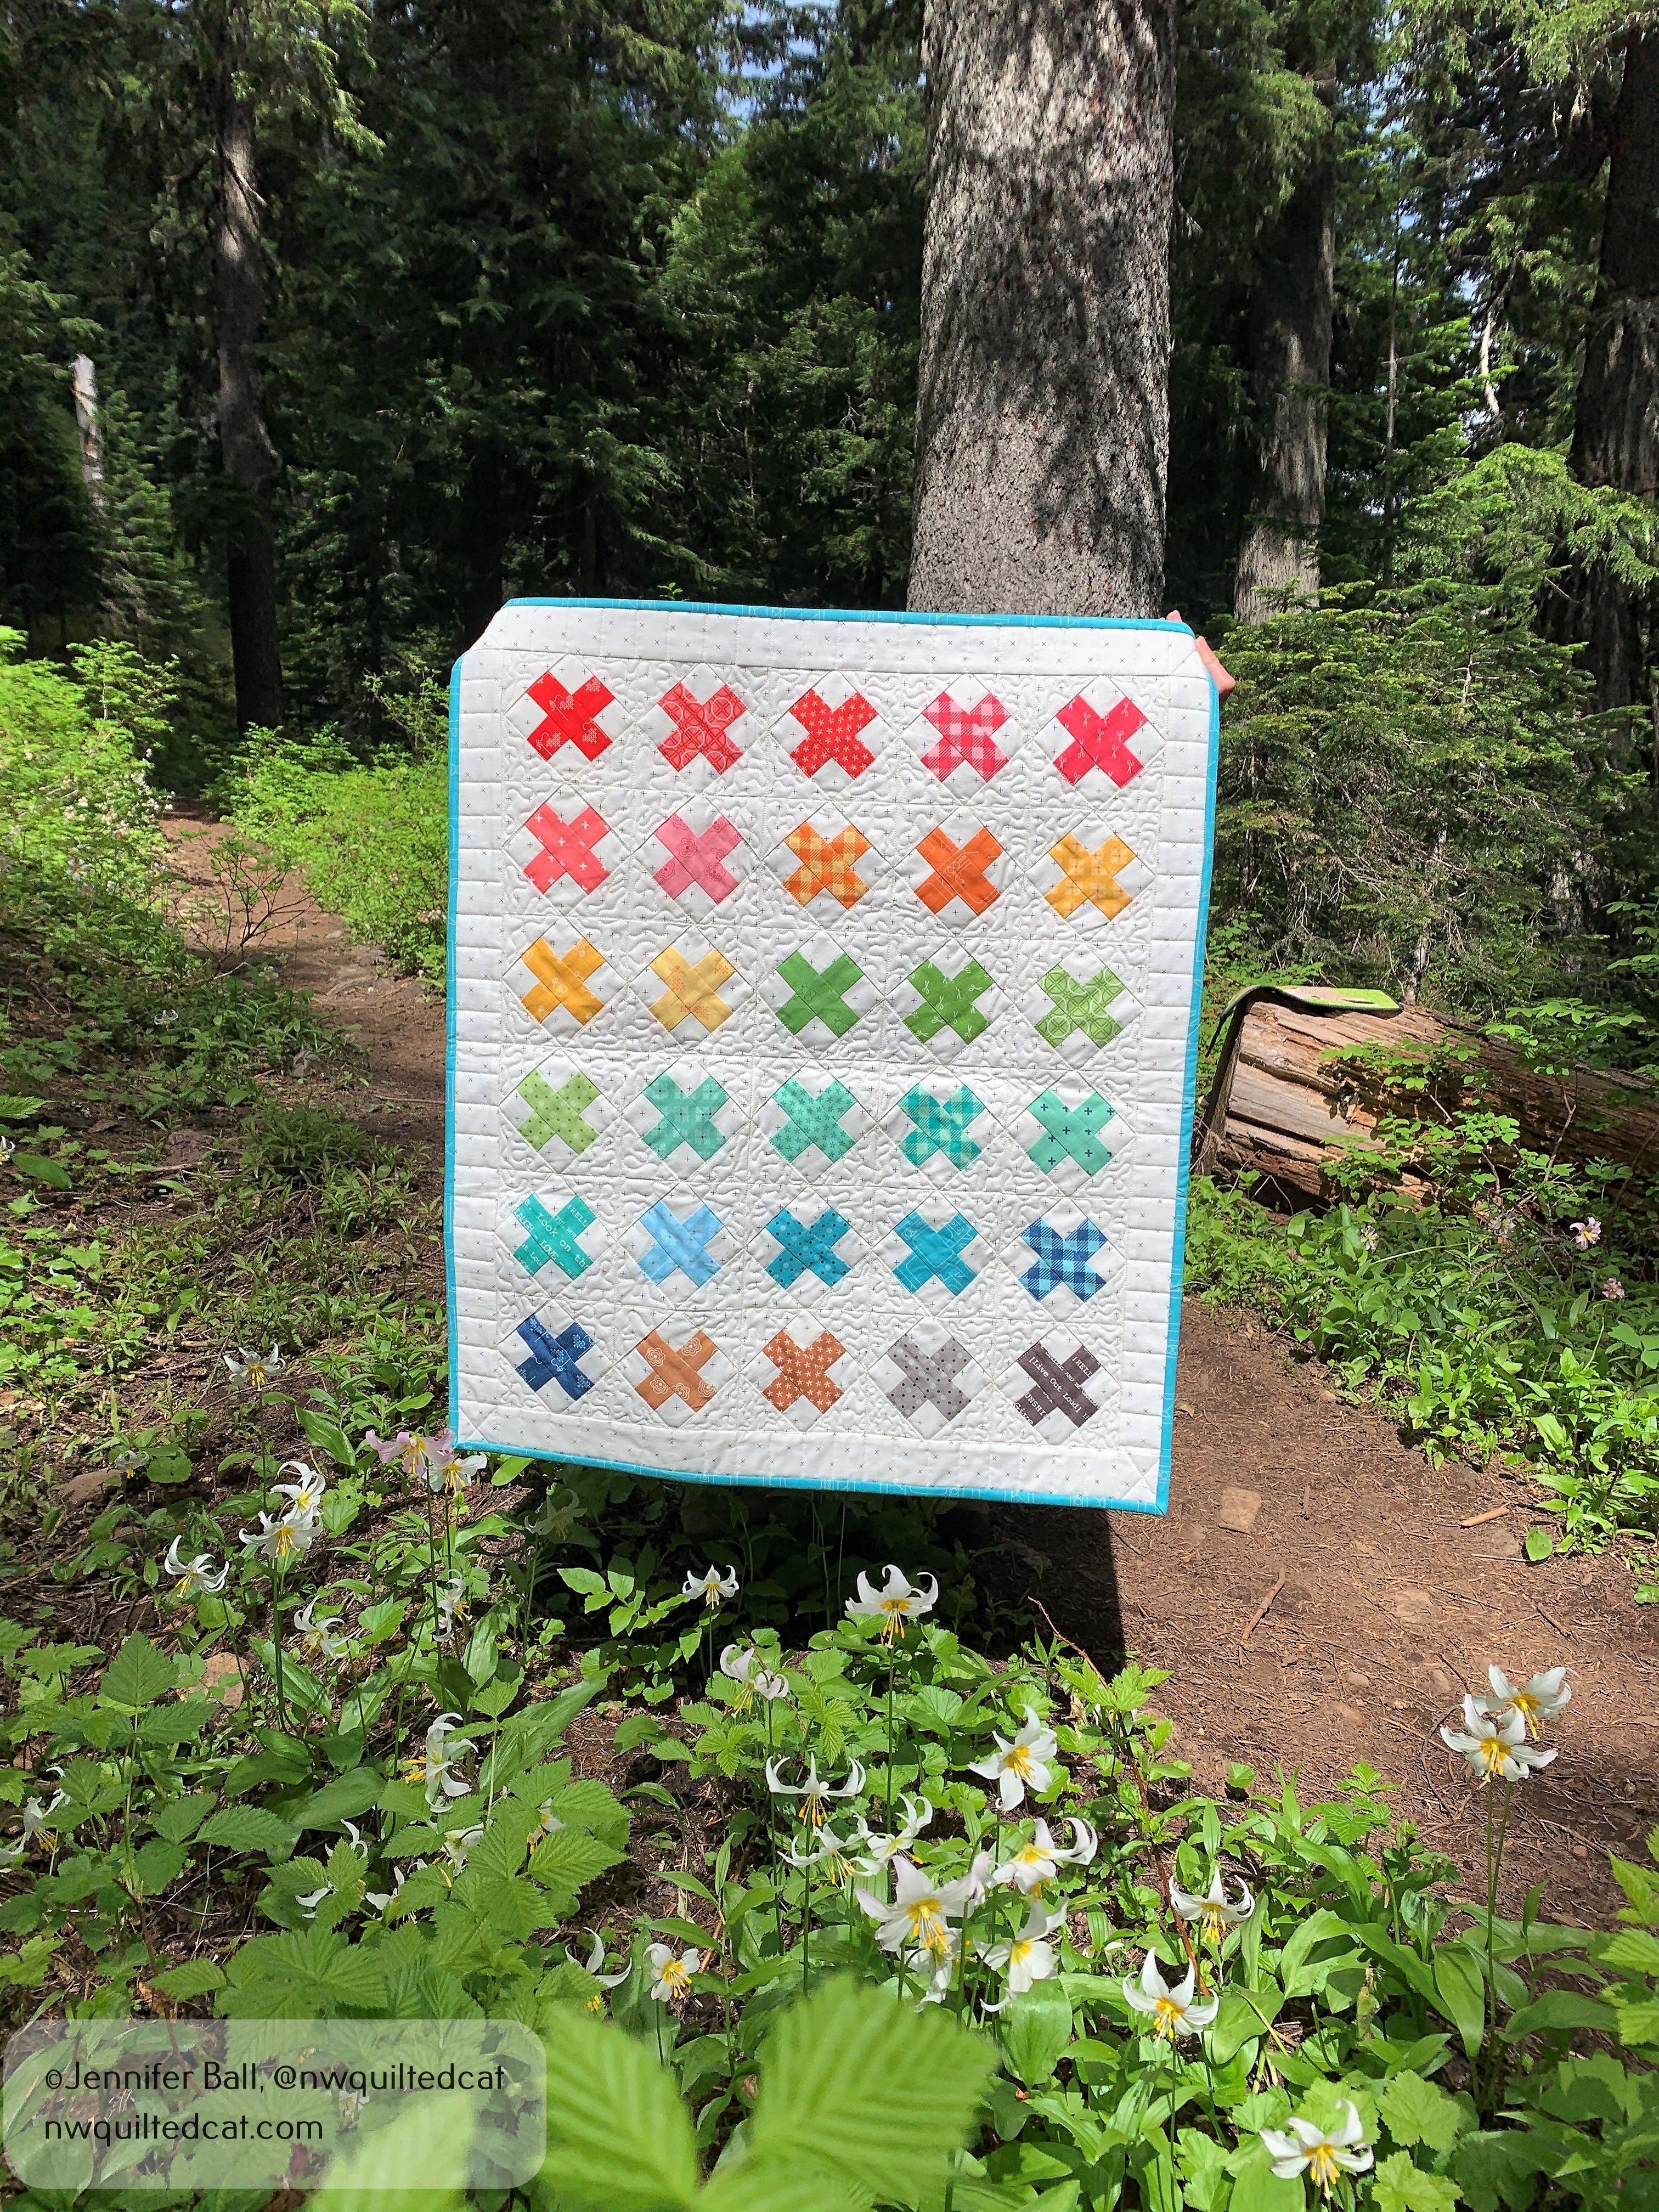
Each month, I love receiving the Sew Sampler box from the Fat Quarter Shop with exclusive patterns and notions. I’ve very behind on making the projects, but I finally completed a cheery and happy mini quilt recently called Bubblegum Kisses by Lori Holt.
This quilt finishes at about 23 1/2″ x 27 1/2″ and uses charm squares plus some background fabric. I started this quilt at a retreat in December 2017, pieced the top, and then set it aside in my to-do quilting pile. Yikes!
I pulled it out last week and found a pretty blue gingham fabric in my stash for the backing.
Here’s my quilt inspector, checking it out before quilting:
Romeo inspects my quilt sandwich
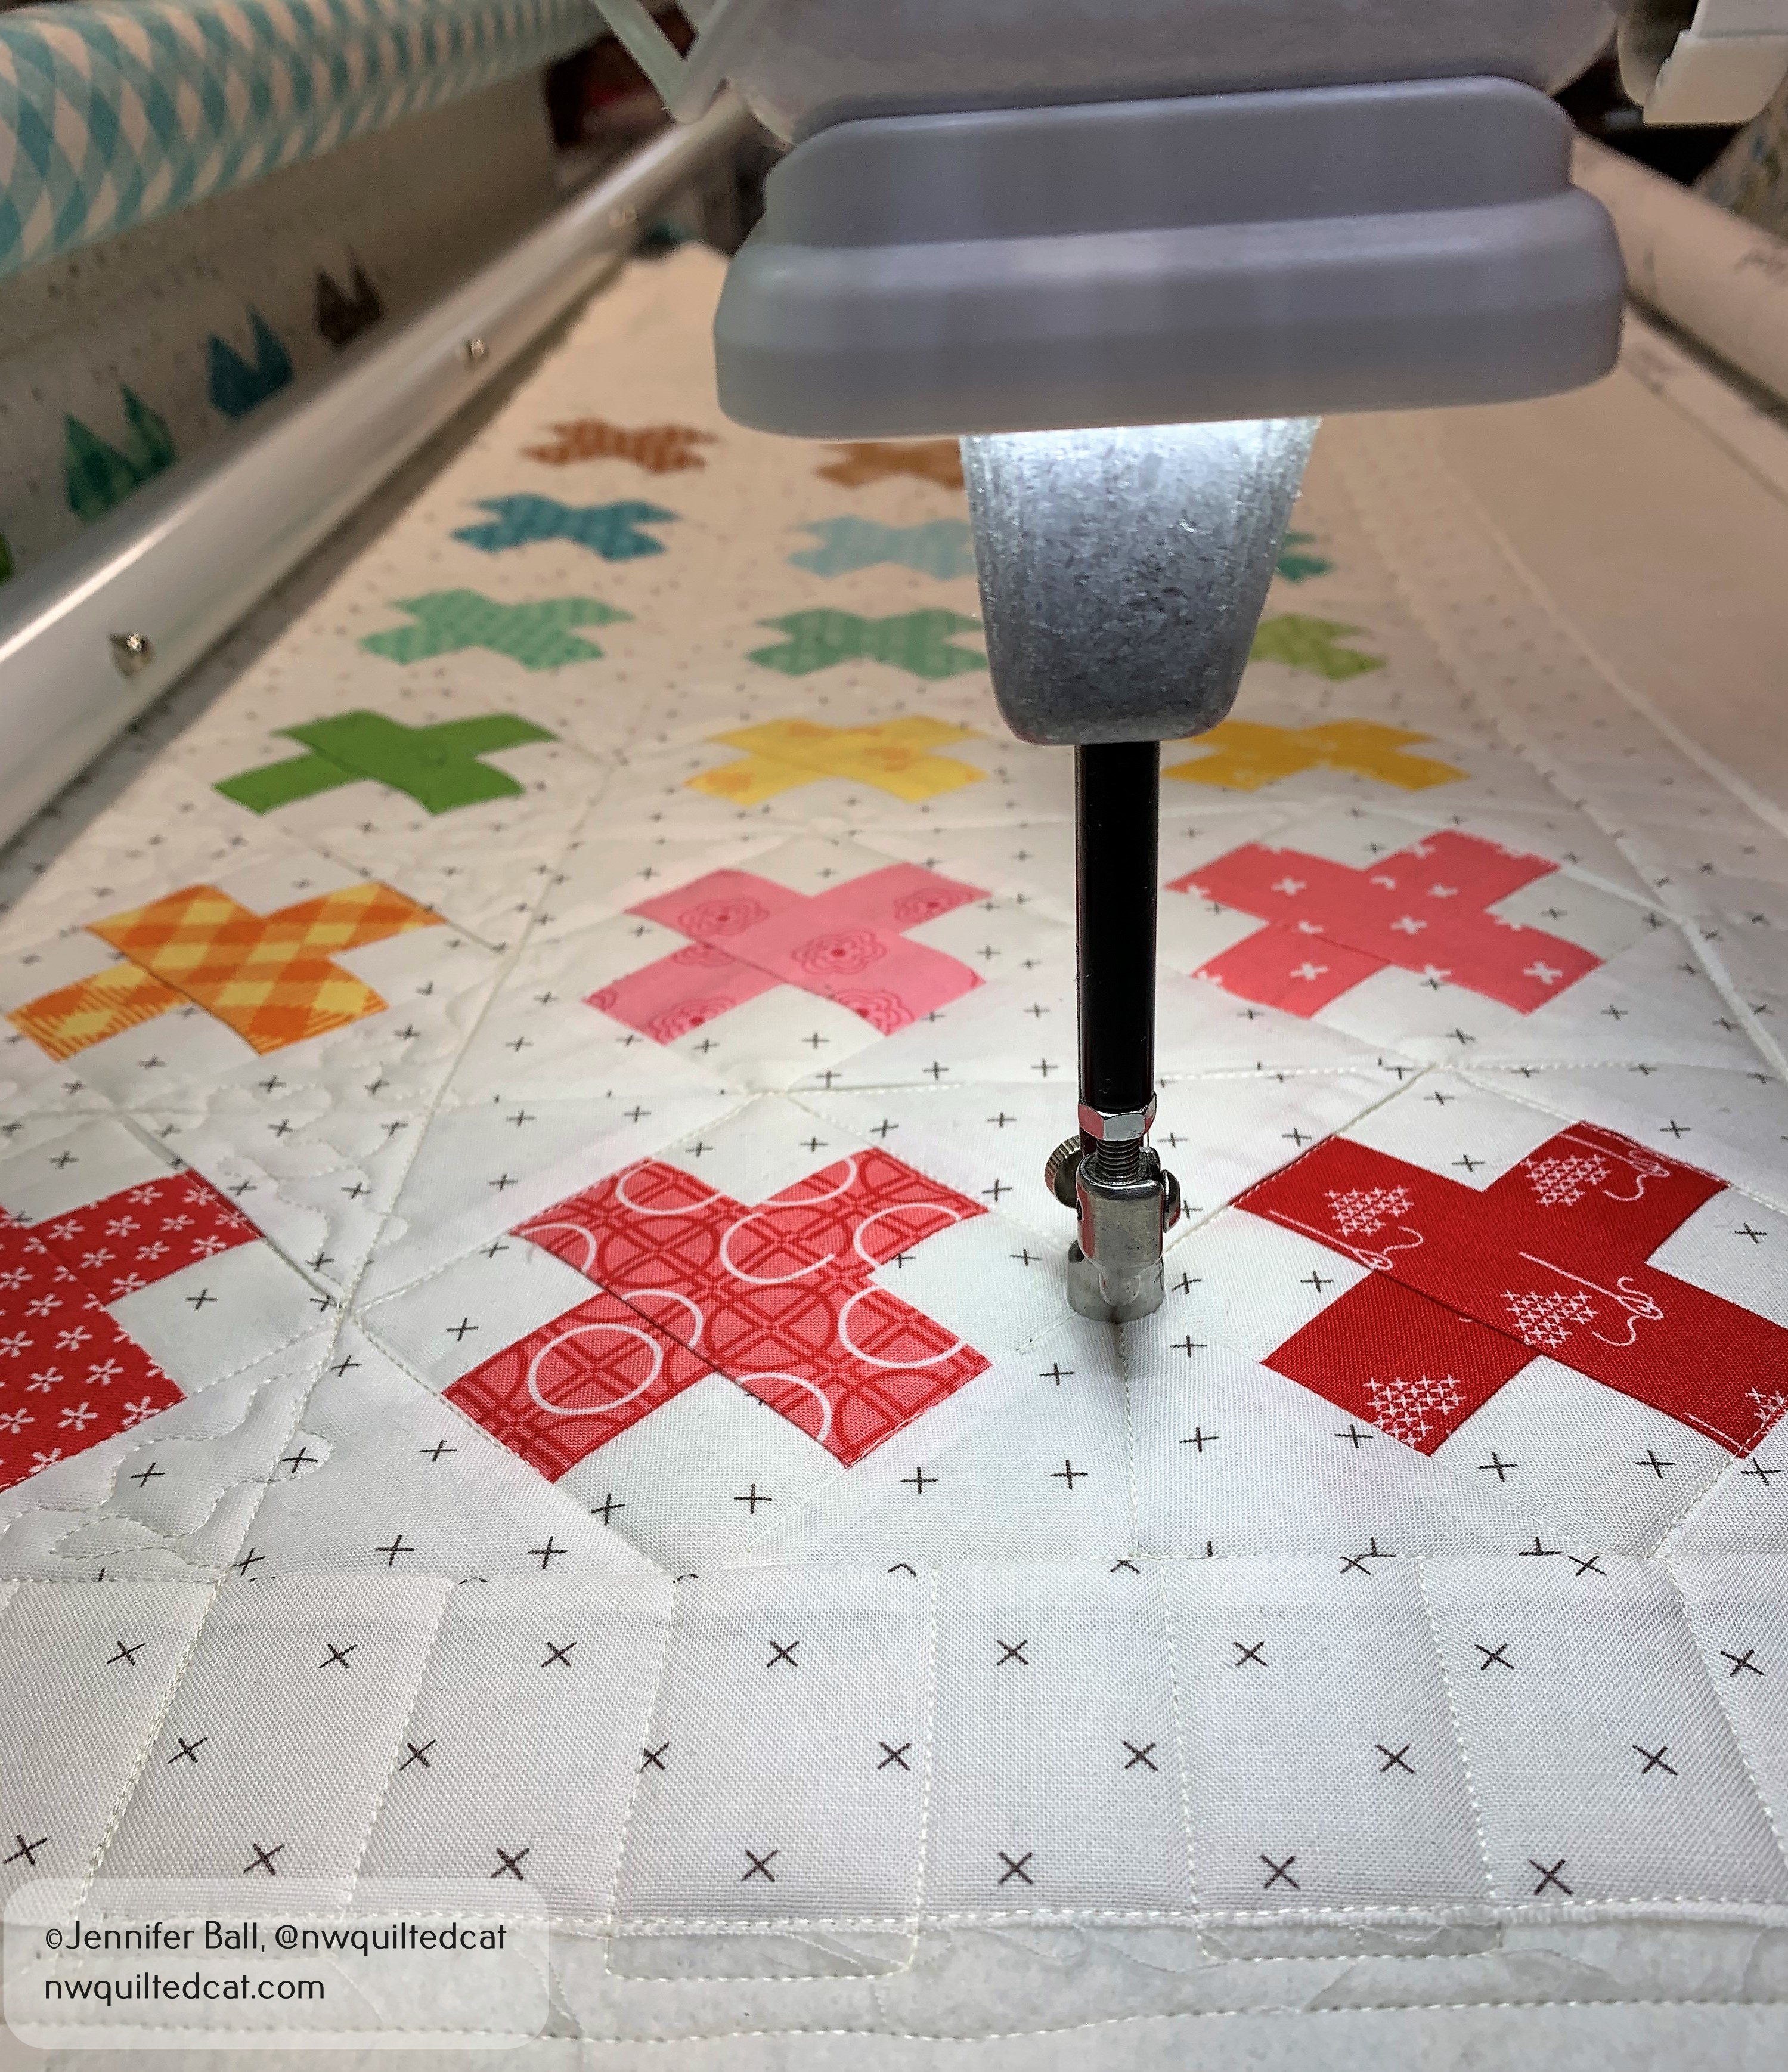
For quilting, I decided to do 1″ piano keys around the border. I also stitched-in-the-ditch around each block. I did a little free-motion meandering in between the blocks. I used Glide thread in Linen for all of the quilting. It is a nice creamy color that blended into the background fabric nicely.
Quilting Bubblegum Kisses
The binding came with the Sew Sampler box, and I love the aqua color! I finished the quilting and binding pretty quickly. I knew that I wanted to take a picture of the quilt outside, and I had a perfect opportunity this past weekend.
We hiked about 9 miles along the Pacific Crest Trail, near Mt. Hood. The temperature was perfect for hiking, about 65 degrees. The clouds played peek-a-boo all day with the mountain, but we lucked out and got terrific views.
There are so many wildflowers in bloom right now along the trail from pink rhododendron to white avalanche lilies to tall bear grass.
Here’s a picture of the finished Bubblegum Kisses mini quilt with some delicate avalanche lilies:
Bubblegum Kisses Quilt with Avalanche Lilies
These little wildflowers are just so pretty!
At our turn around point, we had an amazing view of Mt. Hood. I thought this was the perfect location for a quilt-in-the-wild photo!
Bubblegum Kisses Quilt Along the Pacific Crest Trail and Mt. Hood
What a beautiful location and great hike!
I recommended getting on the Sew Sampler wait list if you’re interested in these fun monthly project boxes! Spots do open up regularly. Now to get more projects finished!
I’m happy to share my completed Catalina Stars quilt with you. In my last post, I talked about receiving this project in my first Little Box of Figs subscription, and I showed my quilt flimsy.
I decided to keep the quilting simple on this project. I free-motion quilted a flower and swirly pattern using Glide thread in white.
Finished quilting the Catalina Stars quilt
I auditioned several choices for binding, but I kept coming back to a red striped fabric. I wanted to accent the reds in the quilt, and this binding helped to pull it all together. Yes, I do wind up my completed binding strips onto an Aurifil thread spool. I add the binding spool to my extra spool holder on my machine, and it slowly unwinds as I stitch.
Because I’m going to use this quilt as a lap quilt and a picnic quilt, I decided to complete my entire binding by machine. This not only saves time, but it holds up better with repeated machine washings.
Here is my finished Catalina Stars quilt next to a rose hedge in my yard. My trusty quilt inspector, Cow, came over right away to give it a thorough test. We had lunch together on the quilt in the sunshine!
Quilt inspector on Catalina Stars
Completed Catalina Stars quilt
I really love how quick and easy this quilt is to make! You can purchase a copy of this pattern from the Fat Quarter Shop. I’m thinking about making another version of it to give to a friend who is expecting a baby boy this summer.
I’m happy to say that I’ve finished my project in the 2020 Mini Series sew-along, hosted by Giucy Giuce and Alison Glass. Over the past 2 months, we have made 8 tiny foundation paper pieced blocks as part of this SAL plus a 9th bonus block for registered participants!
This SAL was a great virtual quilting community project to work on during COVID-19. We encouraged each other through our posts on Instagram, which you can find using the #MiniSeriesSAL hashtag.
I completed all the blocks and decided to piece them together into a “skinny mini” horizontal quilt. I added a 2-inch border to the top, bottom, and sides. I did not add any sashing strips between my blocks because I had a special place in my quilting room picked out to display this quilt.
For quilting, I used Glide thread in white and did some simple piano keys in the borders using a ruler. I also stitched-in-the-ditch around each quilt block.
Quilting my “skinny mini”
For my binding, I used a print from Tula Pink’s Zuma line that perfectly complemented the Kona cotton colors that I used for my blocks. This is the same fabric line that I used for the little green print with the seahorses, stars, and anchors in my blocks.
I’m displaying my Mini Series skinny mini quilt above a closet door in my quilting room and attached to a shelf holding some of my antique toy sewing machines. I love the beachy pop of color that it provides in that color. It also coordinates well with the Sherwin Williams Sea Salt paint on my walls!
Mini Series SAL Finished Project, A Skinny Mini!
This has been such a great project to make over the past several months. I’m happy that I kept up with the blocks each week, and that I was able to finish a project on time to get a finisher’s pin. When the pin arrives, I’ll add it to my skinny mini! My thanks to both Giucy Giuce and Alison Glass for hosting this sew-along!!