Make a Wish Postcards for SOQS + A Fabulous Coupon for Cricut Maker Machine

Hi everyone!

Today, I’m excited to share with you the 2 postcards that I made for the Make a Wish Postcard challenge for the 2020 Sisters Outdoor Quilt Show, now a re-imagined as a virtual show. I’m also very happy to share a special price and some coupon codes for the Cricut Maker machine, which you can use with fabric!

The Cricuit Maker machine normally retails for $329-$369, depending on options. However, this weekend through May 31st, you can get one for $299! You can also use the coupon code, JUNSHIP, to get free shipping through June. If you already have a Cricuit machine, you can get 40% off all materials through June 2nd. If you purchase using one of my links, I’ll receive a small commission, which I use to offset the cost of fees for running this blog.

Are you ready to see my 2020 SOQS postcards? I support the show every year by making at least one postcard using the challenge fabric.

This year, the challenge fabric was from Elizabeth Hartman.

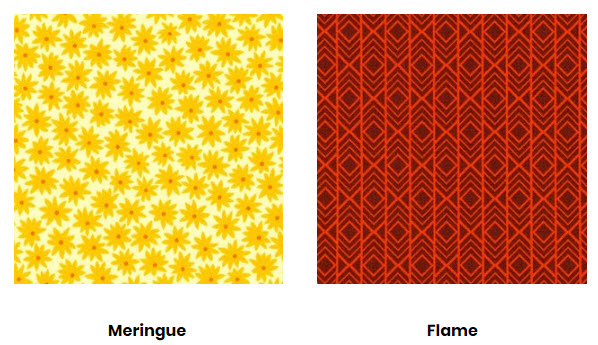
Challenge fabric for Wish Upon a Card 2020

For my first card, I used the Flame fabric by incorporating it into bird legs and the Meringue fabric by turning it into a bird’s eye. The remaining solid fabrics are by Cherrywood. I added hand embroidery elements, and added rose gold wire detail to the bird’s head. I called this postcard, “Tall Bird.”

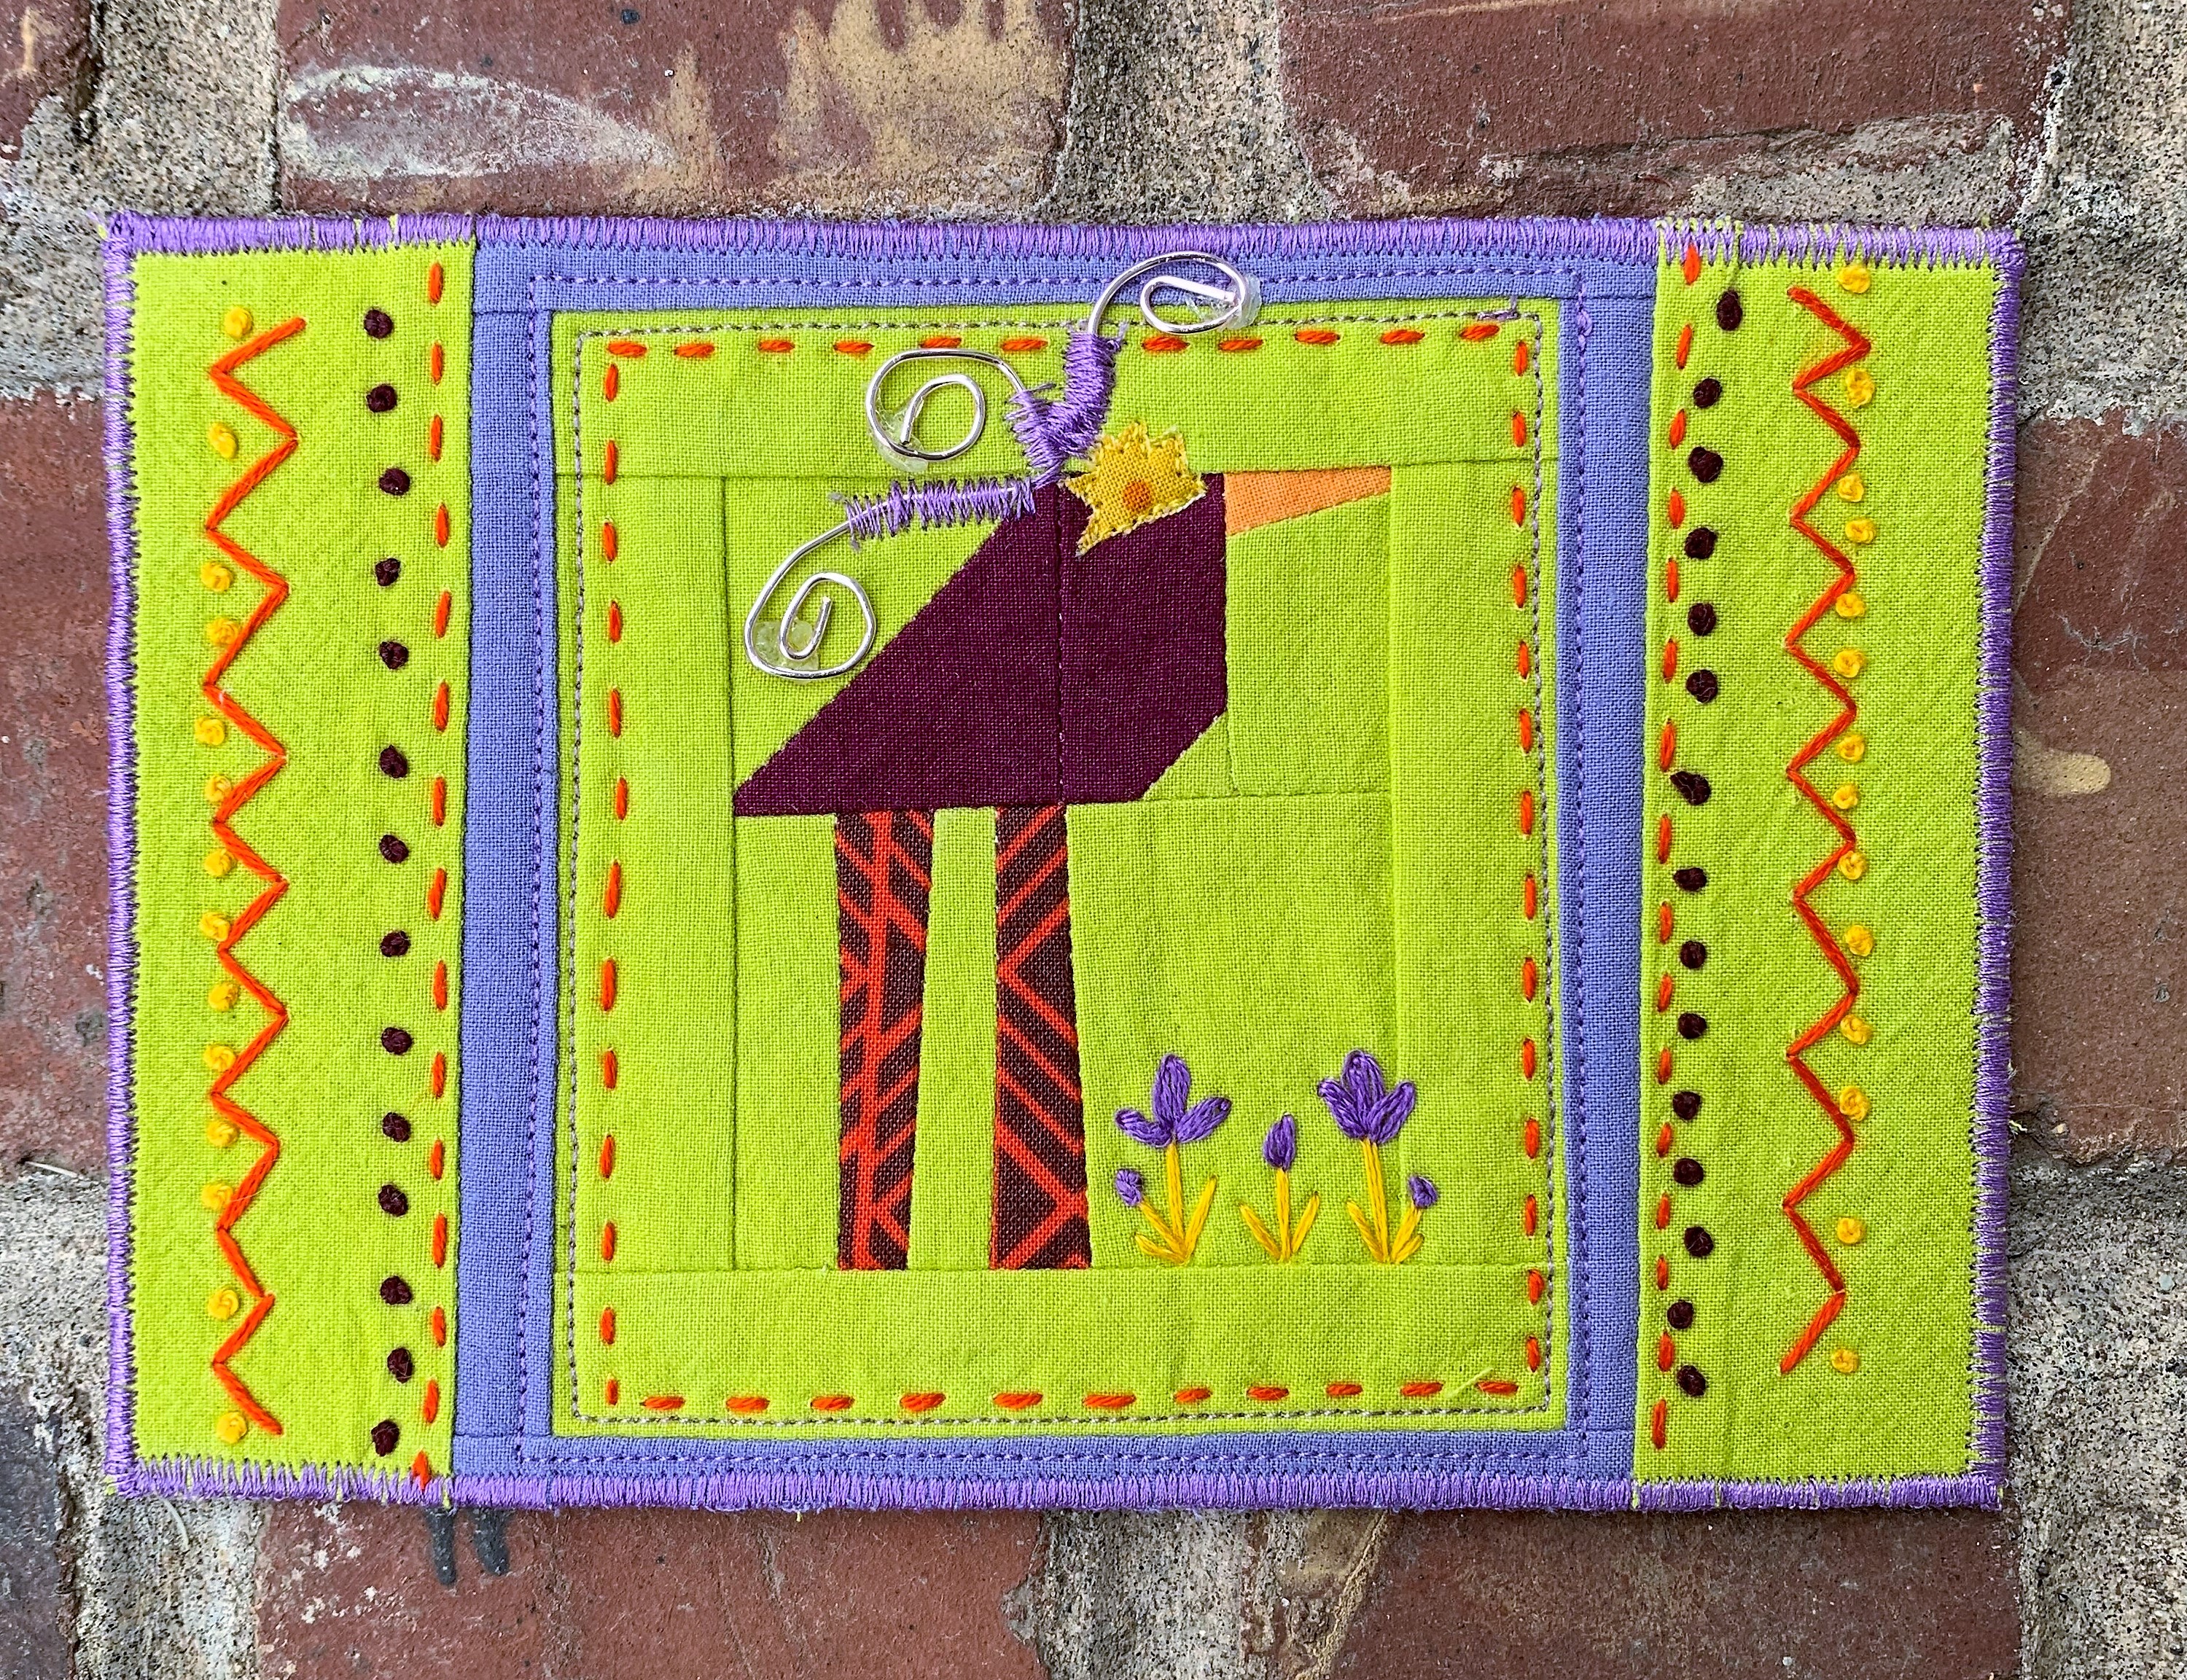
“Tall Bird” Postcard for 2020 Wish Upon a Card

For my second card, I decided to make an alpaca based on a photo that I took at last year’s quilt show while staying at the Sisters Best Western. The hotel replaced their llama herd with some young alpacas. One alpaca, in particular, gave me a charming side grin that I wanted to capture.

Designing an Alpaca Postcard

I started the process by printing 2 versions of my photo: a close-up and a full body. I traced the close-up of the alpaca face onto paper to make my pattern. I used a light table and created reverse applique pattern pieces.

The background of the card is from 3 different green batik prints, pieced together. The alpaca body is made from wool felt with machine and hand embroidered details. I used the Meringue challenge fabric as flowers in the background, along with some orange embroidered flowers.

I called this card, “Happy Alpaca!”

“Happy Alpaca” Postcard for the 2020 Wish Upon a Card challenge

Although neither of my cards won a prize in the challenge, they will both be available for sale during the 2020 Sisters Outdoor Quilt Show virtual event. I’m not sure if they were selected for framing or matting, so I’ll find out along with you! I may even bid on my open cards, lol.

I really enjoy supporting the show by making these cards, and I purchase cards each year.

Postcards for the 2020 Wish Upon a Card Challenge

Did you make a challenge card this year? I’d love to see it!

Happy quilting!

~Jen

2020 Mini Series SAL – Finished Project Reveal!

Hi everyone,

I’m happy to say that I’ve finished my project in the 2020 Mini Series sew-along, hosted by Giucy Giuce and Alison Glass. Over the past 2 months, we have made 8 tiny foundation paper pieced blocks as part of this SAL plus a 9th bonus block for registered participants!

This SAL was a great virtual quilting community project to work on during COVID-19. We encouraged each other through our posts on Instagram, which you can find using the #MiniSeriesSAL hashtag.

I completed all the blocks and decided to piece them together into a “skinny mini” horizontal quilt. I added a 2-inch border to the top, bottom, and sides. I did not add any sashing strips between my blocks because I had a special place in my quilting room picked out to display this quilt.

For quilting, I used Glide thread in white and did some simple piano keys in the borders using a ruler. I also stitched-in-the-ditch around each quilt block.

Quilting my “skinny mini”

For my binding, I used a print from Tula Pink’s Zuma line that perfectly complemented the Kona cotton colors that I used for my blocks. This is the same fabric line that I used for the little green print with the seahorses, stars, and anchors in my blocks.

I’m displaying my Mini Series skinny mini quilt above a closet door in my quilting room and attached to a shelf holding some of my antique toy sewing machines. I love the beachy pop of color that it provides in that color. It also coordinates well with the Sherwin Williams Sea Salt paint on my walls!

Mini Series SAL Finished Project, A Skinny Mini!

This has been such a great project to make over the past several months. I’m happy that I kept up with the blocks each week, and that I was able to finish a project on time to get a finisher’s pin. When the pin arrives, I’ll add it to my skinny mini! My thanks to both Giucy Giuce and Alison Glass for hosting this sew-along!!

Happy quilting,

~Jen

Making a Ski Patrol Themed Pillow, Part 2, the Reveal!

Hi everyone,

In my last post, I talked about making a pillow front as part of a special graduation gift for my nephew. Although we are not able to travel to his modified graduation ceremony, I still wanted to make him a gift that he could take with him to college in the fall.

For the pillow back, I designed a foundation paper pieced block based on the logo of the ski resort where he worked as a ski patrol member. I thought it would a fun personal touch!

I used solid Kona cottons in red, blue, and white for the ski resort logo. The background is the same ski lift print from Dear Stella that I used on the pillow front.

For quilting, I used the channel locks on my HQ Avante for hand-guided straight lines. I wanted to keep the quilting very simple. I used Glide thread in white. I did quilt all three of the pillow panels at the same time using solid pieces of backing and batting.

Quilting the ski patrol pillow panels

Once I finished quilting the panels, I cut each panel down to the appropriate size, using the dimensions in the free “Simple Quilted Pillows” pattern by Elizabeth Hartman.

Ski patrol pillow panels after quilting and trimming

I did bind the two back panel pieces using the same red Kona cotton for a nice pop of color on the pillow back. I pre-washed all the fabrics, and washed the red Kona two times with color catchers. I wanted to be sure that my nephew could remove the pillow cover and wash it without worrying about the red fabric bleeding into the other fabrics.

Ski Patrol pillow front, close-up

I really love how this pillow turned out, and I hope that my nephew enjoys it as he starts his college life!

Happy quilting,

~Jen

Making a Ski Patrol Themed Pillow, Part 1

Hi everyone,

My nephew is graduating from high school this June and, due to the COVID-19 crisis, graduation will be a bit different from normal. Only the student and 2 guests can attend a sort of “drive-through” graduation ceremony.

I decided to make him a special gift that he can take with him to college. He is an avid skier, and a member of ski patrol. What better gift than a ski patrol themed item? Initially, I thought about making a quilt, but I opted to go for a pillow instead mostly so that I could make the item in time to mail it to him for graduation.

For the pillow front, I created the classic ski patrol logo, which is a cross shape. I made the cross from Kona cotton in Cardinal, and the block background is Kona cotton in white.

Ski Patrol block dimensions

Once I stitched these units together, I had an 10.5-inch unfinished block.

Ski Patrol cross block

My pillow form is 18-inches, so I added borders to expand the size of the block. I used a fun ski lift themed fabric from Dear Stella that I had in my stash. I think the fabric line was called, “North Pole After Dark.” I just love those little ski lifts and mountains!

Ski Patrol block with borders

This ski patrol block will become the pillow front. I’m working on a custom block for the pillow back. Once I have the back block assembled, the pillow should come together pretty quickly.

In my next post, I’ll share the special block that I designed for the back.

Happy quilting!

~Jen


2020 Mini Series SAL – Week 8

Hi everyone!

We are now at week 8 in the Mini Series SAL with the last block called Criss Cross! These past 8 weeks have been very surreal, with time warping strangely due to working-from-home during this pandemic. I’m so grateful to Alison Glass and Giucy Giuce for organizing and hosting this great SAL!

The Criss Cross block is one of the more difficult blocks in the series due to the section joins. I took it slow and careful, taking time to pin the seams together and doing a basting stitch test alignment. I love the itty bitty flying geese in this block!

Here’s a look at my Criss Cross block in a field of lupine:

Criss Cross block

I also completed my bonus block this week, called String Block. This block is very easy and comes together quickly.

String Block (bonus for SAL participants)

I love all these little 4-inch foundation paper pieced blocks! We now have 2 weeks to make a project (or projects) to earn a finisher’s pin.

I’m leaning towards making a mini quilt, but I might also make little fabric baskets. Hmm, what to make!

Mini Series SAL, finished blocks

When I took a walk earlier this week to photograph my Criss Cross block, I took my hiking girl, Pepper. We dodged rain clouds, and we had a marvelous time just being outdoors together, taking in fresh air. I wanted to get some pictures of her in the field of lupine, but she had a hard time focusing with several people walking by and smiling at her. A doggie smile has the power to lift people up, even in uncertain times!

Stay tuned for my finished project with these blocks! Are you doing the SAL? Leave me a comment!

Happy quilting!

~Jennifer

Homemade Flower Boxes for Mother’s Day

Hi everyone,

If you celebrate Mother’s Day, I hope you had a good one over the weekend! We enjoyed the day at home with very warm temperatures, near 90 degrees.

My husband helped our 14-year-old design and build some little flower boxes that I could hang along the fence for my mother’s day gift. They created a plan to use some old fencing material that we had leftover after replacing our fence several summers ago.

Flower box plan

Next up, learning safety! Our son is getting some learning opportunities at home due to COVID-19 closing down the schools. He learned how to use the saw and some basic construction techniques.

Learning how to use the saw safely

He worked hard on this project all afternoon. Once he had cut all of the flower box shapes, he assembled the flower boxes with glues and nails. We let the wood glue dry, and then he treated the boxes with a sealant.

In total, he made me 4 little flower boxes! I planted different colored petunias in each one, and I know that they will bloom all summer, providing beautiful cascading color spots along my fence.

I’m so happy and fortunate that my two guys worked on this project for me. I will treasure these little flower boxes for years to come!

Enjoy!

~Jennifer

2020 Mini Series SAL – Week 7

Happy Thursday, everyone!

This week, we are working on block 7 called the “Curved Cabin” in the Mini Series sew-along hosted by Giucy Giuce and Alison Glass.

This block is comprised of 4 tiny sections, giving you the ability to create many different looks from one block depending on your fabric choices and fabric placement. Each tiny section is 2-inches by 2-inches (finished measurements).

I’m continuing my color scheme by using a Kona charm pack in Mermaid Shores with a batik background that reminds me of tiny beach pebbles.

The pieces in each section are tiny! I narrowed my final block assembly to these 3 options:

I think it’s so wonderful how this block can completely transform depending on my layout! I really liked options 1 and 2, but I ultimately went for option 1 because I do enjoy the center circle that emerged.

My Curved Cabin block with a little frog friend!

I think a quilt made just from this block would be a fun project in the future. I could make the blocks all the same, or maybe do an ombre effect.

Here’s a look at my blocks together:

Mini Series SAL, blocks 1 to 7

We now have 7 out of the 8 blocks in the Mini Series completed. There is 1 bonus block available to the participants only, so I plan to make it next week along with the final block.

If you are participating in the SAL, I’d love to hear about it. Leave a comment and let me know your Instagram handle.

Happy quilting!

~Jen

A Finished Tula Pink Jelly Roll Rug!

Hi everyone,

In my post yesterday, I talked about making my first jelly roll rug using the HomeMade fabric line by Tula Pink.

I finished the rug over the weekend, and we had a little bit of sunshine yesterday so I could get some outdoor pictures at lunch.

I absolutely love how this rug turned out! I didn’t experience any waviness or warping that can happen with this rug. I think it may be because my Bernina sits in a cabinet so I have a large, flat surface to support the weight of the rug as I stitch the rope coil rows together. I stitched slowly and carefully, using my widest zigzag stitch with Aurifil 50 weight thread.

I didn’t do any regular pressing, except for pressing each of the beginning tight corners. Those early tight corners were the hardest part for me! I did get a slight bit of puckering, but the pattern did indicate to expect that to happen.

Here’s a look at the finished rug!


My completed Tula Pink jelly roll rug!

Of course, as I was taking this picture, my quilt inspector, Cow, came sauntering out from under a bush where he had been napping. He gave the rug a thorough cat scan!

Cow gives the jelly roll rug a cat scan!

I brought the rug back inside where my best girl, Pepper, sat on it. She is a 65-pound mixed shepherd breed dog for scale.

Pepper likes the rug!

I now have the rug in my quilting room. I need to clean up some of my sewing chaos before taking a picture!

I hope that you all have a great day!

Happy quilting,

Jen

Making a Jelly Roll Rug for my Quilt Room

Hi everyone,

This weekend, I made my first ever Jelly Roll Rug using the pattern by RJ Designs. What is a jelly roll rug? It’s a rug that you make using 2.5-inch strips of fabric and batting. This rug is similar to the braided or crocheted types of rugs that quilters and sewists have made for a long time, but updated to use modern materials.

You might notice that not all fabric manufacturers label their 2.5-inch pre-cut fabric strips as jelly rolls. Moda Fabrics uses the term “jelly rolls,” but other manufacturers might call a similar product design rolls, strip sets, or other names.

If you don’t want to purchase 2.5-inch pre-cut rolls, you can always make your own strip sets from yardage.

The batting strips are similar. You can buy pre-cut 2.5″ batting strips by Bosal called Katahdin On-A-Roll in either 25 yard or 50 yard rolls or you can cut your own from batting leftovers.

I used HomeMade Design Roll for my rug. This is an adorable new line of fabric using bright colors and features items that quilters use every day. I thought it would be the perfect collection to use to make a rug for my quilting room. I had purchased 2 rolls of Katahdin back in 2018, but I was waiting for the just the right fabric collection to come along and Tula really delivered!

This pattern takes a ton of bobbin thread! I pre-wound 5 bobbins, but I needed about 7 total. For me, it took the longest to create the fabric “rope,” which is the 2.5-inch fabric and batting strips folded and stitched together. I’d guess that this step took almost 4 hours.

Here’s a look at my jelly roll rug coil. Doesn’t it look fun?

Once I had my jelly roll rug coil finished, I started sewing it to form the rug on my Bernina. I used my widest zigzag stitch, and started going round-and-round.

Look at my rug growing under my needle!

My jelly roll rug is growing!

It took another 2 hours or so to stitch my rug together. I’m planning on taking some pictures of it today in the afternoon sunshine. Come back tomorrow where I will reveal my completed jelly roll rug!

You can purchase all the supplies to make a rug from your local quilt shop or from the Fat Quarter Shop. I get a small percentage of sales from this link to help me with the costs of this blog.

Happy sewing!

~Jen

2020 Mini Series SAL – Week 6

Hi everyone,

Happy weekend! We are getting some spring rain showers, which I’m sure the plants are loving. I planted a few color spots in some patio containers recently so all those tender roots are enjoying this mild weather. We are supposed to get some warmer sunny days later in the week, which I will love!

Today is the end of week 6 in the Mini Series sew-along, hosted by Giucy Giuce and Alison Glass. We made the Triangle Geese block this week, and it went together pretty fast!

I’m continuing to use my Kona cotton charm square pack called Mermaid Shores with a lovely batik background that reminds me of tiny beach pebbles.

Here’s a look at my Triangle Geese block with my friend, Victor. He’s wondering where the path might lead him . . .

Victor poses with my Triangle Geese block

Well, in Victor’s case, the Triangle Geese block was going to lead to the other blocks that I have sewn so far in the SAL, but my quilt inspector, Cow, had other ideas.

This picture is what happens when trying to photograph quilt blocks with a curious cat. Of course, as soon as I took the picture, he feigned disinterest and started to take a bath. Victor is quite shocked!

Cow, the quilt inspector, interrupts the photo taking

Eventually, Cow decided that taking pictures of miniature quilt blocks was too boring for him, and he strolled over to the grass to watch birds.

I got another picture of Victor with all 6 of my blocks. Victor is still miffed, but decidedly happier to have the blocks all to himself.

Victor with blocks 1-6

We now have just 2 blocks left in this SAL before creating a finished project. I’m still undecided on my project, but I have a few ideas that I’m pondering.

Happy quilting!

~Jen