2020 Mini Series SAL – Week 2

Hi everyone!

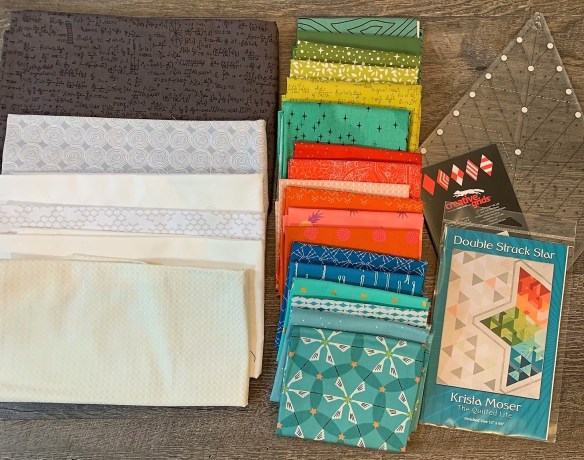
Yesterday, quilters everywhere kicked off week 2 of the 2020 Mini Series hosted by Giucy Giuce and Alison Glass. You can read about my fabric selections and the first block, the Log Cabin, here.

The block this week is called the Courthouse Step, and it is very similar to the Log Cabin block with some minor differences. The Log Cabin took longer for me to sew because each piece slightly overlaps the prior piece, radiating outwards into the classic log cabin shape. Each piece must be pressed and trimmed separately before moving onto the next piece.

The Courthouse Step block sews together much quicker than the Log Cabin block because the little rectangle pieces on each step face each other, enabling me to sew two pieces before pressing and trimming.

For example, in the photo of my Courthouse Step block below, you can see each color is mirrored on the opposite side.

Courthouse Step block with a trillium

I love the look of these two blocks together. You can see the similarity between the blocks, but the differences really make them shine on their own.

Log Cabin and Courthouse Step with a trillium

While I was taking pictures of these blocks in a wooded area near my house, I saw a mama deer and her two fawns! Look closely in the background of this picture where you can see mama and one fawn.

Courthouse Step block with deer in background

Next week, I’ll post my completed Pineapple block. Are you participating in the SAL? It is completely free to join, but you do have to purchase the patterns either from your favorite quilt store or online at Alison’s website.

Happy sewing!

~Jen

Making Face Masks, Assembly Line Style

Hi everyone,

In my previous post, I mentioned that I’m making face masks for my sister, who is a nurse practitioner.

I’m making a few each day after work, and I’m mailing them to her in batches. I’ve made approximately 25 masks so far. I have run out of 1/4-inch elastic, but I do have some 1/8-inch elastic. I think I have enough of the smaller elastic to make another 20 masks or so. After that, I will start making fabric ties for the masks.

I’ve become really efficient at mask making. Initially, I was making complete masks, one at a time as I learned the pattern. Now, I’m making them assembly line style.

After work yesterday, I did the first mask making step upstairs in my sewing room. I stitched, right-sides together, about a dozen masks with the elastic inserts.

Then, I brought the masks downstairs to work on the next step while watching a movie with my husband and son. After turning each mask right side out, I’m use the new Oliso mini iron to press each mask.

This little iron is very portable and gets nice and hot for my smaller quilting and sewing projects. I do use it on a wool pressing mat so that I do not need to have an actual ironing board.

Once I press the masks, I eyeball the 3 pleats and pin them.

I now have a set of 12 masks to take back upstairs and finish the top-stitching.

Pressing Face Masks with an Oliso mini iron

I find that making the masks in batches of 12 goes pretty smoothly for me, and I don’t feel overwhelmed by the project.

I’m very happy to be able to contribute in this small way. My sister is sharing these masks with her colleagues until the medical grade masks are available again.

Stay safe and happy quilting!

~Jen

Making Masks for COVID-19

Hello everyone,

Yesterday, I had a phone call with my sister. She is a nurse practitioner who works in a cancer clinic. They are out of face masks, and they are not expected to get any more for a while. She has to treat patients without a mask.

I offered to make her some fabric masks. While they are not as effective as medical grade masks, they are better than nothing.

She asked for 2-layer masks in light colors. The light color allows her to see easily any foreign material that may have splattered onto the mask.

I’m using the Deaconess face mask pattern. Click the link to see printed instructions as well as a video on how to make the masks.

If you want to help make face masks, check with your local hospitals and clinics first. Not all places want homemade face masks. You can also check Million Masks A Day, organized by Just Wanna Quilt, for a list of places accepting homemade mask donations.

After work yesterday, I made 8 face masks, and I will mail those mails out today. I plan to make more each day this week. Each mask takes about 15 minutes to make.

The Deaconess face mask pattern uses double-layered fabric and elastic bands. They are triple pleated. I used batik fabric because it has a denser weave than regular quilting cotton. These face masks are double-stitched so they will hold up well to multiple washings. I made 7 masks with elastic and 1 mask with ties. My sister is going to let me know which style she prefers.

Here’s a look at the masks that I made:

My Tula Kitty Modeling a Homemade Face Mask

Homemade masks with elastic bands

Homemade masks: 1 with elastic and 1 with ties

Stay safe and happy quilting!

~Jen

2020 Mini Series SAL – Week 1

Hi everyone,

Have you heard about the 2020 Mini Series Sew Along hosted by Alison Glass (#alisonglass) and Giucy Giuce (#giucygiuce) ?

It’s a 10-week sew along with 8 tiny foundation paper-pieced blocks plus a bonus block for those participants who sign up on Alison’s website. The SAL is free; however, you do need to purchase the patterns. You can find the patterns on Alison’s website or from various quilt stores that she mentions

Here are my fabric selections for the SAL:

  • A Kona charm square pack called Mermaid Shores
  • A batik fabric for the background that reminds me of pebbles on a beach
  • A Tula Pink fat quarter from the Zuma line with little stars and seahorses

Fabric Selection for 2020 Mini Series SAL

I’m making the 4-inch blocks rather than the 8-inch blocks due to the length of my charm squares.

For week one, we are making the classic log cabin block. I’m an experienced foundation paper piecer so I already had an Add-An-Eighth ruler on hand as well as some very fine 80 weight piecing thread. The 80 weight thread is important with smaller blocks because it is less thick than 50 weight thread so your block presses flatter.

I fuzzy cut a little star for the very center of my block from the Zuma fat quarter. You can see it in the picture with the dime for scale.

Here are some pictures of my log cabin block:

Week 1: Log Cabin Block

Week 1: Log Cabin block with dime for scale

Week 1: Log Cabin Block on Tree

Week 1: Log Cabin block on a stump

I really love these colors together! I’m leaning towards making a small wall-hanging quilt with the blocks from this SAL. I may make a few extra of some of the blocks, but I have’t entirely decided.

Here’s a look at the back of the block. I will keep the paper on for stability until I sew the block to another block or sashing.

Week 1: Log Cabin back of block

Are you participating in the SAL? Leave me a comment below!

Happy stitching!

~Jen

Yoga Mat Carrying Bag

Happy Friday, everyone!

I hope that you and your family are healthy and safe in these uncertain times. I usually attend a yoga class twice each week during my lunch breaks at work. While these classes are temporarily canceled to keep everyone safe, I decided to keep up with my stretches by using yoga videos online.

I have a home yoga mat that I wanted to keep clean while not in use. Why not make a yoga mat carrying bag?

I had some fun yoga themed fabric in my stash from Michael Miller’s Namaste Spa collection. This fabric is mostly sold out, but a few quilt stores may have some left if you do an online search.

I used these supplies:

  • Main body is Good Postures in gray
  • Bag bottom is Namaste in orange
  • Handle is Chakra Stripe in Happy
  • Liner is muslin
  • Thread is Aurifil 50 weight in cream

I have a standard sized yoga mat so I searched online for some yoga bag patterns. I wanted a pattern with a draw-string instead of a zipper because I didn’t have a large enough zipper in my stash.

I used a free pattern by Laura Pifer called DIY Yoga Mat Bag available on the Brother website. This pattern is quick and easy and, if you are a quilter like me, you will have plenty of fabric options to choose from your stash! I made the bag in under 2 hours.

Now when I practice my yoga at home, I have a cute  carrying bag to keep my mat clean and mostly free from pets when not in use! Of course, my cat and dog both try to “help” me when doing yoga!

Happy sewing!

~Jen

Double Struck Star Quilt

Hi everyone,

I finished this fun modern quilt earlier this year called Double Struck Star by Krista Moser of The Quilted Life.

This quilt has an off-set, partial star shape, with each of its three star points featuring colorful fabrics. I selected some small-scale modern prints and solids to create my star points in greens, oranges, and turquoises.

The background triangles are from five different low-volume fabrics and one darker gray fabric. I used the same gray fabric for the inner star shadow border and the binding fabric.

Here’s a look at my fabric selections:

star_struck_fabrics

Fabric Selections for Double Struck Star

I cut and pieced all my colorful triangles first and then added them to my design wall, tweaking a few here and there. I made a few fabric substitutions because some of the prints had the wrong scale or wrong shade in my initial fabric pull.

I did follow the pattern recommendation to have more of the lighter triangles towards the middle of the star with the darker triangles radiating out towards the star points.

star_struck_design_wall

Double Struck Star points on design wall

Once I was satisfied with the colorful triangles, I pieced the neutral triangles. The triangles with the gray star shadow were a little tricky, but I used my pins liberally to ensure the seams matched.

For quilting, I used Glide in Cool Grey 3 with free-motion swirls in the colorful triangles. I used the same thread color in the neutral triangles, but I experimented using different free-motion designs and ruler work in each of the triangles.

star_struck_quilting

Quilting the Double Struck Star Quilt

For the binding, I used the dark gray fabric and added a very small color-pop section using left over pieces from the colorful triangles.

I recruited my hubby to hold the quilt while I took pictures of it at a local park earlier this year.

star_struck_finished1

Completed Double Struck Star Quilt

star_struck_finished2

Close-Up of Completed Double Struck Star Quilt

Isn’t this a cheerful quilt? It reminds me of all the beautiful spring flowers emerging after a cold, rainy winter!

Happy quilting!

~Jen

Introducing the Swatch Service from The Confident Stitch

Hi everyone!

I’m so excited to share with you a fun new quarterly swatch service program from a wonderful modern quilt store, The Confident Stitch!

When you sign-up for this program, you can choose to receive from one or more different swatch card options including Quilting Cottons, Garment Fabrics (Warm Tones), and Garment Fabrics (Cool Tones). The links in this post are affiliate links, meaning that I earn a small commission. However, I only endorse quilting products that I use myself and find valuable.

Each swatch card subscription features 8 fabric samples and includes delivery for just $13 plus a special discount code for all of the featured fabrics!

The advantage of having a swatch card for quilters is that you can see and feel the fabrics in person before ordering larger cuts of fabric. When you are matching fabrics for a quilt project, it is so important to be able to see the exact shades and hues in the fabric. I also like to feel the hand of a fabric before purchasing, and each 3-inch by 2-inch swatch is large enough to satisfy our tactile need for fabric petting!

The Spring 2020 swatch cards are shipping now. I really love the bright modern fabrics featured this month for quilters.

Outside of the Swatch Card

The outside portion of the card has a note about Kate McIvor, founder and owner of The Confident Stitch. See the color wall on display with the cute dachshund pillow? I made that pillow as a sample for the shop!

Swatch Service, Quilting Cottons, Outside of Card

Inside of the Swatch Card

You’ll find all the quilty goodness on the inside! Each card comes with a brief description, describing the theme of this quarter’s fabric swatches. For this quarter, the theme is “London in the 1960’s.” Each individual fabric swatch is 3-inches by 2-inches. The fabric designers featured this month include Kaffe Fassett, Tula Pink, Cotton + Steel, Carolyn Friedlander, Ruby Star Society, and Art Gallery Fabrics.

You will also receive a special discount code for all the fabrics listed in the swatch card. This discount is only available to swatch card subscribers!

Swatch Service, Quilting Cottons, Inside of Card

Peek Under Each Fabric

After you have lovingly petted each fabric swatch, lift it up for a description and pricing of each fabric.

Swatch Service, Quilting Cottons, Close-Up

Are you ready to subscribe? Hope on over to The Confident Stitch and sign-up today! Let me know in the comments if you’ve joined! I can’t wait to see the projects that you create using these fabrics.

Happy quilting,

~Jen