Thread Catcher Baskets!

I needed a fun and useable container to place all those little threads and small fabric clippings that seem to pile up while sewing. Fortunately, I happened to come across a swap for a quilt-as-you-go thread catcher on Instagram recently with a fun group of quilters called @modernpalooza.

For this swap, each person created a thread catcher using a free pattern by The Sewing Chick. The swap organizers matched us up with a secret partner, and sent us some hints as to their fabric likes and dislikes.

I decided to pull some Libs Elliott fabrics from my stash as my modern, bright fabrics to use for the patchwork scraps. I changed up the pattern slightly by deciding to add a black and white border to the top and lower edges of my colorful patchwork strip. I then added a smaller width of a dotted gray fabric for contrast.

I also didn’t have duck canvas on hand as called for in the pattern. Instead, I fused some Pellon Shape Flex to my lining fabric before adding the quilt-as-you-go fabric pieces.

For the binding, I used the same black and white fabric to echo the borders. I took my little completed thread catcher basket on a hike to central Oregon, and I think it looks great resting on this old juniper tree.
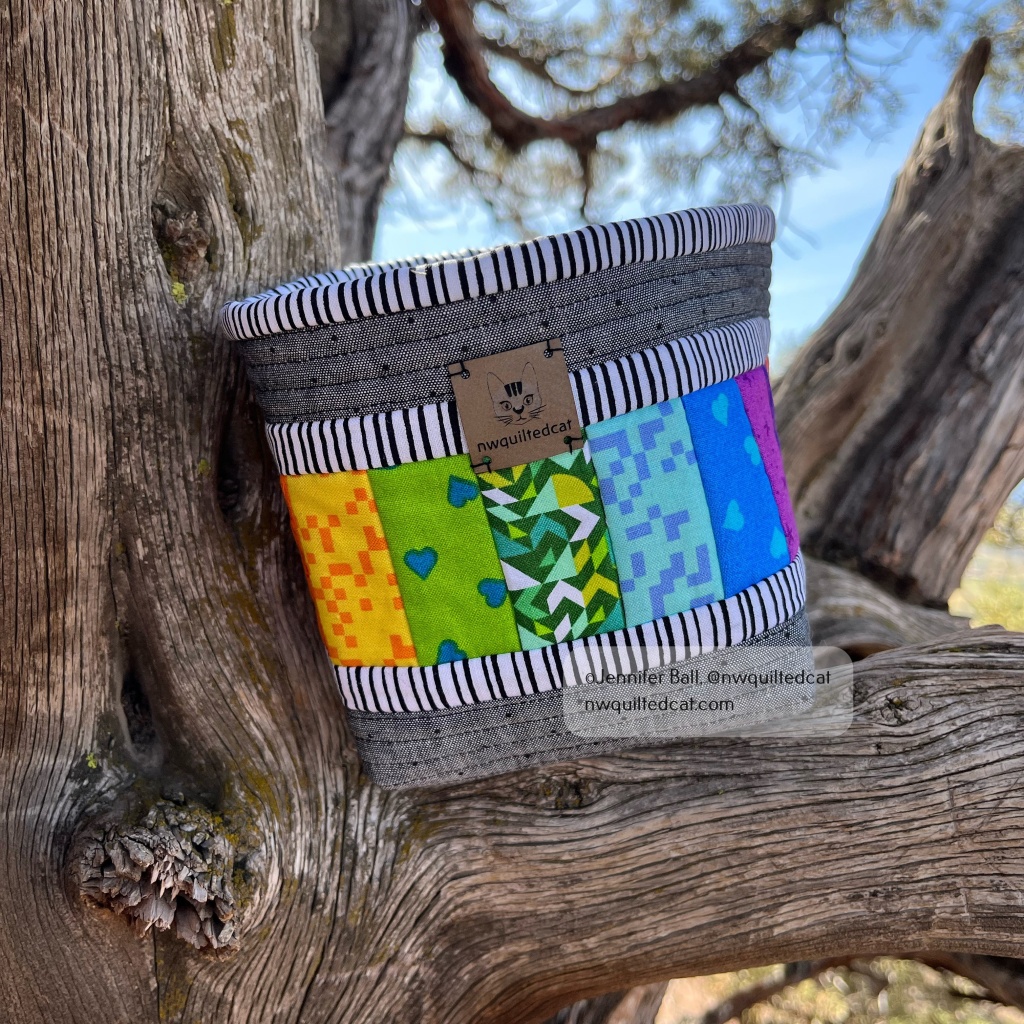
Thread catcher basket that I made for my partner

We were also asked to send a favorite treat or snack along with the bucket. I sent some Moonstruck chocolate made by an Oregon company along with some fabric and other little goodies. I didn’t think to take a picture of the complete package before I mailed it.

In return, I received a wonderful thread catcher basket from my partner!
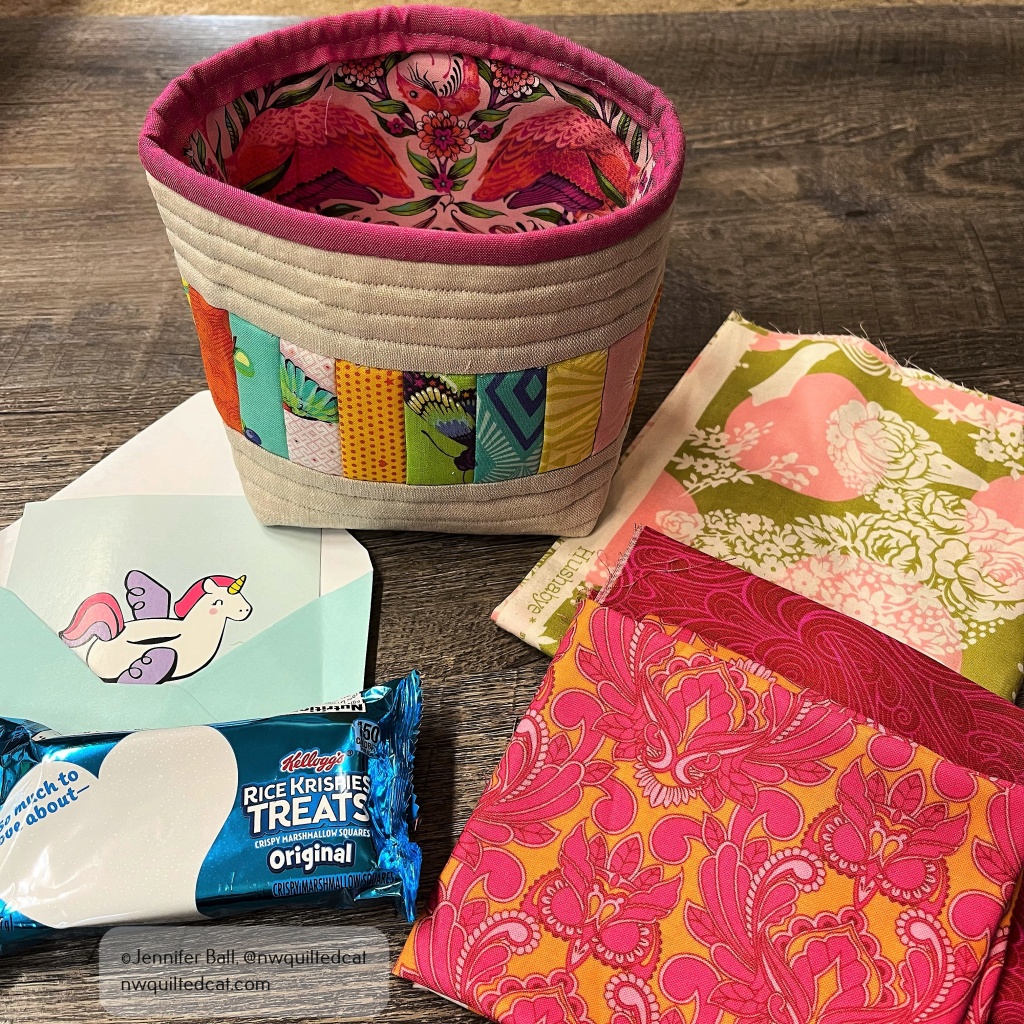
Thread catcher basket that I received

My partner made me this super cute basket using Tula Pink’s Daydreamer fabric! Isn’t it bright and cheerful? She also very thoughtfully included some super rare out-of-print Tula Pink fabrics that I do not own. I’m very excited to use them in a future project just for me.

What I really loved about this little thread catcher basket swap is that the project was pretty small and not too time consuming. Sometimes, swaps can be overwhelming for people because they try to make something too complicated or underestimate how long it might take to make a larger item like a mini quilt. I do enjoy swaps because it gives me a chance to try new projects, learn new skills, and make new friends!

Happy sewing!

-Jen

Cats in Space Cuteness Overload!

It’s no secret that I’m a cat lover! I’m currently owned by three cats, including one special foster kitty named Gracie. The three cats take turns playing musical laps, rotating on my lap so that each one gets some special petting and snuggle time. When I saw a new pattern by Elizabeth Hartmann called Cats in Space, I just knew that I had to make it as soon as possible.

I had a short quilt retreat recently with my sister and two of our quilting friends. I tossed this pattern into my bag along with some fabrics to make one cat block. Usually, I like to precut pieces for a quilt retreat, but I didn’t have time with this project.

I started by cutting out each section according to the pattern, and I labeled the sections with these amazing little plastic squares called Alphabitties. I take each label and clip it to the fabric piece using a Wonder Clip. These Alphabitties labels are game changers for patterns with tons of little pieces that can be easily confused with one another.

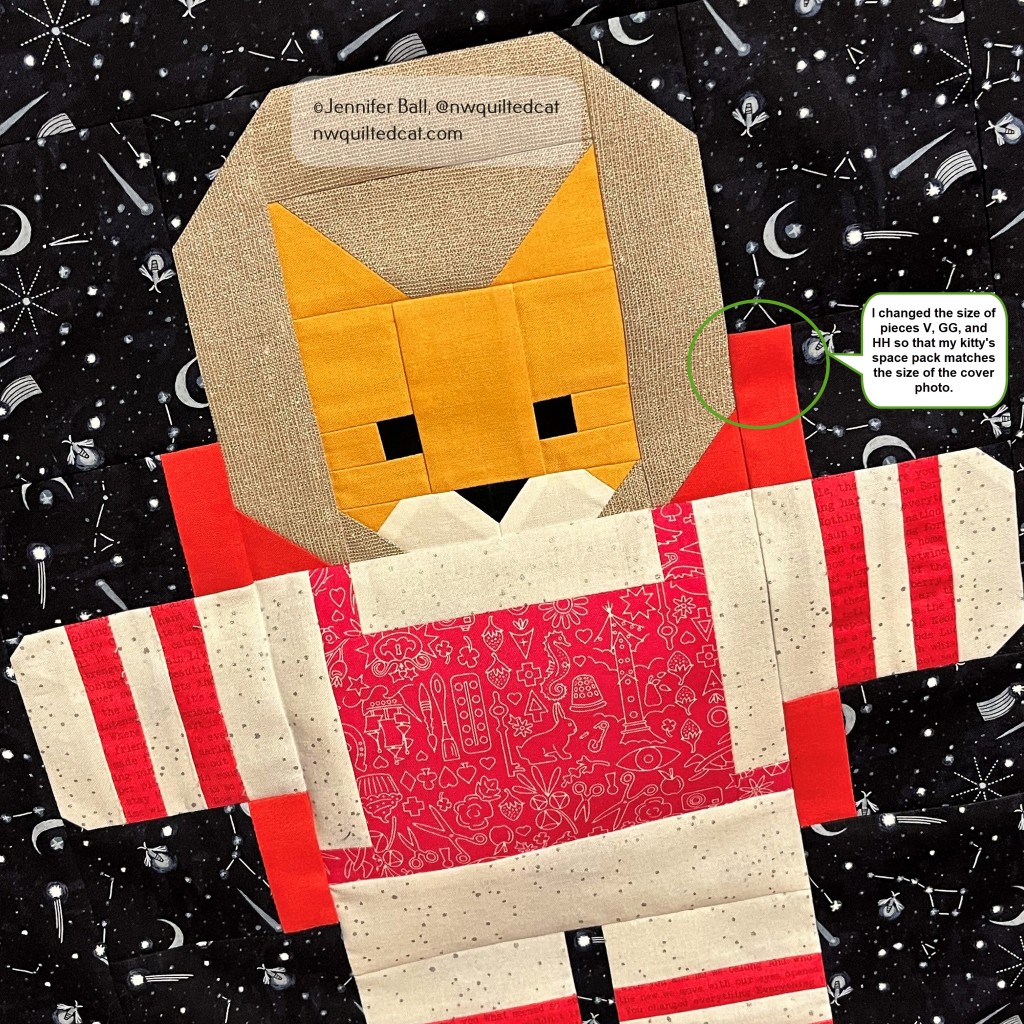
I did notice a possible pattern error related to the diagrams. If you look at the picture on the pattern cover, the space pack on the cat’s back is higher than in some of the pictures inside of the pattern. The pattern pieces (V, GG, and HH) are sized so that your space pack comes out shorter than the pattern cover photo. I adjusted these few pieces so that my kitty’s space pack is the higher version.

Here’s a close-up view of the space kitty:

Isn’t the background fabric fun? It has little fireflies, shooting stars, and constellations. It’s called Night Sky by Dear Stella. The other fabrics are from my stash. I used some Alison Glass pink fabrics for the space suit details, some sparkly Essex linen for the helmet, and Kona cotton solids for the kitty.

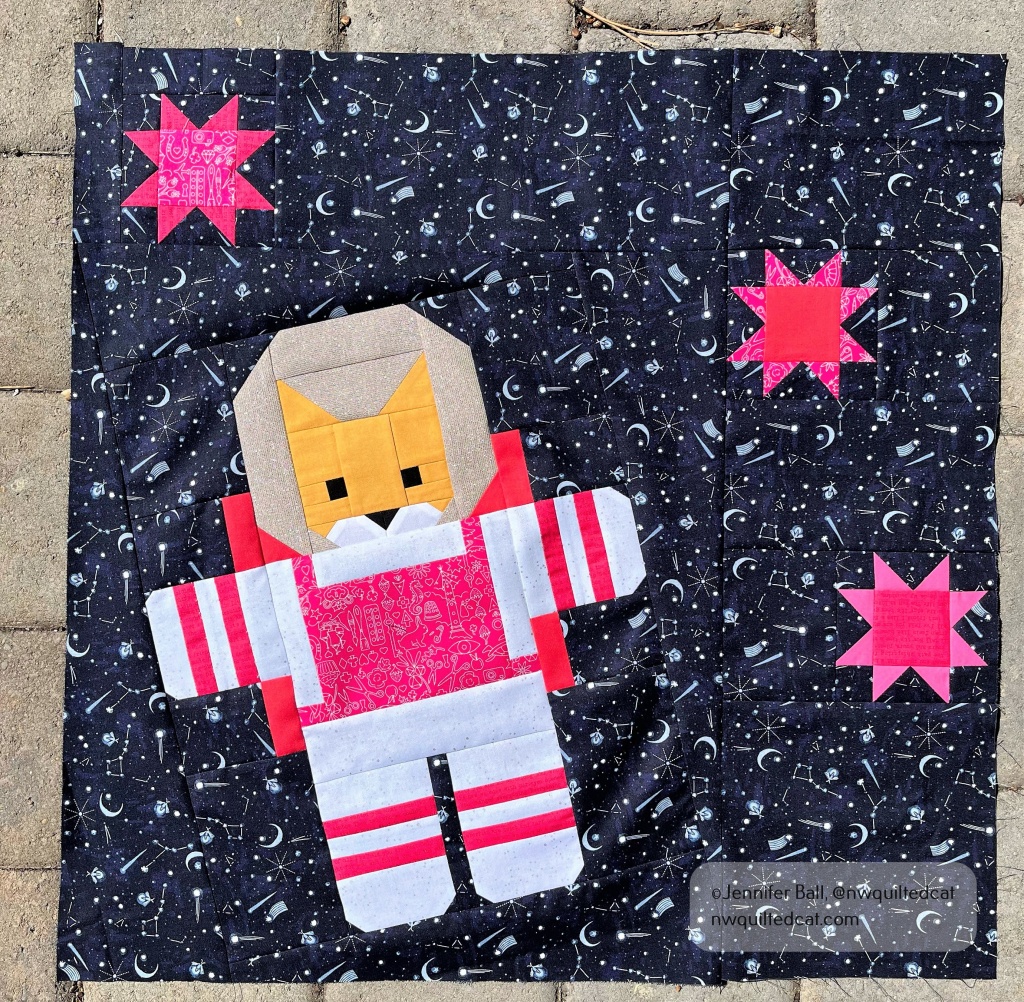
Once I had created my kitty block, I wasn’t sure if I wanted to keep it as-is or go ahead and add the three stars surrounding the kitty. I’m pretty sure that I’m going to turn this block into a mini quilt so I thought that the three stars would just up the cuteness factor.

Here’s a look at my finished block:

Swoon! This block is so adorable. The kitty looks like she’s coming in for a hug with her favorite human. I love it so much!

I’m still leaning towards keeping this space kitty as a mini quilt to hang in my sewing room. If I decided to make the small size quilt, I’d need three more space kitty blocks.

What do you think? A mini quilt or enlarge it?

Happy quilting!

Jen

Baskets in the Woods

Remember my post about making fabric baskets? Well, I couldn’t stop with just one, and so I made 4 similar baskets for a group of quilting friends.

I wanted to get a picture of the baskets all together in an outdoor setting. So, my family and I took a weekend drive to a beautiful little lake, with falls colors beginning to emerge.

I placed all 4 baskets into a plastic bag, and I took them with me on the very short hike. It was only 1 mile around the little lake, with a some heavy brush in a few sections.

How cute are these baskets all lined up on a log with the lake in the background?

Fabric baskets on log

We had a great time, having this little lake all to ourselves. It wasn’t chilly, but there was a beautiful cloud hovering over the lake surface and providing a misty backdrop to our time here. The foliage was quite wet, and so our pants became soaked as we walked around the lake, but we didn’t mind at all.

The maples were starting to turn color, with many trees displaying vibrant yellow leaves and a few turning towards orange and red.

Cloud hugging Daly Lake
Wooden bridge
Fall foliage

I hope my friends like their fabric baskets! Getting out in nature is one of my favorite things to do, and it really helps me deal with times of stress. I can’t wait to go again!

Take care,

-Jen

Tula Nova EPP Progress

Hi everyone,

This summer, I started an English paper piecing (EPP) project so I could have some handwork to do while waiting in parking lots due to Covid restrictions. I blogged about starting the Tula Nova quilt here.

I’ve had a bunch of time in the past few weeks due to my son’s taekwondo classes and surgery follow-up appointments for my dog. We used to be able to go inside, now we must wait in the car. I’m not sure what will happen will we start getting below freezing, lol!

I’ve added some more rounds to my cat themed Tula Nova. I’m using as much of the “Tabby Road” line as possible, but I don’t have many of the coordinating prints so I’ve been trading with people on Instagram for different pieces. I’m also using fabrics from the True Colors line, such as the mineral prints, hexy rainbows, and fairy dust.

Do you see the cute cans of cat food in the star blocks?

Once I complete each round, I audition fabrics from my stash. It’s quite a messy process! I have fat quarters and half yards scattered about the room, until I decide on something.

The next round has 10 stars and 20 medium hexagon shapes. I decided on some purple stars to pull out the purple in the center of the quilt.

I fussy cut a striped print from the “Chipper” fabric line so that the dark purple fabric was more or less in the middle of the star points with some green on each side. I had just enough of the cat eyes print from “Tabby Road” to make enough small hexagon centers for the 10 stars needed.

“♪ ♪ ♪ I always feel like someone is watching me . . . ♪ ♪ ♪”

After I finished hand piecing these 10 stars, I placed them next to the my Tula Nova to decide what color I wanted for the medium hexagons in between each star.

Well, my quilt inspector had a strong preference, which I will reveal in a future blog post! He is really loving this cat themed quilt, and loves to help me “arrange” fabrics.

This is a bright and cheerful quilt, and I’m so happy that I started learning how to EPP.

Happy quilting!

Jen

Making a Fabric Basket (or Tub)

Hi everyone!

Recently, I came across a fun sew along on Instagram where the participants were making fabric baskets, also called tubs. I was intrigued by them, by I knew that I didn’t have time to complete one within the sew along timeframe. I purchased the pattern called “Tub Family” from RosieTaylorCrafts on Etsy, and set it aside for a couple of days.

Then, several weekends ago, I had a few hours to try my hand at making one. The pattern comes with 3 sizes of fabric baskets, and I opted to make the largest one. I have some of the beautiful Homemade fabric by Tula Pink, which I think is absolutely perfect to make all sorts of things for my sewing room.

The pattern walks you through the construction steps pretty well, but I have a few pointers if you decide to make one.

Once you have your main basket panel, liner, and foam all ready for quilting, I do recommend using the straight-line quilting as mentioned in the pattern. I tried doing an all over swirly type quilting on my test basket, but I had a much harder time attaching the bottom and getting the basket to sit properly. It’s just kinda floppy!

On my “real” basket, I did straight-line quilting using a beautiful Aurifil bright green thread with a seam guide on my Bernina. In the picture below, you can see my seam guide helped to give me perfect 1-inch quilting lines.

After quilting at 1-inch and .5-inch intervals, I had my finished main panel, ready for my quilt inspector. I used some fun Tula Pink ribbon along either side of the fussy cut sewing machine in the center of the panel. This pattern is so flexible that you could make baskets out of scraps, a single piece of fabric, or several large chunks like I did.

My finished main body panel with quilt inspector

After trimming the main panel to the correct size, I started to attach the base to the body. This step is the hardest part of the whole pattern because the base really needs to be eased in using clips or pins.

I used Clover clips to secure my base rather than pins. No blood! If the base is still too large after easing it, you may need to trim it down slightly.

Using Clover clips to attach the base

The pattern does have you hand stitch the base to the body before using your sewing machine to help with puckers. I highly recommend doing this step. You can remove the clips after hand basting, and then use your machine to slowly and carefully stitch the base to the body.

I did my binding a bit different from the pattern by pressing one side in 1/4-inch so that I’d have a nice finished edge to work with when sewing the second long edge to the inside of the basket.

Getting the binding ready

I did completely machine stitch my binding rather than hand sewing the inside, just for lack of time. I used the same color thread as the quilting, and I think it looks fine.

Here’s a look at my completed fabric basket, filled with some EPP supplies:

My finished basket!

These baskets are addictive to make, and I want to try making the medium and small sized ones soon. Maybe Christmas themed ones as well!

There are many examples of completed baskets using the #tubfamily hashtag on Instagram.

Enjoy and happy sewing!

-Jen

How to Make a Trumpet Bell Cover

Recently, my son’s high school band received permission to begin in person outdoor rehearsals. They are limited to 10 students per rehearsal time, and they need to have a bell cover and wear a mask.

I decided to make bell covers for all the trumpets in his group so that they wouldn’t have to wait for an online order, which could take weeks. There are 7 trumpets in his cohort group, and each bell cover takes about 10 minutes to make.

7 trumpet bell covers!

Supplies Needed

  • Stretchy material (polyester/spandex blend). I purchased some athletic apparel fabric from my local fabric store in blue, which matches one of the school’s colors.
  • 3/8″ elastic
  • Safety pin
  • Thread to match
  • Paper and pencil for template
  • Sewing machine and basic sewing supplies

Instructions

  1. Trace the trumpet bell onto a piece of paper.
  2. Enlarge the bell shape by about 1.25 inches to create your pattern. I used a school compass for this step or you could eyeball it. I found that a 1″ enlargement was a bit too small to fit over the bell comfortably. If you use cotton fabric instead of the poly/spandex blend, you’ll likely want to cut it 1.5 inches larger.
  3. Cut (2) circles from the fabric.
  4. Place the circles right sides together (RST), pin or clip together, and stitch using a 1/4″ seam allowance. Be sure to leave a small area open for turning right sides out and backstitch at the start and end of your stitching.

    Sew a 1/4″ seam, leaving an opening for turning

    Opening in the bell cover before turning

  5. Turn right sides out.
  6. Stitch another seam about 5/8″ from the edge of the circle to create the casing for the elastic. Stitch around the entire circle and backstitch. You do not need an opening for this second seam.
  7. Cut a piece of elastic about 11.25 inches long.
  8. Place a safety pin on one of the short edges of the elastic to help you insert the elastic into the casing. Be sure to hang onto the other end so that it doesn’t get sucked into the casing.

    Inserting the elastic into the casing

  9. Overlap both ends of the elastic about 1/2″ and sew together securely. I removed the pin before stitching.

    Overlap the elastic about 1/2-inch and sew

  10. Sew the opening closed.

    Sew the opening

  11. Ease the elastic around the casing so that it is more or less evenly dispersed.

    Inside of trumpet bell cover

  12. Place the bell cover on your trumpet and play!

Trumpet standing with bell cover

Trumpet bell cover

My quilt inspector supervised me very closely during this process. Maybe he thought I was making him a shower cap? Ha, ha!

Is it a cat shower cap?

I hope to make my son a reusable face mask with a little slot or flap for the trumpet mouth piece next. Until then, the band members have to cut a little slot into disposable face masks in order to play. They are also social distancing during practice. 

It’s a strange new world in so many unexpected ways!

Take care and happy sewing!

Jen

Scrappy Summer Sew Along + Update on Pepper

Hi everyone,

I posted about joining a scrappy summer sew along a few weeks ago here. This quilt uses your scrap bin to make a 9-patch blocks for a scrappy finish!

I used a bunch of yellows plus pinks/reds to make a “Raspberry Lemonade” scrappy quilt. I started sewing my 9-patch blocks as leaders/enders while working on other projects. Then, a bunch of crazy life stuff happened, and I had to stop sewing for a couple of weeks.

Here’s a look at some of my 9-patch blocks, with sunlight filtering in through a side window:

Scrappy 9-patch blocks

Sunday was the last day to post our finished top on Instagram as part of the sew along. I pulled out the 9-patch blocks that I had completed, and I had just enough for a baby sized quilt. My quilt inspector helped me to sort the blocks into rows and columns.

Romeo inspects the
9-patch blocks

I enjoyed sewing these little blocks together as a sort of meditative time for myself. We had beautiful weather here yesterday so I was able to get a picture of the quilt flimsy, fluttering in the breeze, on a nearby little bridge.

Scrappy Summer Sew Along Flimsy – Raspberry Lemonade!

I’m going to back this little quilt with some soft, cuddly Minky fabric and likely donate it.

You can find other participants and fun quilts from this sew along by searching on the hashtag #scrappysummersal2020 on Instagram.

One of the life events that happened recently is a major (and expensive) surgery for our girl, Pepper. She had the surgery one week ago today, and she is doing pretty well with her recovery. We’re hoping that she’ll be back to hiking with us later this winter or next spring. She needs a full 8-10 weeks for recovery plus multiple physical therapy sessions.

If you’d like to help, I started a GoFundMe to offset some of the cost of the surgery and physical therapy.

Here’s a look at Pepper post-op with her poor, furless leg and incision:

Pepper, resting after knee surgery

Each day, she is getting stronger! We just have to keep this very active dog from running or jumping for 8 weeks. Whew!

Happy quilting!

Jen

Making a 3D style of face mask

Hi everyone,

Recently, my nephew asked me to make him some solid color face masks that he can use at college. He wanted washable ones so that he doesn’t have to keep buying disposable ones and to create less waste.

I decided to try the “3D” style of mask, which is slightly boxed to allow for easier breathing because the fabric sits just a little farther out from the nose and mouth.

I followed a pattern and YouTube video by Add Crafts. She has a downloadable pattern in a link in the comments. The video does not offer text instruction, only visual instruction so you may need to pause it a few times to see how she assembles the mask

I used the size large pattern for my test mask. It did sew together fairly quickly. However, I think this pattern runs small. The size large is ok for me, but I asked my teen son to try it and he said it is too small. There is an XL size that I will try next.

Here’s a look at the mask with the pattern:

3D Face Mask, size large, pattern by Add Crafts

The top of the pattern has a curved indentation to fit the nose area better, and you can insert a wire.

Here’s a look at the 3D mask outside and inside:

For me,  I prefer the feel of the rounded style of face mask using the Craft Passion pattern. It’s definitely all about personal preference! I’m going to make my nephew one of each style, and ask him which style he prefers to wear.

Happy quilting!

-Jen

Quilted Zip It Up Project Bags

Hi everyone,

Recently, I decided to tackle my first pattern from ByAnnie, the Zip It Up large organizer. I almost only do quilting projects so anything with a zipper seemed to be a good challenge. So instead of making just one organizer, I decided to make two!!

I made one for me using the HomeMade fabric line by Tula Pink. I just love the sewing machines and notions in this line so I thought that it would be perfect for a sewing project bag.

The pattern calls for quilting together the bag outside, Soft and Stable (the material inside that gives the bag its shape), and the bag liner. At first, I thought about quilting it on my domestic sewing machine, but then I thought why not try and quilt it using my HQ Avante? I wasn’t sure how my longarm would like the Soft and Stable project, but it quilting like a dream.

I used Glide thread in Cool Mint, and did some pretty floral swirls.

For the second organizer, I decided to use llama/alpaca themed fabric for my sister. I did straight-line quilting on her bag.

I surprised her with this organizer several weeks ago when we had a mini sewing retreat together.

Here’s a look at her completed organizer, with some alpacas giving it an inspection:

Alpacas inspect a Zip It Up organizer

Inside the organizers, there are 2 separate zippered pouches. One is a clear vinyl pouch, and the other one is a mesh mesh. There is also a second zipped pouch on the outside back of the bag (the pattern has it on the front but I decided to add them to the back instead).

I added some fun goodies to the inside of the organizers including a little cutting mat, stickers, pencils, a notepad, and some Tula Pink ribbon. The zipper pull is a cute fluffy llama that I found at a local craft store.

Zip It Up organizers, a look at the inside

Finished Zip It Up Organizers

I really like how these Zip It Up organizers turned out. These are the large size finishing at about 11.5 inches by 14 inches, which is perfect for taking a little sewing project with me while traveling.

Happy quilting!

Jen

Making a Migraine Relief Headband: A Free Tutorial

Image

Hi everyone,

I’ve experienced migraine headaches my entire life. I’ve tried all sorts of remedies, and I do have prescription medicine to help manage the pain.

I’ve told my husband many times that I wished there was some type of headache wrap that I could wear because I tend to use my hands to press against my forehead for some relief. My hands get tired after a few minutes, ugh!

So, why not make something myself? Although this migraine relief headband won’t cure your achy head, it might help relieve the pain.

Supplies

  • Basic sewing supplies
  • Knit or other stretchy fabric
  • A sewing machine needle suitable for sewing on knit fabric
  • Fabric scissors
  • Measuring tape

Migraine Relief Headband Tutorial

  • Use the measuring tape to measure your head, centering the tape in the middle of your forehead.
  • Subtract 2-inches from the measurement to get your headband length.
  • Cut a piece of fabric to your headband length by 5-inches wide. For example, my head measured at 20-inches. I use a piece of knit fabric that is 18-inches long by 5-inches wide.
  • Fold the fabric in half, right sides together, and hold together with clips or pins.

Fold headband in half, right sides together

  • Sew the long edge using a 1/4-inch seam. Be sure to back stitch at both ends. I like to use a stiletto to help feed the fabric through the machine.
  • Fold one short edge over, wrong sides together.
  • Sew the short edge with a 1/4-inch seam. You only need to fold this seam once.

Fold one short side, wrong sides together

  • Turn the headband inside out. The right side of the fabric should now be on the outside.
  • Insert the raw short edge into the sewn short edge, about 1/4-inch. Use clips to hold the ends together.
  • Sew the two short edges together along the earlier stitching line, and remember to back stitch. You can use the headband now or go to the next step.

Tuck in the raw edge

  • Fold the stitched short seam in half, right sides together.
  • Stitch using a 1/4-inch seam. I like this final step because it gives the headband a nice finish.

Back of headband, short seam folded in half and sewn

Your headband is now finished and ready to wear! It should fit tightly against your forehead so that the compression offers a little relief.

A Completed Headband!

If you do not have allergies to fragrances, you can add a drop or two of your favorite essential oil to the headband.

I’m making a few of these headbands using different knit prints because they can also be used for exercise or hiking headbands. My bangs continue to grow longer and longer during COVID-19, and I’ve decided to let my hair grow out a bit before visiting my hairdresser. These headbands will come in handy during this awkward hair phase!

Happy sewing and I hope these headbands help with your migraine pain.

Best,

Jen