Triangle QAL, Rows Joined!

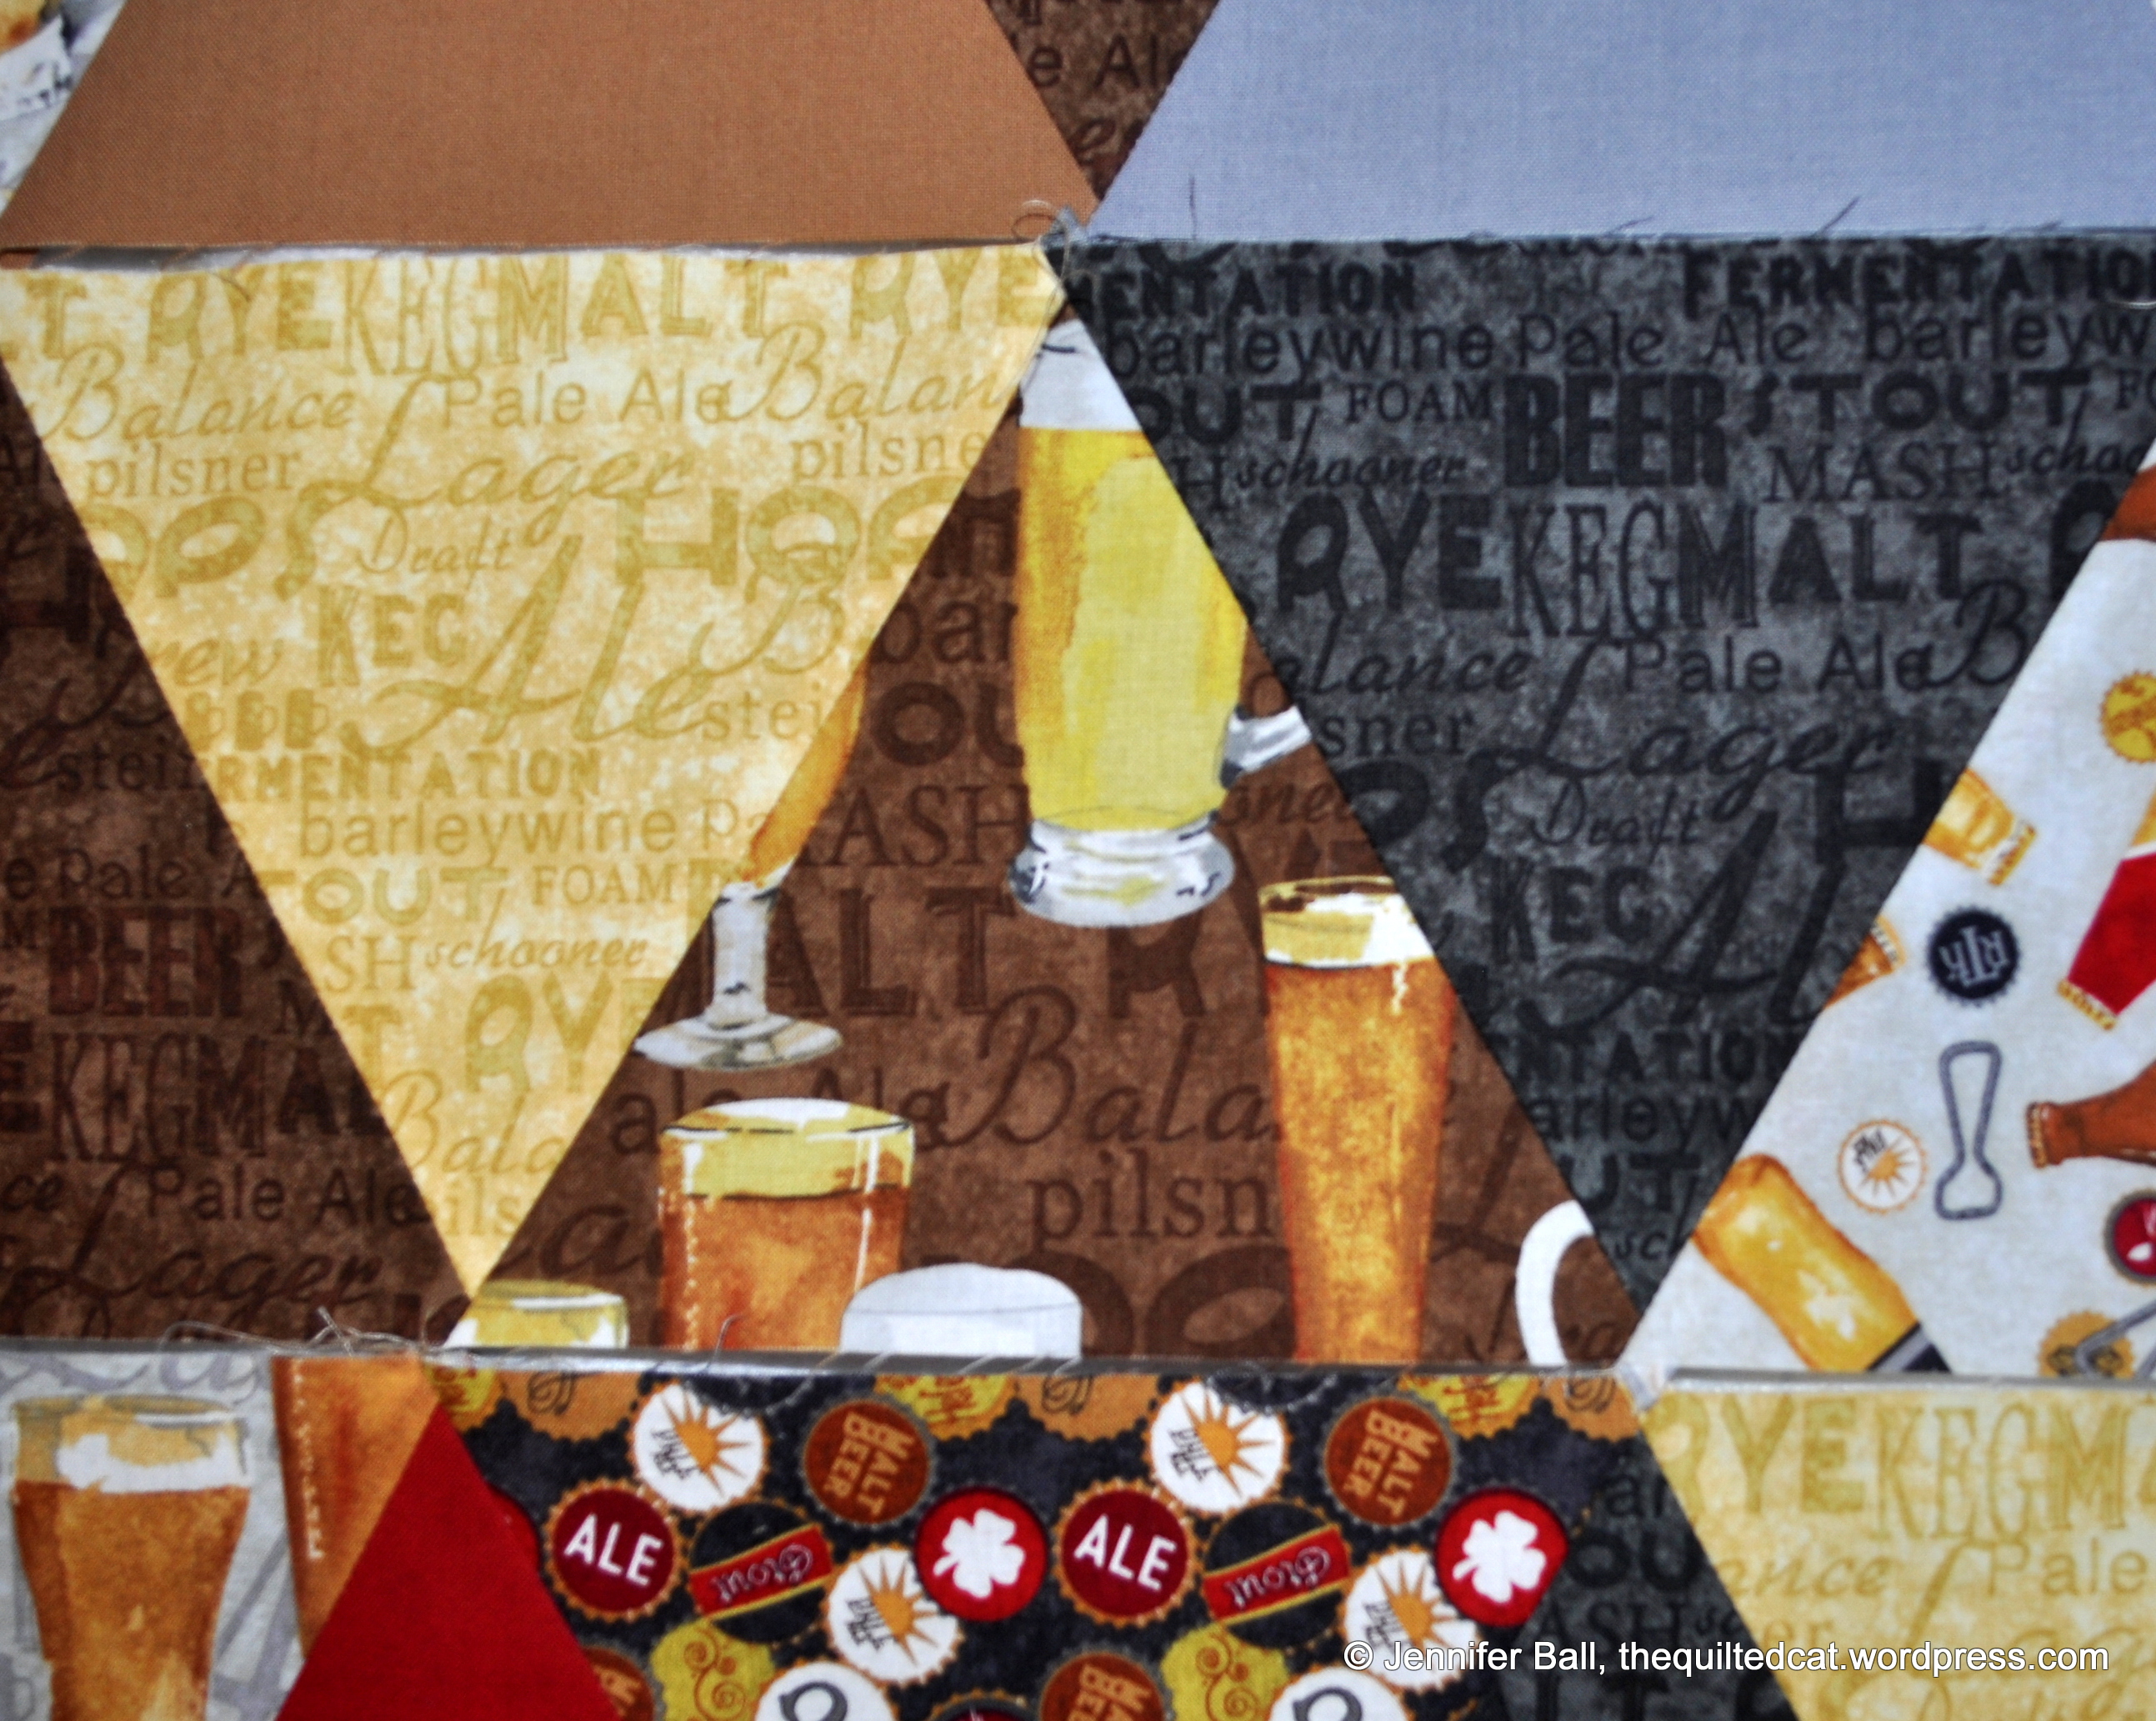
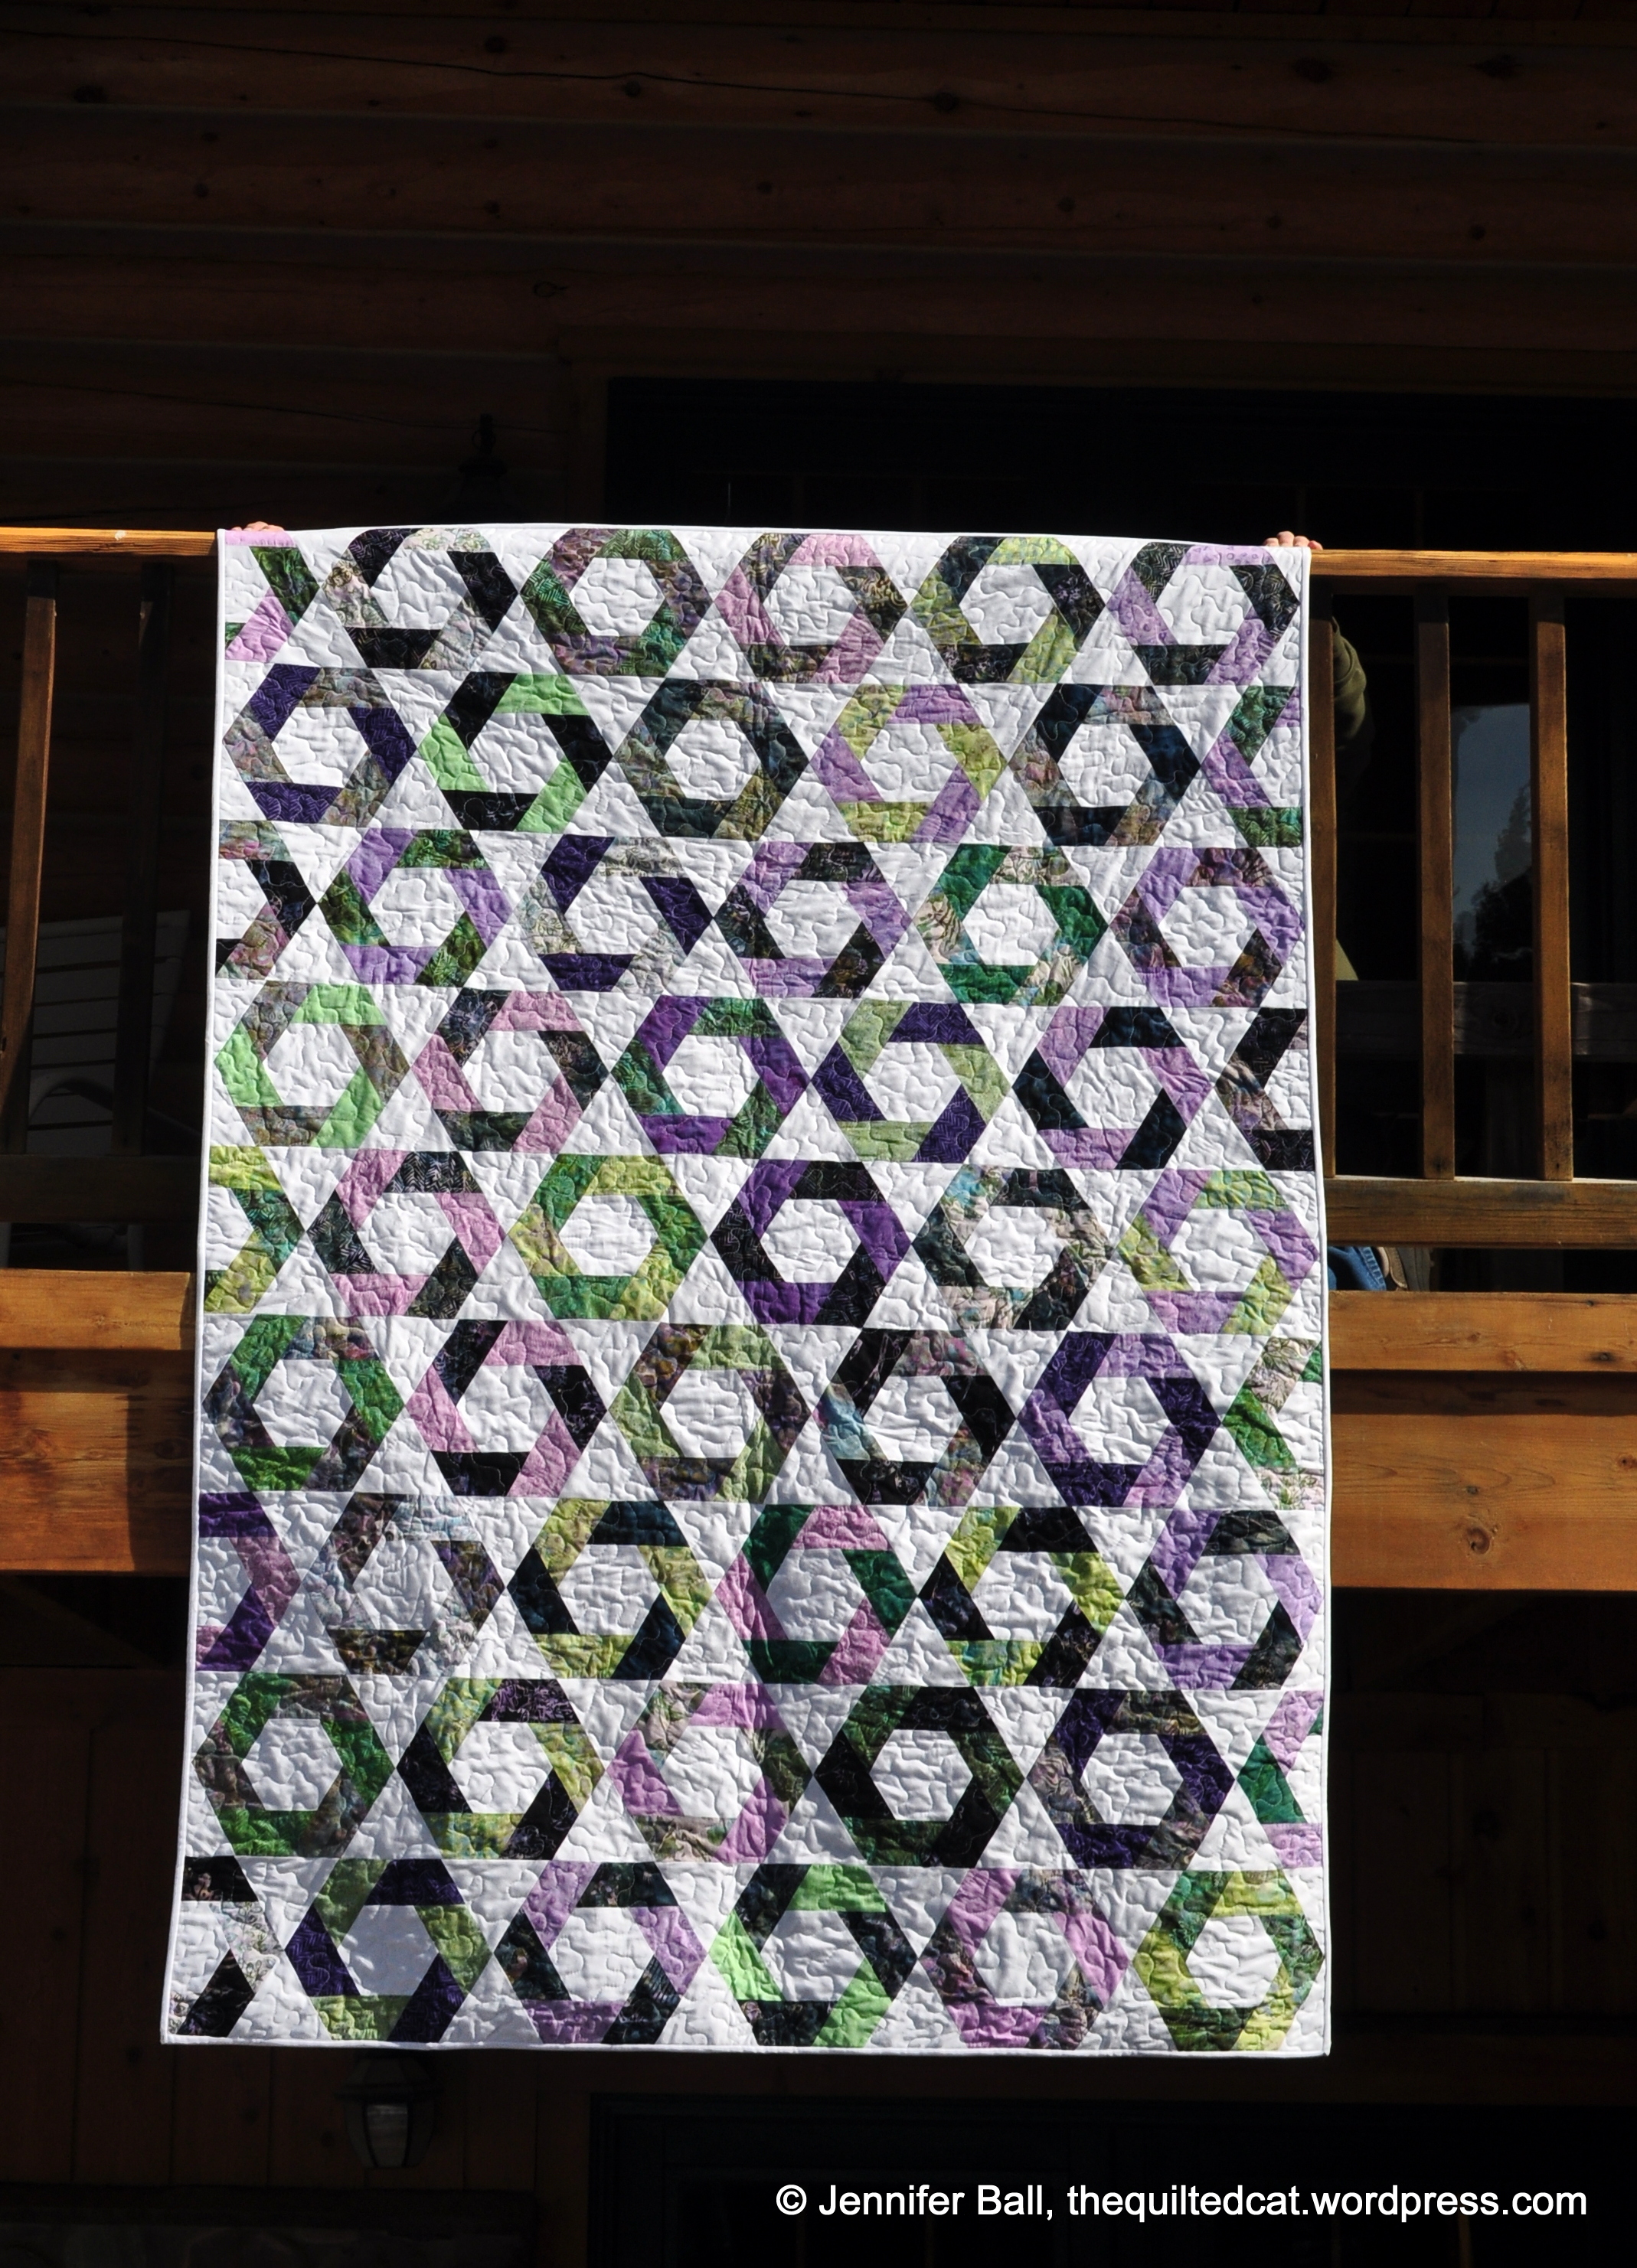
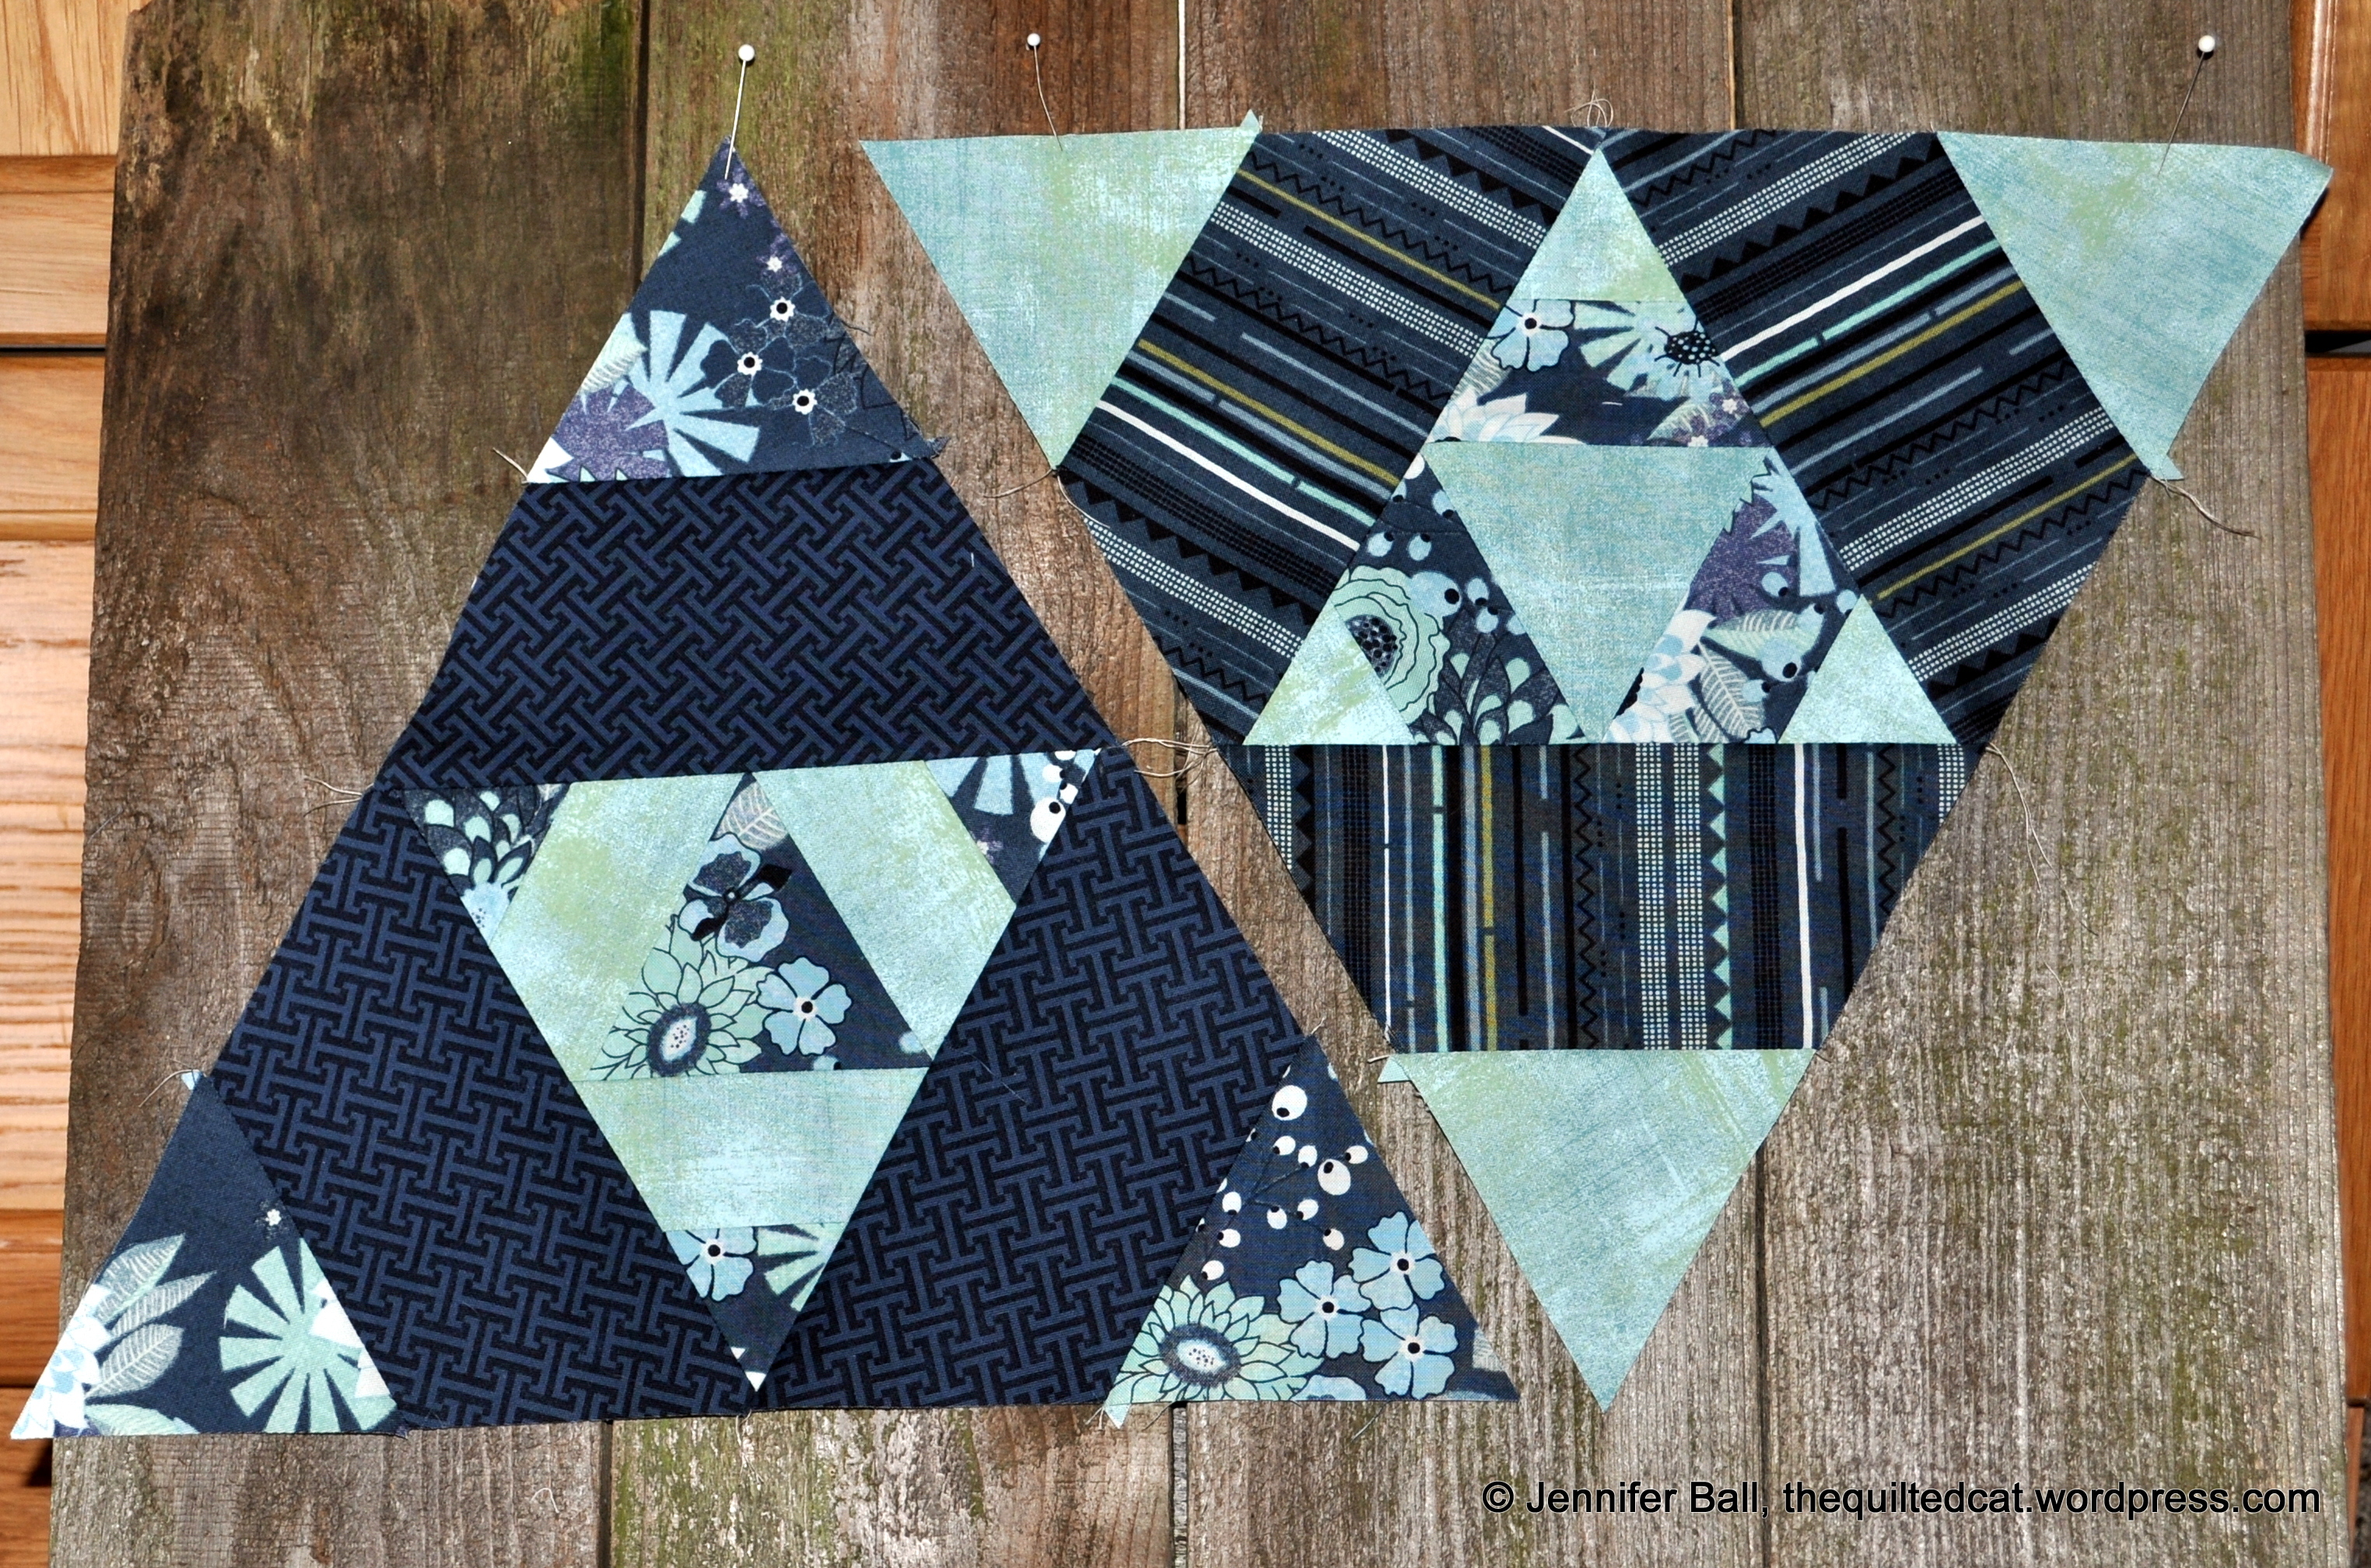
I stitched my rows together this morning for the Triangle QAL, hosted by Paula over on her blog, Sassy Quilter!

The rows on my manly, beer-themed quilt went together fairly quickly. As I was trimming off the zig-zag edges along the side, my hubby walked in and saw the quilt top. Ooops! I just told him to act surprised when I give it to him once the quilting and binding are completed.

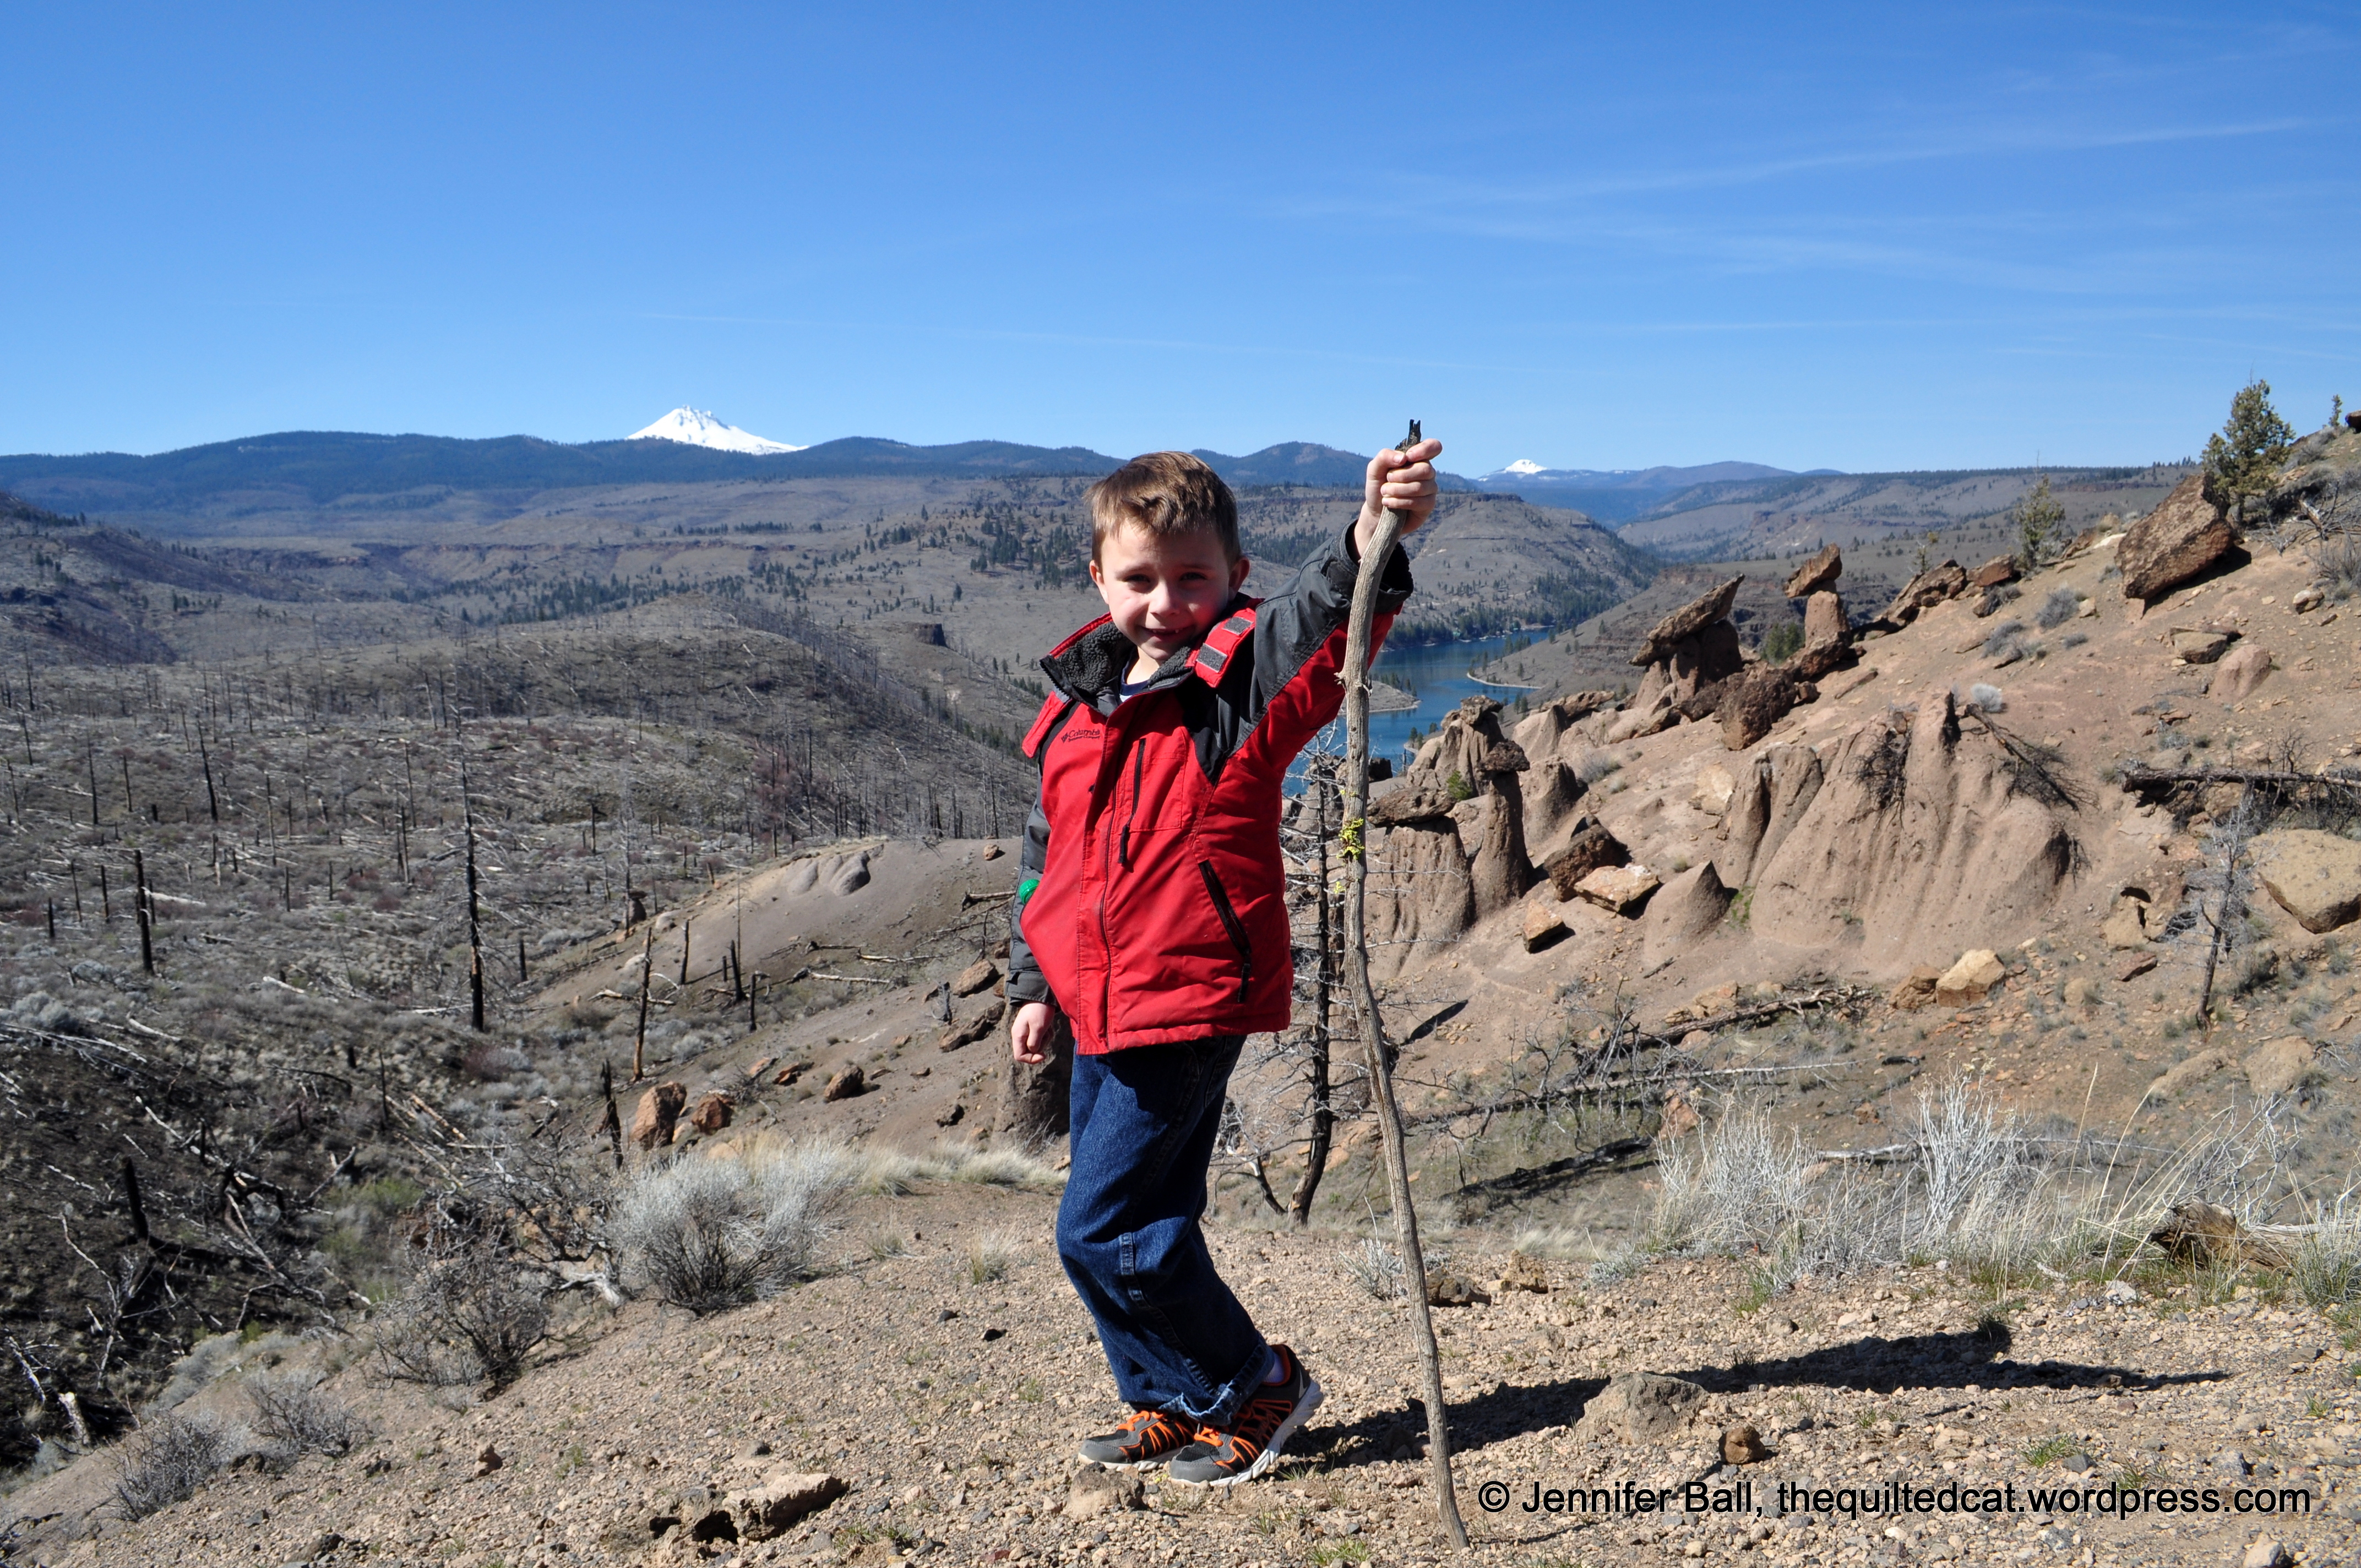
So off my hubby went to Home Depot while my son and I decided to take the quilt flimsy to a local park and get some pictures of it. The sun is shining and the leaves and flowers are bursting open in early spring.

One problem – the wind didn’t want to play along! (Or maybe it was playing along and just being frisky).

Here are some poses we tried to catch while the wind played with us:

Triangle QAL Flimsy on Rocks - Too Windy!

Triangle QAL Flimsy on Rocks – Too Windy!

Triangle QAL Near Giant Bear Statue? Still Too Windy!

Triangle QAL Near Giant Bear Statue? Still Too Windy!

Triangle QAL Quilt Top on Play Structure? Almost!

Triangle QAL Quilt Top on Play Structure? Almost!

Finally, I decided to place the quilt flimsy on the sidewalk and take a picture of it while standing on a bench, in between wind gusts.

Triangle QAL Quilt Top!

Triangle QAL Quilt Top!

I want to think up a clever, beer-themed name for this quilt, but I haven’t thought of anything good. Do you have ideas?

Enjoy!
~Jennifer

Scott Lake Quilted Postcard, Sisters Outdoor Quilt Show

Each year, the Sisters Outdoor Quilt Show has a special fundraiser called Wish Upon a Card. Participants make fabric postcards to be auctioned during the quilt show week.

This year, I decided to make a fabric postcard featuring Scott Lake with the Three Sisters in the background. For inspiration, I used a photograph that I took at Scott Lake last fall during a camping trip.

Here’s my original picture:

Scott Lake at Sunset

Scott Lake at Sunset

It’s such a beautiful place and worth the short drive from Sisters if you are visiting the area.

I printed out my photo and then started to look in my scrap bin for fabrics to use. I’m entering the Michael Miller fabric challenge with this postcard so I needed to incorporate a piece of the Beadwork fabric into my design.

I decided to use the Beadwork fabric to represent the green meadow on the far side of the lake.

I built my postcard by layering the sky and water to form a solid foundation piece. Next, I carefully cut out and appliqued the mountain, lake, and tree shapes to this foundation using various colors of Aurifil thread. I added rocks to the water, a cloud to the sky, and a stick along the grass in the foreground.

Once all the shapes were appliqued, I used embroidery floss to add extra details such as the hint of tree trunks and late summer snow on the mountains. Finally, I layered the completed fabric postcard top with interfacing and cardstock and bound the edges using a black color weave fabric by P&B Textiles.

Here’s a look at the finished fabric postcard side-by-side with my printed photo:

Scott Lake Fabric Postcard and Picture

Scott Lake Fabric Postcard and Picture

Here’s a close-up look of the fabric postcard:

Scott Lake Fabric Postcard for the Sisters Outdoor Quilt Show

Scott Lake Fabric Postcard for the Sisters Outdoor Quilt Show

I really love how this fabric postcard turned out, and I’d be so thrilled to be one of the finalists!

I plan to attend the Sisters Outdoor Quilt Show this year, and I always stop by the wonderful postcard exhibit and auction.

Happy quilting!
~Jennifer

Triangle QAL Rows

I made progress this week on my Triangle QAL by stitching together the triangles to form rows!

You can still join in on the Triangle QAL by checking out Paula’s blog, The Sassy Quilter.

I’m using the Brewsky line by Clothworks along with 3 Kona cotton solids. You can read about my fabric selections here.

The 12 rows of this quilt took up my entire design wall. It will shrink down a bit when I sew the rows together during next week’s assignment, and I think the finished size will be the perfect beer-themed quilt for my wonderful hubby.

I’m trying to make this as a surprise, but I’m pretty sure that he knows something is up when I told him don’t go into the playroom! My sewing room (a spare bedroom) is too small for a design wall and cutting table so I’ve taken over a corner of the all-purpose playroom.

Here’s a look at the rows on the design wall:

Triangle QAL - Completed Rows

Triangle QAL – Completed Rows

Some of the prints are directional so I had to be careful to keep those triangles pointing in the correct direction!

Directional Triangles

Directional Triangles

Oddly enough, this quilt continues to be a project that holds very little interest to my feline quilt inspectors. My dog has been my quilting buddy on this project instead!

At first, I wasn’t too sure about the bold red, but I did match it to the reds in the print fabric using my Kona color chart. The red is growing on me, and I think it adds interest while still keeping in line with a “manly” themed quilt.

Enjoy the triangles!
~Jennifer

Reach for the Stars Quilt, Blocks 1-3

This year, I made myself a goal to improve my piecing skills. To achieve that goal, I’m participating in various online BOMs as well as working on the Reach for the Stars quilt. You can read about my start on this quilt as well as all my fabric selections here.

I’m using the delicious Sunnyside line by Kate Spain for Moda, along with several solids thrown into the mix.

I finished up part 2 of 7 this weekend, which included blocks 1-3. I really wanted to get an outdoors photo to show off the fabrics better, but couldn’t squeeze it in before work on Monday.

Here are close-up photos of blocks 1-3. You can click each picture to zoom in on the block.

These blocks will be placed on the top of the quilt, above the center medallion:

Reach for the Stars, Blocks 1-3 with Center Medallion

Reach for the Stars, Blocks 1-3 with Center Medallion

It was challenging to find a floor space big enough for a photo. I stood on a little chair to get high enough, and I’m really surprised that one of my quilt inspectors didn’t come to “rearrange” the blocks, lol!

Since this project stretches over a year or so, I decided to create a little fabric swatch card/cheat sheet.

Fabric Swatch Cheat Sheet

Fabric Swatch Cheat Sheet

This cheat sheet really helped me keep all my fabric placements correct for each block. In the past, I just had my chicken scratches on a piece of paper. I could just see myself confusing dark 2 with dark 3 or light tan with medium 1 if I didn’t have the little fabric swatches.

I cut out all the pieces for blocks 1-3 at the same time and kept them in individual groups with labels:

Cut Fabric Groups

Cut Fabric Groups

Now, if only I could be this organized with all my quilty projects!

I hope you enjoyed seeing photos of this evolving quilt. I still need to “catch up” on parts 3 and 4, which are already published in the magazine.

Happy quilting,
Jen

Aurifl BOM – April’s Block

It looks like spring might have finally arrived here in Oregon! We expect sunshine and about 70 degrees tomorrow. I had a very sewful weekend, having spent about 5 hours each day on various quilting projects. I have so many going at once!

First up is the Aurifil BOM for April. This block is a fun take on the classic bear’s paw, designed by Angela Yosten. She has added a nice hand-embroidered touch to the block with stitches running around the inside of the bear paw. I am undecided if I should add this accent or not. I may wait until I get all the Aurifil BOM blocks completed to decide.

I’m using Kona cotton in Shadow for my neutral across the BOM. The other colors are various coordinating reds, blacks, and whites from my stash.

Here’s a look at my Aurifil BOM April block:

Aurifil BOM - April Block

Aurifil BOM – April Block

And here are my first 4 blocks together:

Aurifil BOM - First 4 Blocks

Aurifil BOM – First 4 Blocks

I finished sewing about half of my rows together for the Triangle QAL. I hope to have these finished by Thursday in time for the latest photo linkup.

Finally, I worked on several more blocks for the Reach for the Stars quilt. I have 1 more block to finish for step 2 and I’ll show some pictures of my progress.

Hope you have a great week!
~Jennifer

Triangle QAL + Hollyhill Quilt Shoppe Win!

Greetings quilty friends!

The assignment this week for the Triangle QAL hosted by Paula over at Sassy Quilter is to cut out all our triangle shapes!

I’m using 7 fabrics from Clothworks Brewsky line along with 3 Kona cotton solids. I think this line is now out-of-print, but you may still be able to find a few pieces if you search for it. This will be a fun beer-themed quilt project for my hubby!

Here are the pieces stacked together, looking rather like a slice of fabric pie!

Triangle QAL Fabric Pie

Triangle QAL Fabric Pie

And here are all 204 triangles!

204 Triangles

204 Triangles

Next Friday, we’ll begin piecing all these wonderful 60 degree triangles together.

Last week while at my sister’s house, I learned that I had won an April Showers by Moda charm pack from one of my favorite local quilt shops, Hollyhill Quilt Shoppe. I highly recommend a visit to this quilt store if you visit the Portland area. Hollyhill has a sister store across the street called Boughs of Holly, featuring wonderful Christmas and holiday themed fabrics year-round!

Here’s a picture of me in Hollyhill with the charm pack. I should have taken off my brown winter coat!

April Showers Charm Pack at Hollyhill Quilt Shoppe

April Showers Charm Pack at Hollyhill Quilt Shoppe

This is the first time that I’ve won something at a quilt shop so I’m very happy and thank the wonderful folks at Hollyhill.

Until next time, happy quilting!
~Jennifer

A Snack Time Quilt Finish!

Hi everyone!

Last March, I took a class with Julie of Jaybird Quilts. She had finished up her Snack Time pattern, and I was able to purchase a copy of the pattern from the wonderful Quiltmaker booth of goodies outside the classroom area.

I started working on piecing the top sometime last summer and finished it during the fall. Then, other projects popped up, and I never finished the quilting!

This weekend, I finally finished my Snack Time and took some photos of my completed quilt at my sister’s beautiful cabin in the woods!

I used a Bali Pop (2.5″ pre-cut strips) from Hoffman Fabrics in Rum Raisin. I really loved the look of the purples and greens together. For the background, I went with Kona white, which really makes those batiks pop!! The piecing and quilting is with white Aurifil thread.

Here are some pics of the quilt front:

Snack Time at Cabin

Snack Time at Cabin

Snack Time Close-Up

Snack Time Close-Up

For the backing, I went with Kona cotton in Lupine with some left-over Snack time blocks, Kona white, and a label.

Snack Time Back

Snack Time Back

Naturally, this quilt had to be inspected professionally and so Miss Gracie gave us her paw of approval!

Miss Gracie

Miss Gracie

I still have the original quilt top from that class, Boxed In, to finish. I’ll get it done eventually!

Happy quilting!
~Jennifer

Toes in the Sand BOM, Blocks 11 and 12

I’ve been participating in the Toes in the Sand BOM by Julie of Jaybird Quilts over the past year, and I’m happy to say that I’ve finished the last 2 sets of blocks! I signed up for this BOM with the Fat Quarter Shop and just loved receiving that package in the mail each month.

The block for month 11 is La Jolla Cove. I love the dark blues in this block!

La Jolla Cove Block

La Jolla Cove Block

The final block for month 12 is Big Sur. This one has plenty of fun hexagon shapes.

Big Sur Block

Big Sur Block

Now that I have all the blocks completed, I need to work on the setting triangles and assemble the quilt top.

But first, I really need to finish my Celtic Solstice Mystery top. I’ve signed up to take a class with Bonnie in June so I need to hurry – yikes!

Happy quilting!
~Jennifer

A Cute Little Basket

I picked up a cute pattern recently for a fabric basket called Banded Baskets by Indygo Junction. The pattern actually contains 3 sizes of nesting baskets.

I decided to make the small basket and fill it with little fabric treasures for a special someone! It’s the perfect size for carrying a small project or storing fat quarters.

Small Banded Basket

Small Banded Basket

For the outside, I used a pretty little fabric on the bottom portion called Chickadee (# A-7029-LC) by Andover Fabrics.

The dark brown leaf print on the top portion is from P&B Textiles line called Bear Essentials 2 (#ESS2 569S).

For the piping, I used Essex Yarn Dyed in Flax for sturdiness. The lining and handles are made from a solid blue from my stash. I used Aurifil Light Sand #2000 for the stitching.

Once I finished the basket, I added a little bird charm keychain and some fat quarters. I plan to make a nesting set of 3 baskets for my sewing room as a pretty way to store my quilty projects in-process.

Enjoy!
~Jennifer

A Weekend of Rocky Hiking!

Last weekend, we decided to spend the first part of spring break doing some short hikes in central Oregon. The weather was perfect for hiking with bright sunshine and highs in the 60s.

On our first hike, we visited Balanced Rocks. These rocks were revealed in 2002 when a wildfire burned down the surrounding forest. Since then, the Forest Service has established a short 1/2 mile walk to the balanced rock overlook. Once at the overlook, you can walk down into the balanced rocks to explore them up close, if you don’t mind a little scrambling along the loose terrain.

Behind the rocks, you can see part of the Cascade Range including Mt. Jefferson in the foreground and Mt. Hood way in the distance.

Balanced Rocks Hike with Mt. Jefferson and Mt. Hood

Balanced Rocks Hike with Mt. Jefferson and Mt. Hood

The short walk out to the rocks is suitable for all ages. Older kids can easily scramble down with you to view the formations up close.

A Kid-Friendly Hike

A Kid-Friendly Hike

Here are some up-close views of the balanced rocks:

To get to the Balanced Rock hike from Cove Palisades State Park, follow the signs towards Perry South campground. You’ll be on a paved road for about 12.2 miles until it turns to gravel. Drive another 0.3 miles and you’ll see a small turn-out on the right. Park here for the trailhead. The trailhead sign seems to have disappeared but you will see some posts, boulders, and a gravel path:

Balanced Rocks Trailhead

Balanced Rocks Trailhead

The next day, we decided to hike up Misery Ridge Trail at Smith Rocks State Park near Redmond. Yes, the trail is actually called Misery Ridge due to the steep switchbacks. The trail is about 2/3 mile up to the top with stunning views of the Cascade Range.

Smith Rocks with Black Butte in the Background

Smith Rocks with Black Butte in the Background

Although the trail is steep, kids can definitely do this hike with you provided you have plenty of water and snacks. I highly recommend doing this hike before it is too hot outside. The trail down is often slippery due to the loose rock so take your time and watch your kids.

View along Misery Ridge Hike

View along Misery Ridge Hike

A Little Hiking Dude!

A Little Hiking Dude!

Once on top, enjoy some snacks and the view of Cascade Range!

These 2 small hikes were the perfect start to spring. We really enjoy exploring all the beautiful places here in Oregon. If you have a favorite hike, let me know!

Enjoy!
~Jennifer