Star Light Star Bright QAL – Block Sides

I finished sewing the block sides for the Star Light Star Bright QAL, hosted by Melissa at Happy Quilting.

The quilt is starting to take shape, and I certainly have some eye popping colors and fabrics! I’m hoping that once the blocks are completed and joined with the sashing that it won’t be too busy.

Here’s my Star Light Star Bright QAL with the block centers and block sides:

Star Light Star Bright QAL Block Sides

Star Light Star Bright QAL Block Sides

On Wednesday, we’ll get the instructions for building the block corners. I’m looking forward to it!

I managed to squeeze in some more time on my Celtic Solstice blocks as well. I’ve just about finished pressing the chevron blocks from step 2 so hope to finish tomorrow and post some pictures.

Enjoy!
~Jennifer

Giveaway Winner!

Last week, I blogged about a Downton Abbey tea party and fabric trunk show that I attended at the amazing Fabric Depot in Portland.

I had a Downton Abbey themed thread pack to giveaway and used a random number generator to pick the winner today.

The winner is . . .
Alexis from Cob Cottage Craft- congratulations!!!

Alexis, please email me your contact details at quiltedcat07@gmail.com, and I will get the thread in the mail to you.

On Sunday, we took an impromptu drive to the Oregon coast to enjoy a walk before the rain moved back in to the area. We got about 2 hours of dry conditions before the rain and winds prompted us to go have lunch. The temperature was about 50 degrees so a little chilly, but very nice for February!

I saw a flock of seagulls perched just inside the surf and snapped this photo:

Seagulls at the Oregon Coast in February

Seagulls at the Oregon Coast in February

For those of you still buried in snow, I hope this ocean photo brings you a smile!

Enjoy,
~Jennifer

Star Light Star Bright QAL Block Centers

There was some sunshine streaming in through my sewing room this morning while I finished up my last three block centers for the Star Light Star Bright QAL hosted by Melissa.

My quilt inspector decided this bit of streaming sunshine was the perfect spot to nap, and he happily agreed to pose with one of the block centers:

Tiger with SLSB Block Center

Tiger with SLSB Block Center

Once I had stitched together the last of my blocks, I placed all nine blocks randomly on a design wall.

Here’s what my QAL looks like so far:

SLSB QAL Block Centers

SLSB QAL Block Centers

There is still time to join this QAL so hop on over to Melissa’s blog and check it out!

If you want to know about my fabric selections for this QAL, I posted each fabric and line on my post here.

Enjoy!
~Jennifer

Andover Fabrics Downton Abbey Tea Party + Giveaway!

Good morning, everyone!

I had a little panic moment when my pictures from this event would not download from my camera card to my computer! Fortunately, I found a workaround and I was able to retrieve the pictures – yea!

Last weekend, I was so excited to be able to attend a Downton Abbey themed tea and trunk show by Andover Fabrics and hosted by Fabric Depot. This was a ticketed event that had been scheduled for the weekend before but got postponed due to a snow and ice storm in Portland.

Each place setting was beautifully decorated and we could choose between a Creme de la Earl Grey tea or a Forest Park tea. I went with the Earl Grey and it was delicious! We also enjoyed delicate little bite-sized treats to go with our tea!

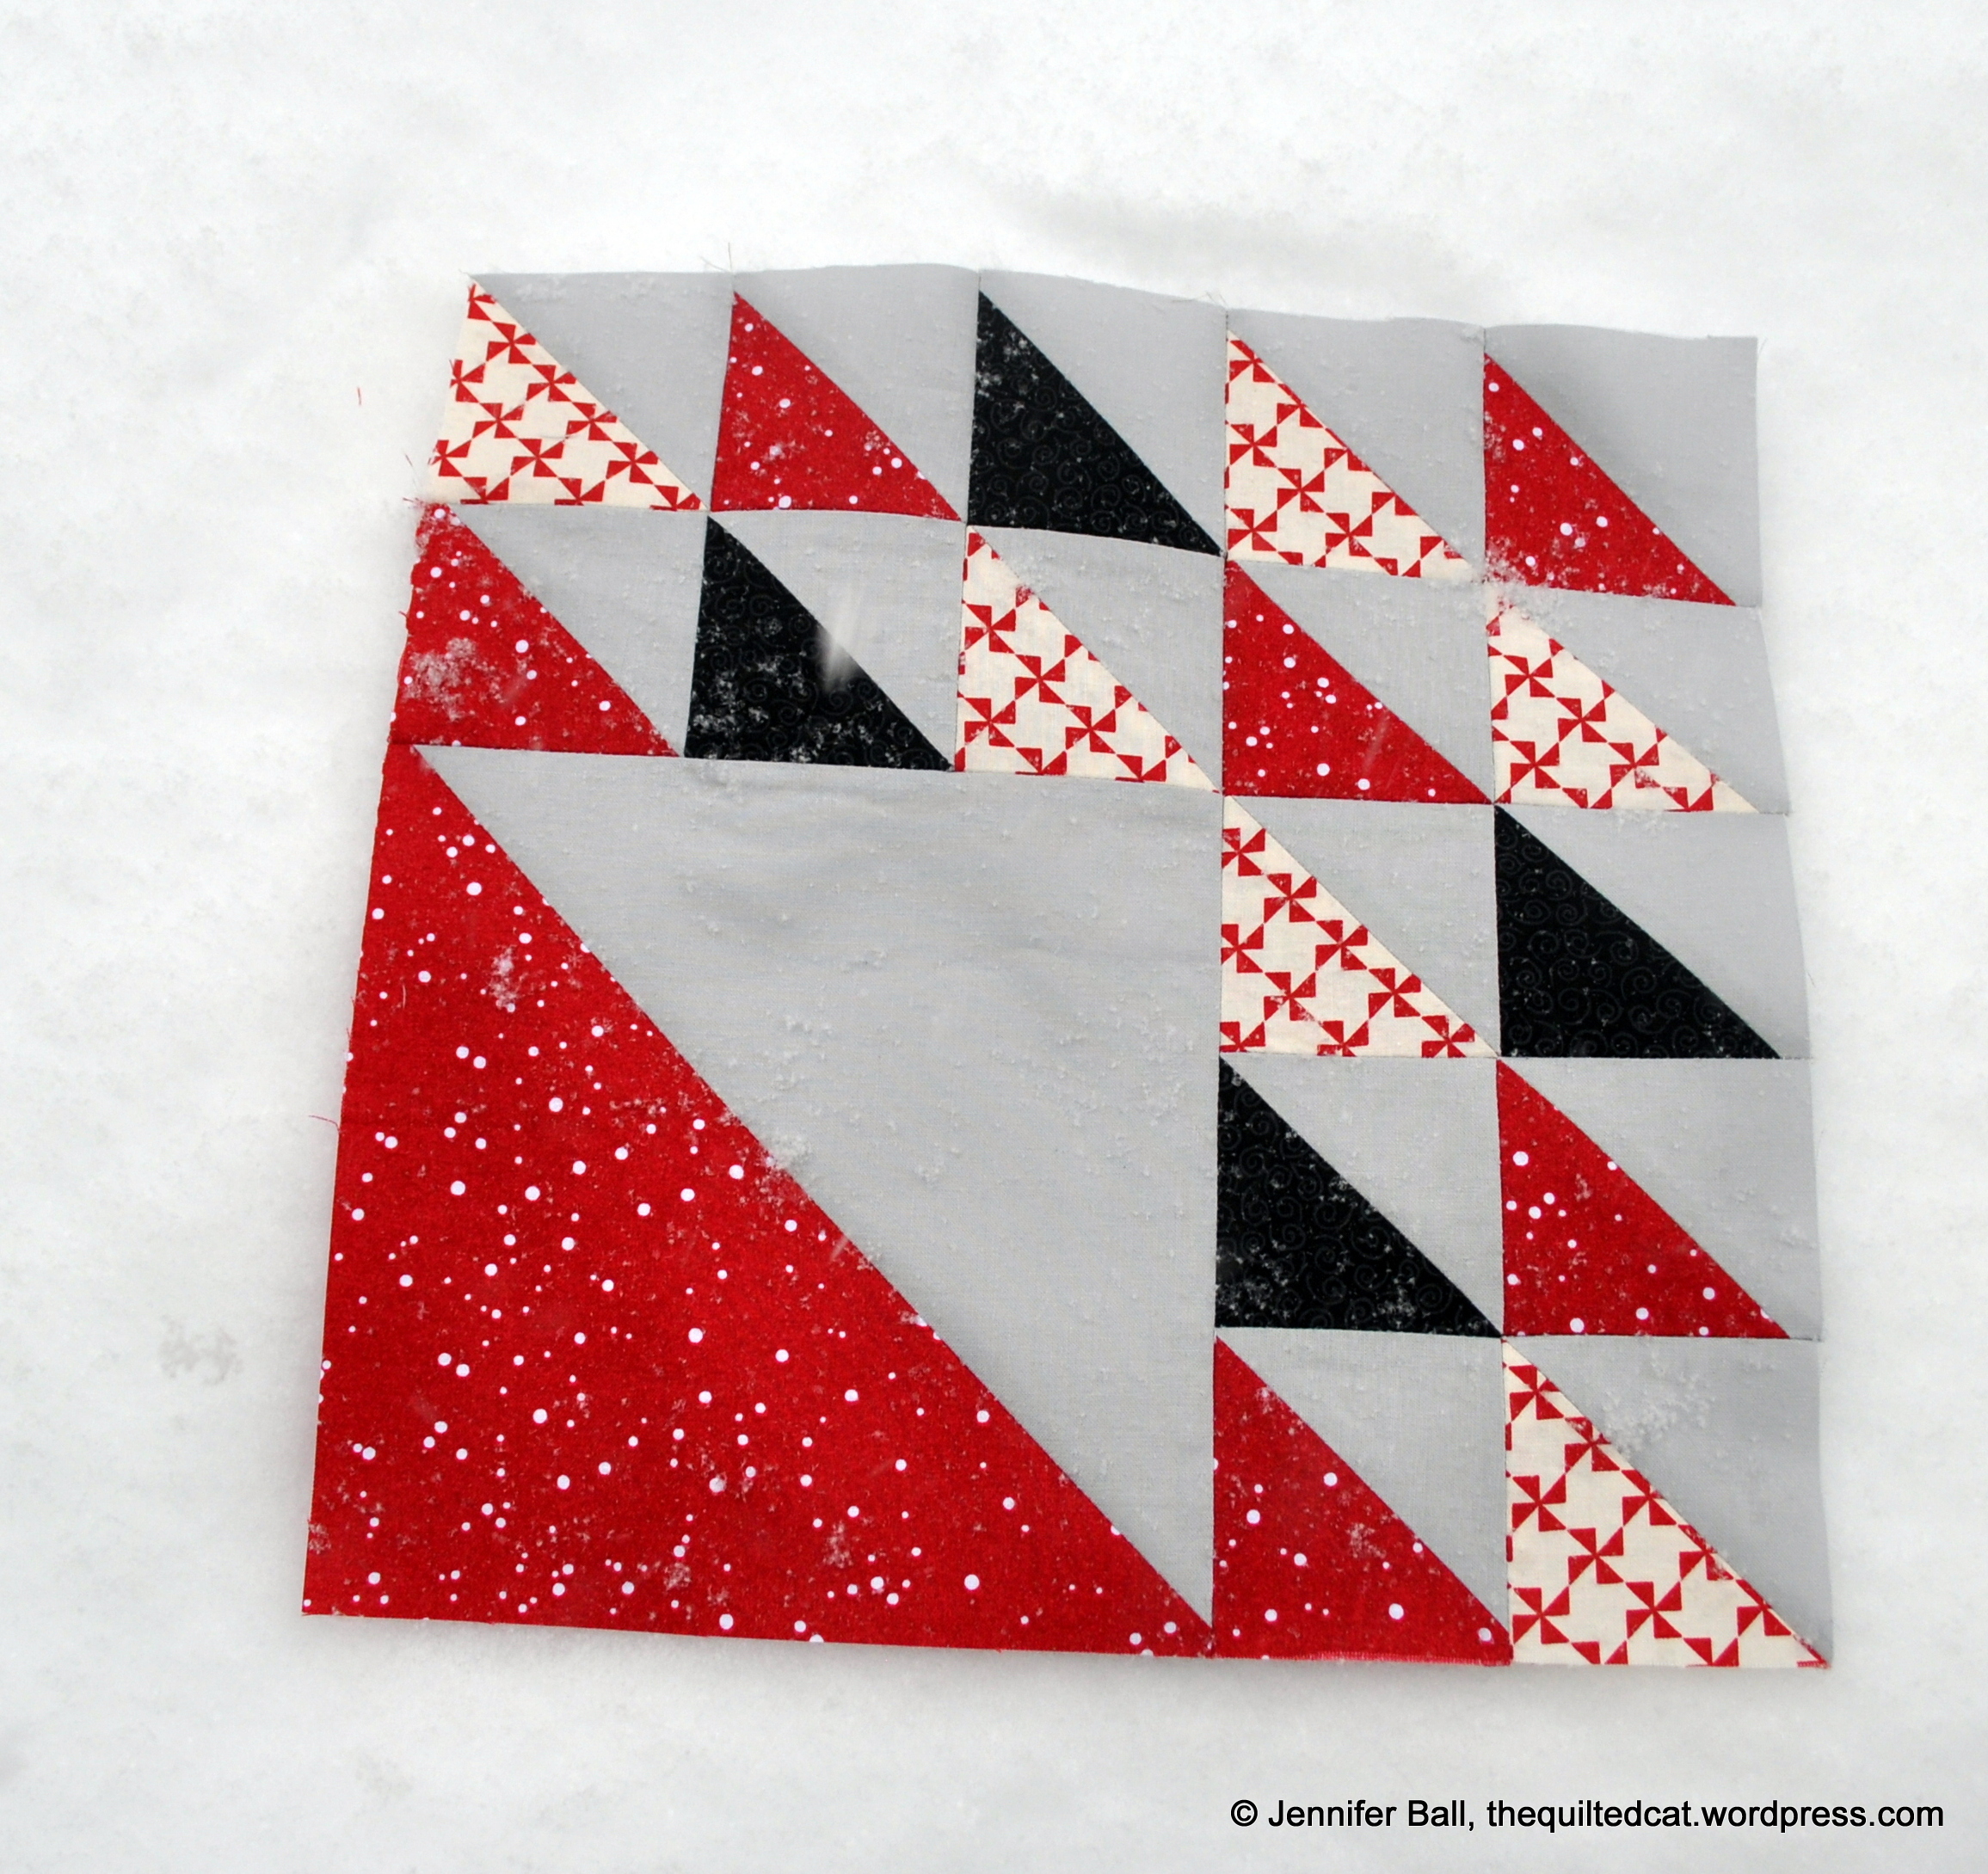
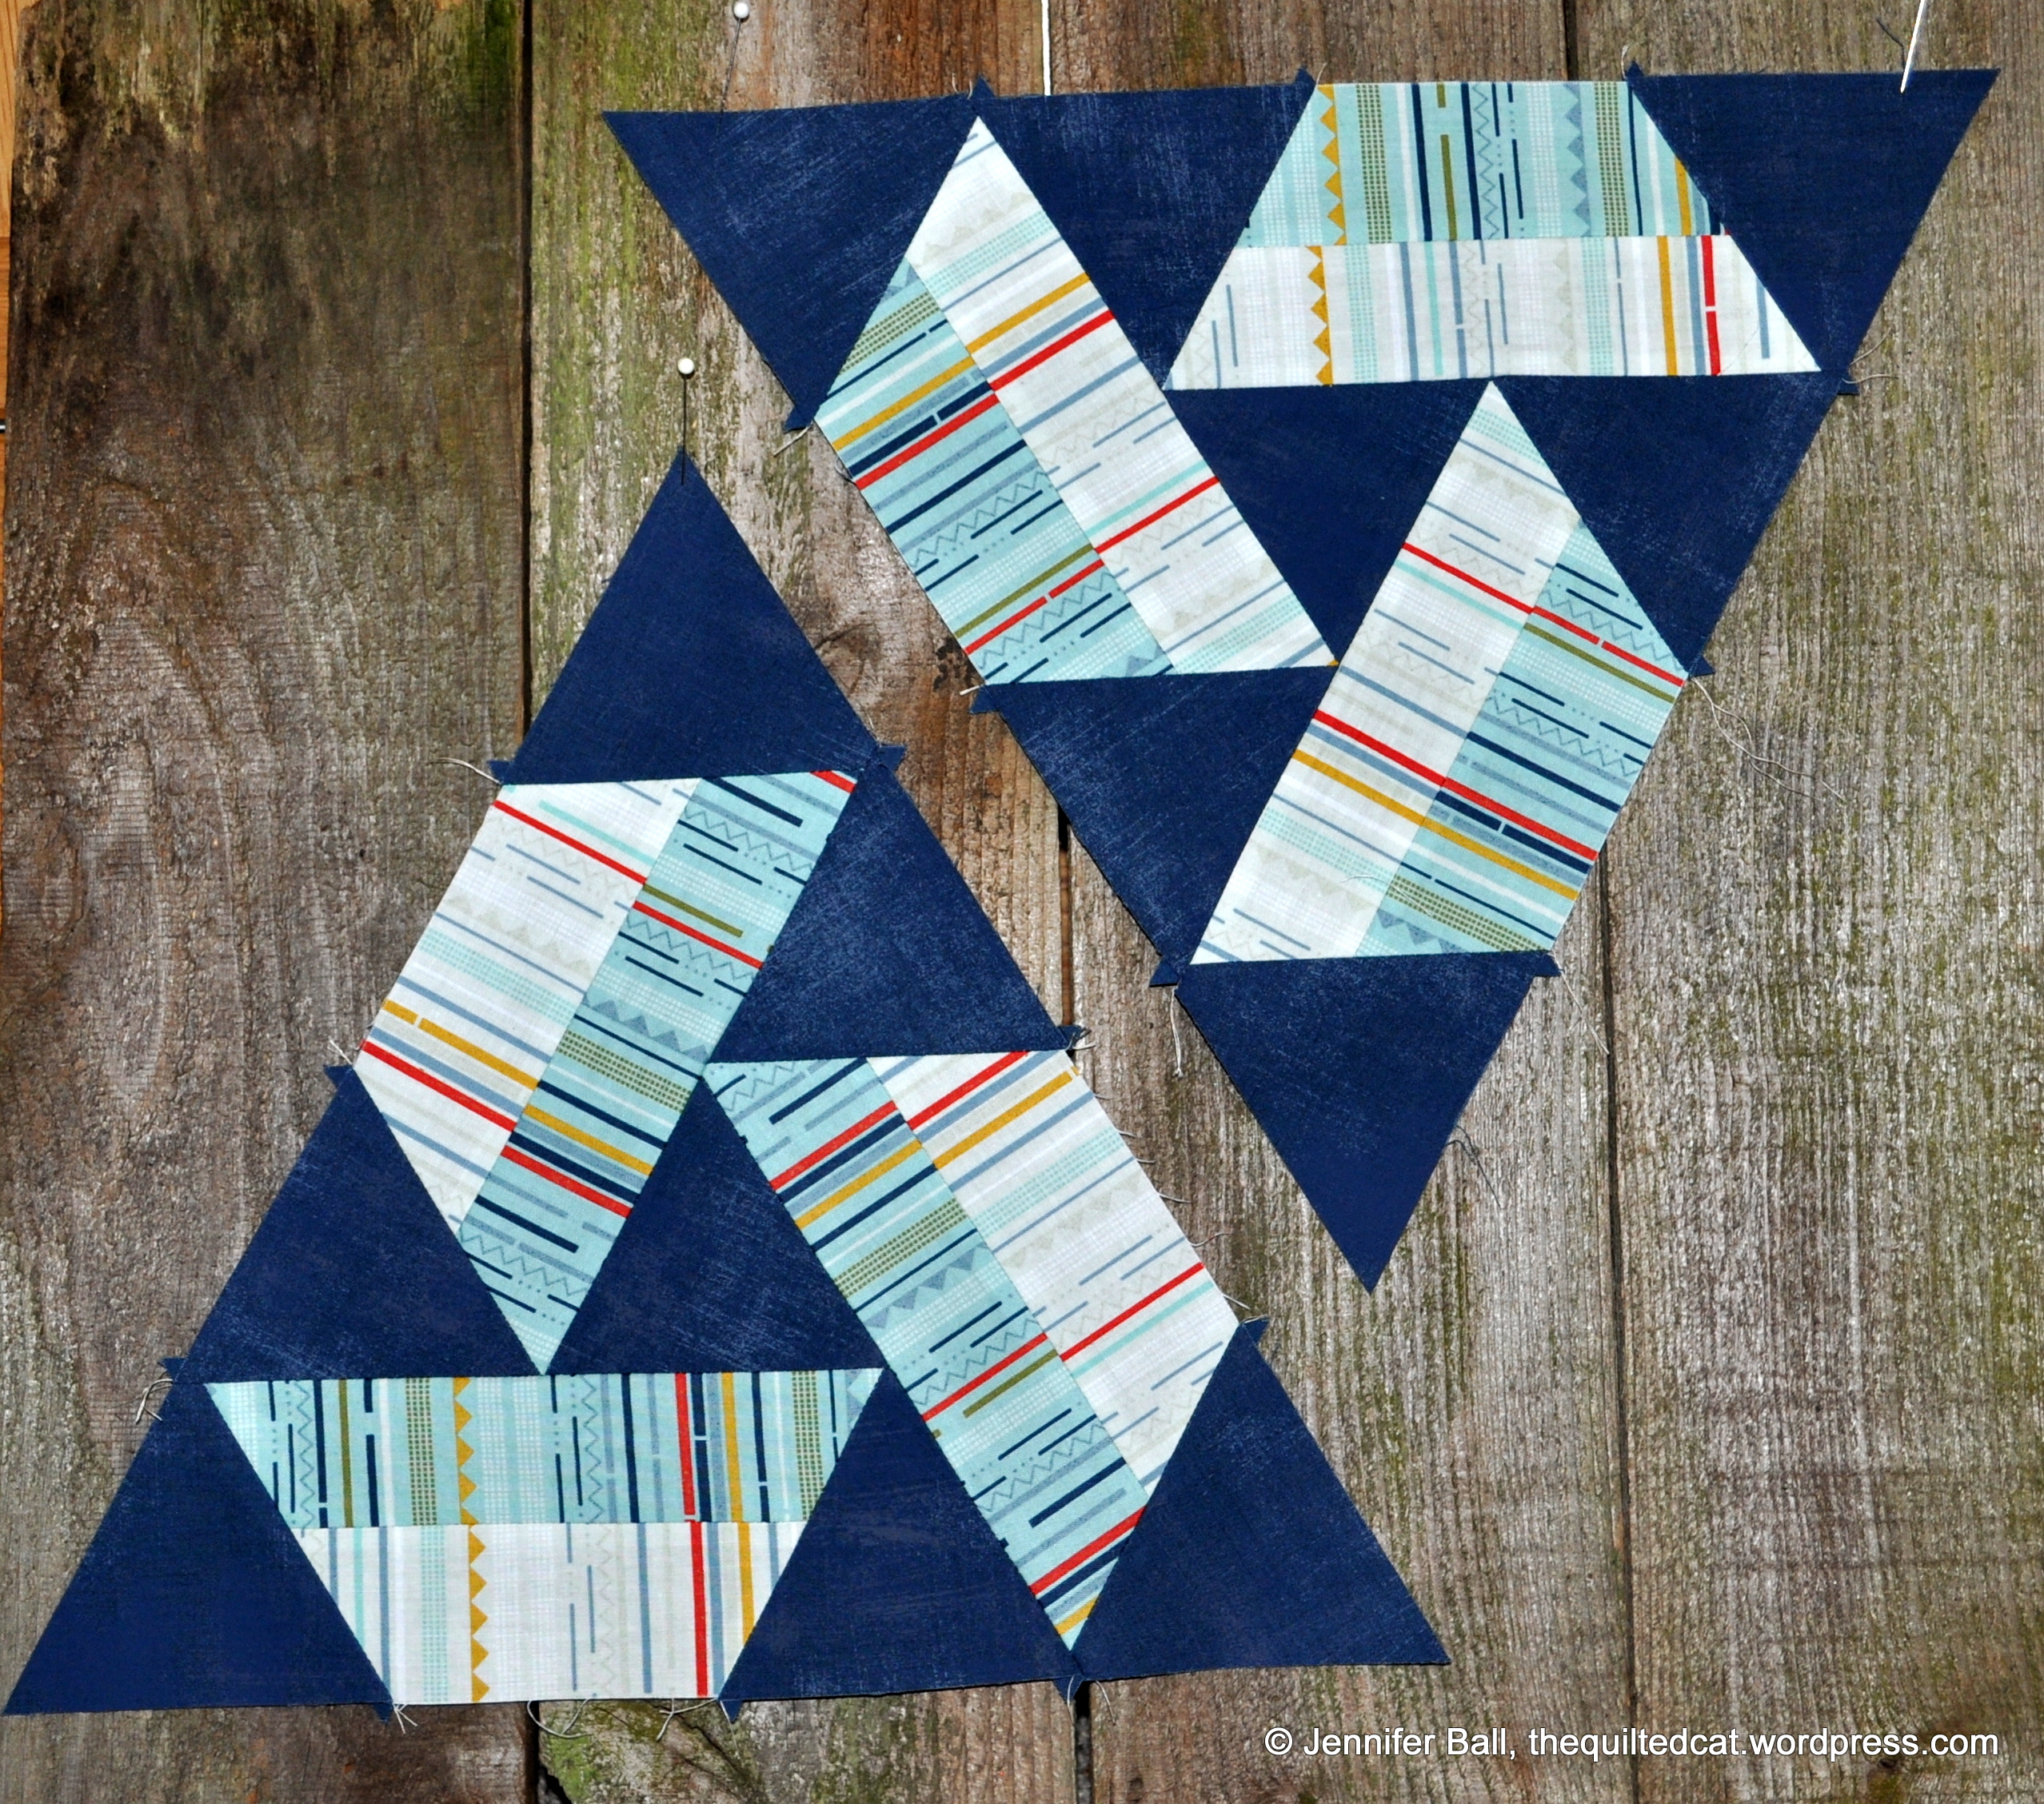
During the tea, attendees were invited to show a panel of judges any sewn creations that they had made using the Downton Abbey fabric line by Andover. I saw many beautiful and elegant dresses, hats, and bags that definitely fit the period of the show. Since I don’t really sew garments, I decided to create a little table topper using the Rock Candy pattern by Jaybird Quilts. You can read about it in my earlier post here. I believe that I had the only quilty type project to show the judges.

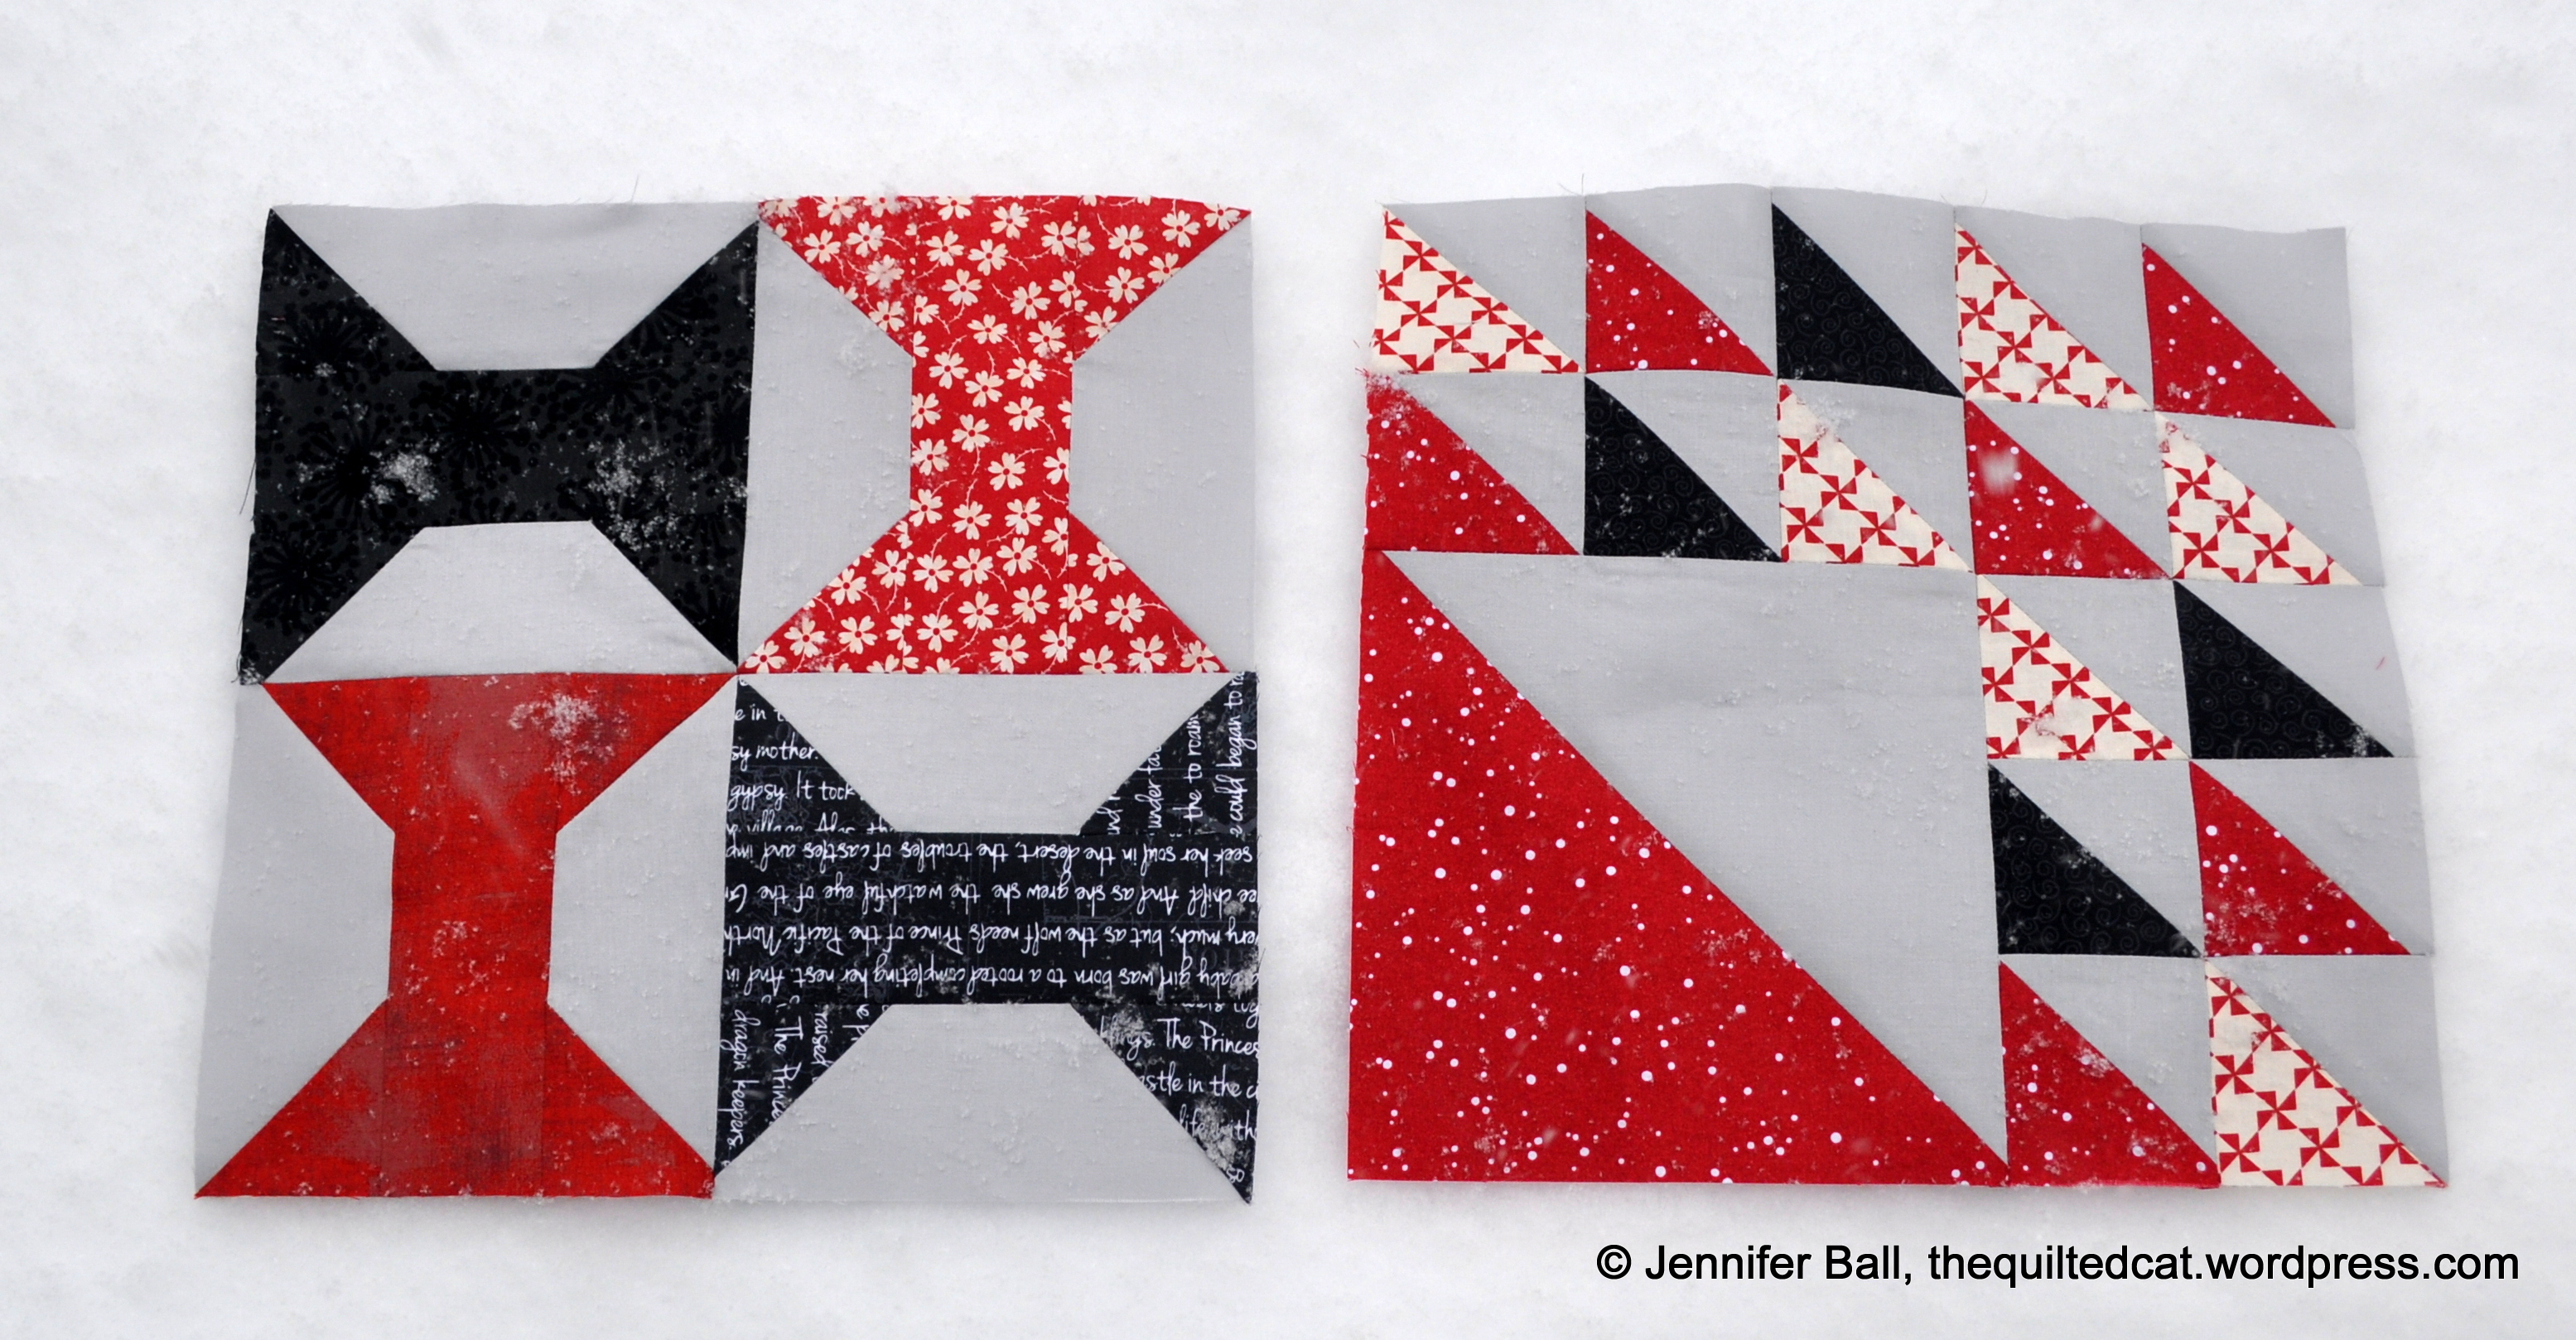
Towards the end of the tea, the prizes were announced and I won second place (most creative) for my little table topper! The prize was a $50 gift certificate to Fabric Depot that I, of course, spent when the tea concluded.

Here’s a picture of my prize and my entry:

I had so much fun at this event and found myself purchasing more Downton Abbey fabric! I want to make a bag and possibly a small quilt wall-hanging.

The trunk show included some completed quilts and bags using the fabric line. I took a few pictures so you could enjoy all of the wonderful creations.

This slideshow requires JavaScript.

Fabric Depot has posted a summary of this event with more photos on their blog here. There is a picture of my hands and the judges’ hands holding my little table topper about half-way through the blog post.

And now for the giveaway! To enter the giveaway, just leave a comment on this post. Be sure that I can contact you if you win! The giveaway will be open until Monday, February 24th at 8:00 a.m., Pacific Time. I’ll use a random number generator to choose a winner. If you are a follower, you can earn an extra entry by letting me know how you follow my blog. I will mail internationally so everyone can enter.

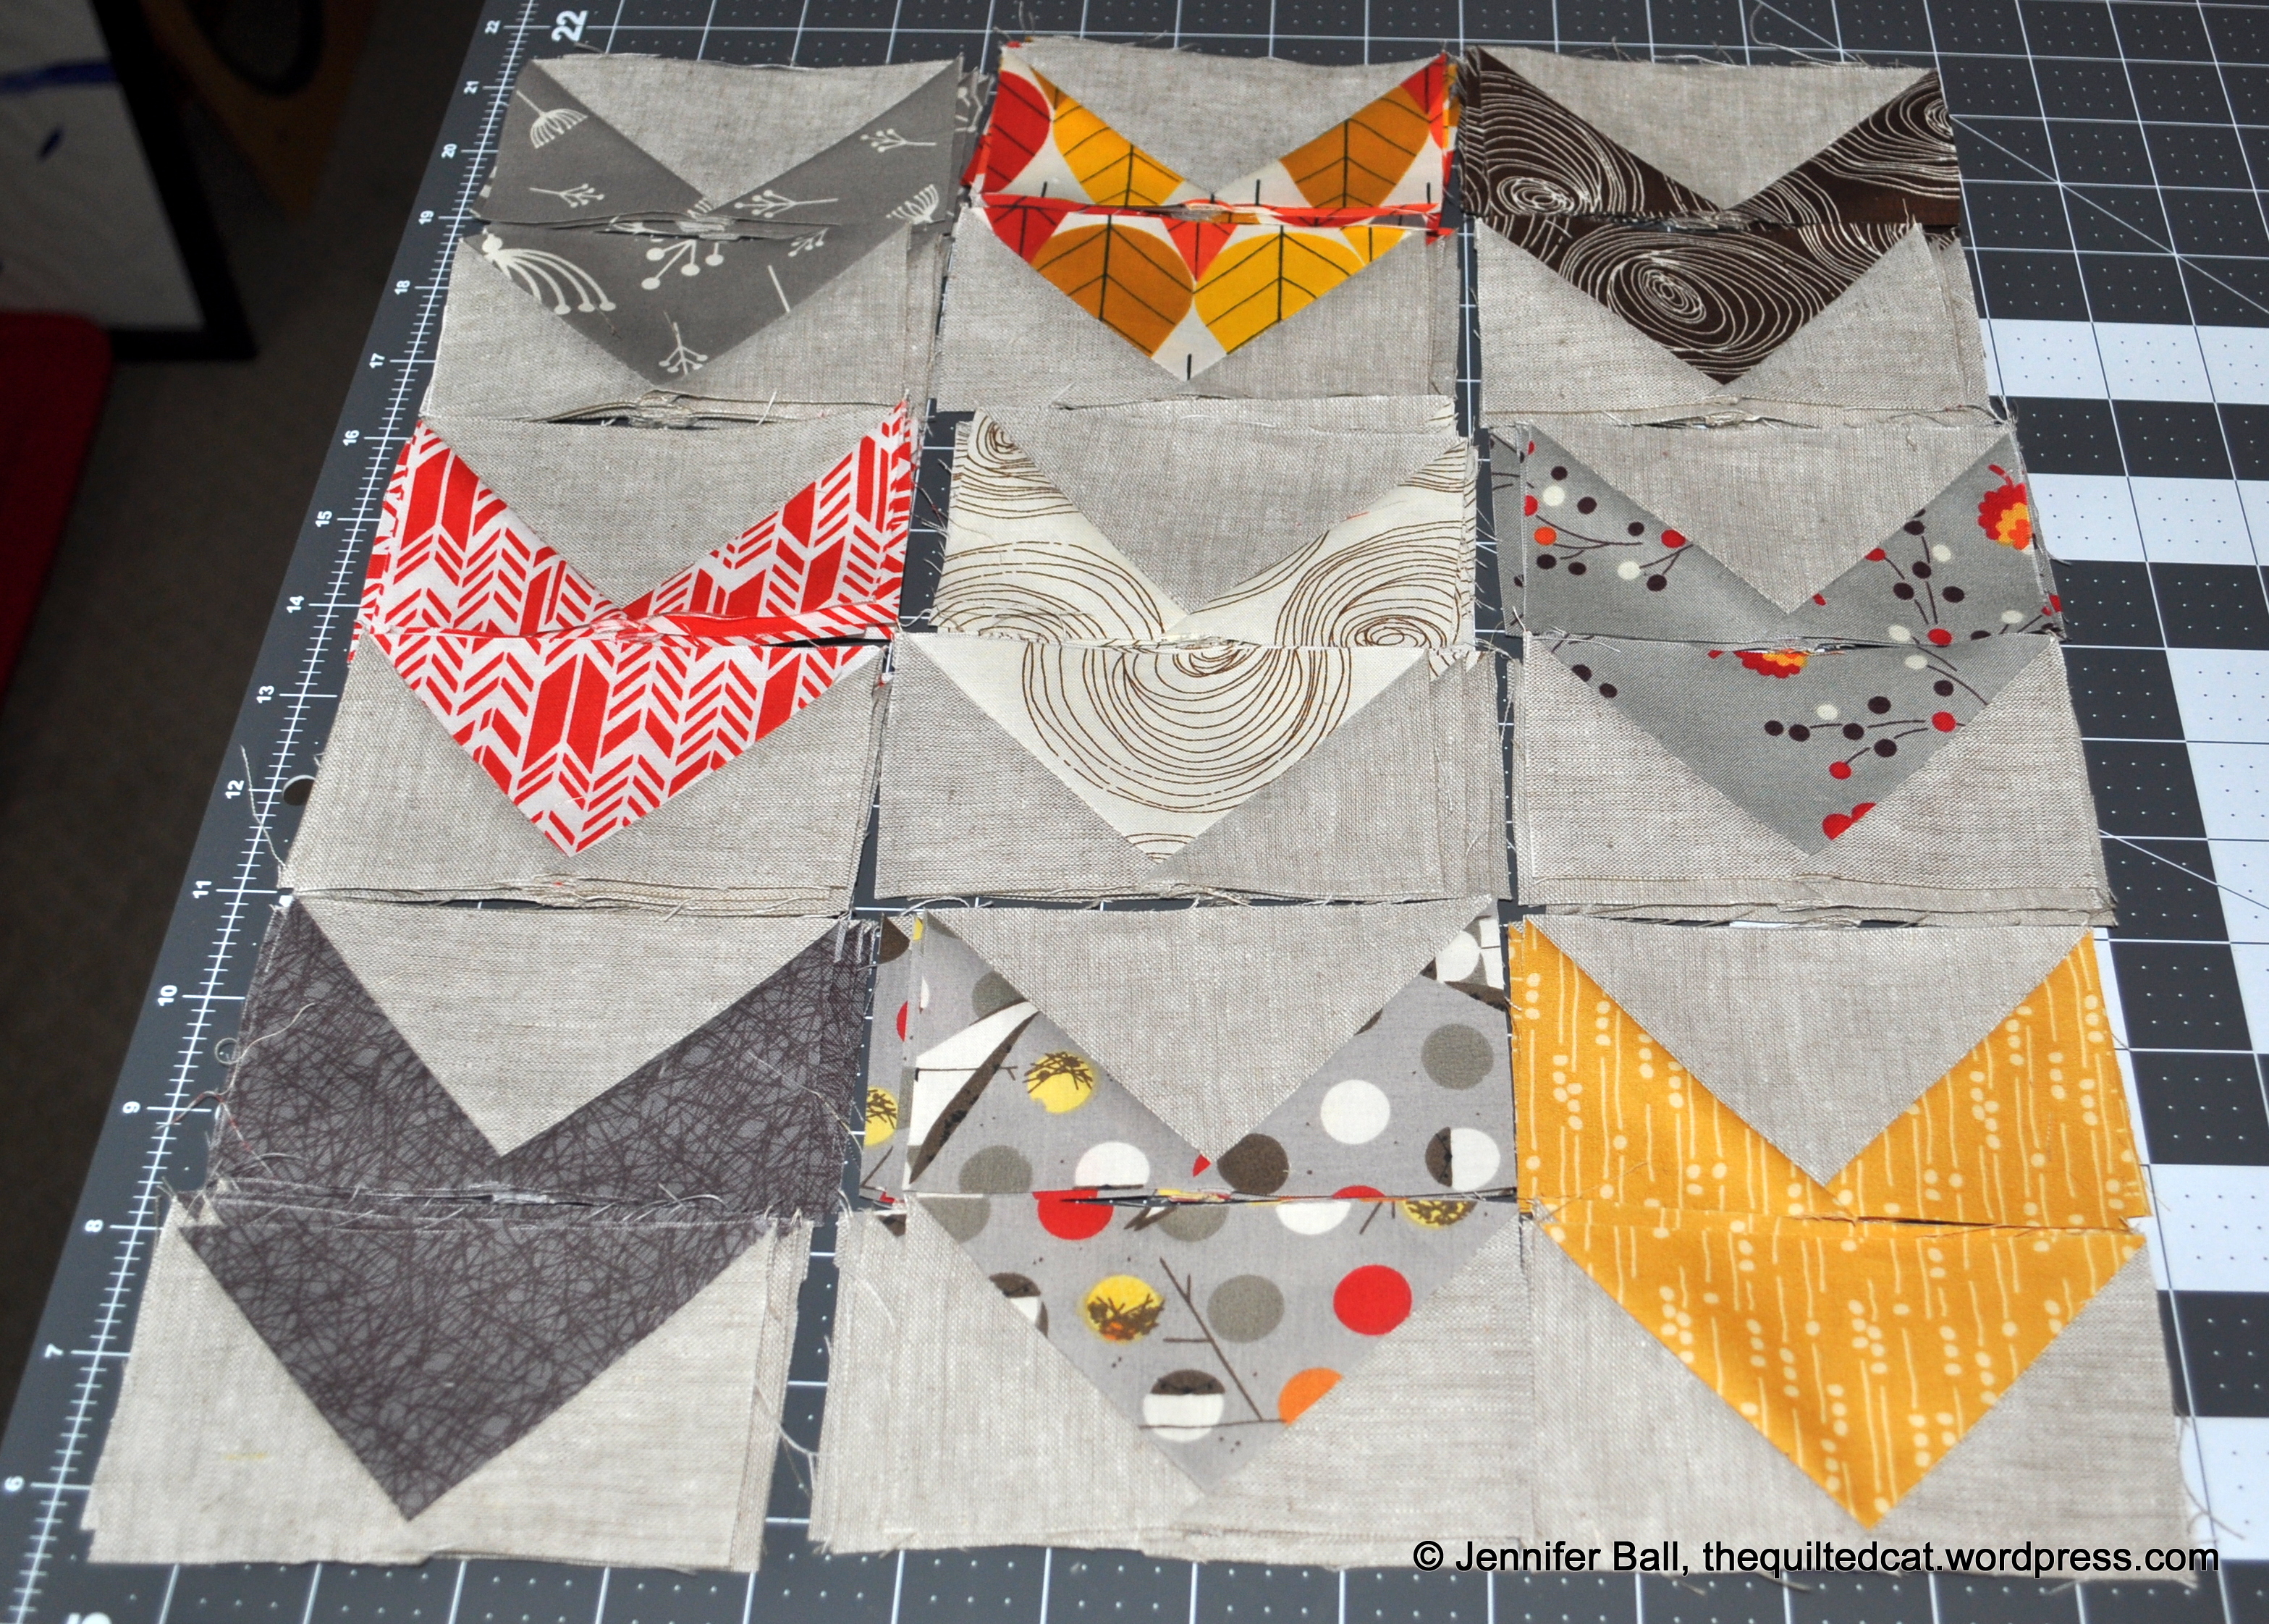
The prize is a pack of Gutermann thread designed to go with the Dowager Countess fabrics from the Downton Abbey collection. This set includes a plum thread (#942), a light grey thread (#100), and a dark grey thread (#112).

Dowager Countess Thread Pack Giveaway

Dowager Countess Thread Pack Giveaway

Good luck!
-Jennifer

Star Light Star Bright QAL, Half Square Triangles

Happy Monday!

This weekend, I found time to work on my project for the Star Light Star Bright QAL hosted and designed by Melissa. There is still time to join the fun so pop on over to her blog to check out all the details!

Our assignment this week was to create our half square triangles. I’m making the 9-block baby size quilt so I had quite a few HST’s to sew and trim!

The sewing part went pretty fast as I chain-stitched each grouping. The important part of this step was to keep our groupings separate so we don’t confuse the half square triangles between groups. I labeled each group with a sticky note and only sewed one group at a time.

Next, we trimmed our little HST’s! This part makes me happy to sew all those perfectly square little blocks, but I definitely get a sore left forearm. I cut with my right hand, but seem to hold onto my squaring ruler pretty tightly with my left hand so that the fabric doesn’t wiggle. This seems to lead to soreness the next day when I do lots of trimming.

Here’s a look at my little mountain of trimmed edges:

HST Trimmings

HST Trimmings

I’ll use these trimmings to make more cat nip presents for my quilt inspectors.

Here’s a look at all my half square triangles, neatly trimmed. I have group 1 spread out on my cutting table next to groups 2 through 9.

Half Square Triangles for Star Light Star Bright QAL

Half Square Triangles for Star Light Star Bright QAL

And here’s a look at all my HST’s and flying geese bundled up together in a little tray:

Organizing Tray for Star Light Star Bright QAL

Organizing Tray for Star Light Star Bright QAL

Stay tuned for next week’s post where I will show you my block centers for this QAL.

I also had the opportunity to attend a Downton Abbey tea party hosted by Andover Fabrics on Saturday. I even won a prize – eek! I’ll upload my photos from this wonderful event to an upcoming post so stay tuned!

Enjoy!
~Jennifer

Aurifil February BOM

Happy Tuesday, quilty friends!

During the snow and ice storm that we had in Oregon this past weekend, I got in some extra sewing time. In addition to finishing up my flying geese for the Star Light Star Bright QAL, I also finished my February block for the Aurifil BOM!

February’s Aurifil block is designed by Amy Gibson of Stitchery Dickory Dock and is called “Mother’s Day.” It is such fun block to make featuring half-square triangles.

Here’s a look at my block in the snow using red and black fabrics from my stash. My background fabric is Kona cotton in Shadow.

Aurifil February BOM

Aurifil February BOM

Here are my January and February blocks side-by-side:

Aurifil BOM: January and February blocks

Aurifil BOM: January and February blocks

I’ve recently been experiencing with a new smartphone app called Waterlogue. It takes your pictures and turns them into watercolor paintings – very cool! I used this app with my February Aurifil block when two of my cat inspectors decided to check out the block. I’ll post the before-and-after pics together. What do you think?


The great snowstorm has now melted and we are back into our regular winter pattern of rain and wind!

Happy quilting!
~Jennifer

72 Flying Geese and Snow!

Happy wintery Saturday!

We haven’t had much snow for the past several winters in Oregon, but we are making up for it now! Over the past 2 days, the snow has been pretty constant and we are nearing the 1-foot accumulation mark. The snow looks so pretty falling down from the sky, but I am glad that we only experience this much snow every 4 or 5 years.

While I was sewing some flying geese today, my 8-year-old noticed a flock of beautiful fluffed up robins trying to take shelter in a tree in our background. I took these pictures through the window of an upstairs bedroom. So beautiful!

Robins in the Snow

Robins in the Snow


Fluffed Up Robins

Fluffed Up Robins

For the Star Light Star Bright QAL hosted by Melissa, our assignment this week was to sew flying geese. I am making the 9 block baby sized quilt so I needed to stitch together 72 pairs of flying geese! These geese went together so quickly using Melissa’s no-waste method.

Here are my flying geese all lined up!

Star Light Star Bright Flying Geese

Star Light Star Bright Flying Geese

If you want to know what fabrics I’m using for the QAL, you can read about my selections here.

Since we’re snowed in today, I’m going to keep sewing on my chevron units for Bonnie Hunter’s Celtic Solstice quilt. I hope to get these units finished up this weekend.

Enjoy the snow!
~Jennifer

Toes in the Sand BOM, Month 10

I’m caught up again on my Toes in the Sand BOM project! I recently finished stitching up the blocks for month 10 – Hermosa Beach!

This BOM is designed by Julie of Jaybird Quilts and uses her fabulous Hex n’ More ruler. You can read about some of my earlier blocks here.

I really love the versatility of this BOM and the happy quilty feeling I get each month when I finish the blocks. I’m looking forward to summer more and more each time I work on this project!

Here’s a look at my Hermosa Beach (month 10) blocks:

Toes in the Sand BOM, Block 10

Toes in the Sand BOM, Block 10

Here in the Pacific NW, we’ve had several years of mild winters. We’re predicted to get our first snow/ice storm this coming weekend. My quilting inspector is soaking up all the sunshine he can before the storm arrives. This block is cat approved!

Hermosa Beach block is cat approved!

Hermosa Beach block is cat approved!

Here’s wishing you a quilty week!
~Jennifer

Star Light Star Bright QAL Fabrics

Happy Friday, everyone!

Melissa over at Happy Quilting has once again designed a great quilt-along for everyone called Star Light Star Bright. This is a weekly QAL with the cutting instructions posted this week.

For this project, I’m going to make the 3 block by 3 block baby quilt size. I found some wonderful Charley Harper fabrics that I’m going to use along with some other bird/fall themed prints that I think will work well together.

Here’s a look at my fabrics before cutting. They looked so pretty that I almost hated to cut them!

Star Light Star Bright Fabrics

Star Light Star Bright Fabrics

See the beautiful red cardinals peeking out in the back? I’m saving that piece for something special!

You know that you need to take a break from cutting fabric when your quilt inspector jumps onto your cutting table and gives you this look:

Time to Stop Cutting Fabric!

Time to Stop Cutting Fabric!

I finished cutting all my pieces this afternoon. Here they are all lined up nice and pretty:

Star Light Star Bright Pieces

Star Light Star Bright Pieces

These are the fabrics in the photo:

  • Background is Essex Yarn Dyed in Flax by Robert Kaufman.
  • Brown twiggy fabric is Bark from Birds of a Feather Nest by Michael Miller.
  • Yellow/gold fabric is Meadow of Gold from Reminisce by Bonnie Christine for Art Gallery Fabrics
  • Bird and colored dots fabric is Bank Swallow Fall from Charley Harper for Birch Fabrics.
  • Red arrows fabric is Feathers Sun Print A-7244-0 from Andover.
  • Brown with white swirls fabric is Brown Rings from Honeycrisp by Dear Stella.
  • Multi-floral fabric is Flea Market Fancy Posie in Grey for Freespirit.
  • White with brown swirls fabric is Cream Rings from Honeycrisp by Dear Stella.
  • Grey floating floral is Twig Fall Shroom by Charley Harper for Birch Fabrics.
  • Colored leaves fabric is Octoberama Fall by Charley Harper for Birch Fabrics.
  • I really hope that these fabrics work well together!

    There is still time to join the QAL and follow along. We’ll start sewing beginning next week so come join in on the fun.

    Happy rotary cutting!
    ~Jennifer

    Celtic Solstice Part 1 + Cat Approved Quilt Fabric Confetti Tutorial

    Greetings everyone!

    I had that nasty stomach bug this weekend that seems to be going around. Ugh! The good news is that I finally managed to finish piecing, pressing, and trimming my pieces for part 1 of Bonnie Hunter’s Celtic Solstice mystery quilt! You can read about this mystery quilt in my earlier post here. Many people have already finished their quilts and you can see some beautiful finishes on Bonnie’s blog.

    I’m making the smaller version of the quilt so I have 96 neutral (cream) units and 92 orange units:

    Celtic Solstice Part 1 Units

    Celtic Solstice Part 1 Units

    For this quilt, I’m using leftover scraps from other projects plus random fat quarters and half-yard pieces in my stash. I used 7 different oranges, 5 different creams, and 7 different blues to make the units in part 1.

    Once these units are finished, the next step is to trim off all the little left-over dog ears.

    You end up with a pile of quilty fabric confetti!

    Quilt Fabric Confetti

    Quilt Fabric Confetti

    Now, you may be thinking that this fabric confetti isn’t too useful in future quilty projects, and I agree! However, if you have a cat quilt inspector, you can use this leftover material to make a cat-approved project.

    Cat Approved Quilt Fabric Confetti Tutorial (aka a catnip toy)

    • Cut two rectangles at 4 inches by 4.5 inches from denim, canvas, or other sturdy material.
    • Cut a 6-inch piece of rick rack (for the tail).
    • Catnip Toy Materials

      Catnip Toy Materials

    • Pin the fabric pieces, wrong-sides together.
    • Sew using a 1/4-inch seam allowance and make sure to leave a small opening along one edge.
    • (Optional): Sew a zig-zag stitch around the outside edge for extra reinforcement. Remember to leave a small opening for stuffing.
    • Stuff the quilt fabric confetti and dried catnip into the opening.
    • Insert rickrack about 1-inch into the opening and pin close.
    • Stuff the Catnip Toy

      Stuff the Catnip Toy

    • Stitch opening closed with a 1/4-inch seam and optional zig-zag stitch. Be careful! This is a step where your quilt inspector will try to help.
    • Tiger "Helping" Me Finish the Catnip Toy

      Tiger “Helping” Me Finish the Catnip Toy

    • Clip any loose threads and present the quilt fabric confetti project (aka catnip toy) to your quilt inspector for approval!
    • Tiger loves it!

      Tiger loves it!

      Catnip Toy is Approved!

      Catnip Toy is Approved!

      I’ve made a few of these catnip toys for my quilt inspectors, and they are pretty sturdy. I have one cat that picks it up and carries it around like prey, meowing all the while. My orange cat loves to grab the tail in tight and then hold onto the body of the toy while rubbing his face all over it. He becomes very affectionate!

      I hope you enjoy this little project and have a quilty week!
      ~Jennifer