A Cute Cat Jack O’ Lantern Block for Halloween

Are you looking for a cute and not scary block for Halloween? How about a cute little cat face on a pumpkin? This adorable block will work on trick-or-treat bags, table runners, mini quilts, and larger quilts.

Pattern

For a limited time, this cute cat jack-o-lantern quilt pattern is on sale in a favorite Halloween craft magazine. You can choose to purchase a hard copy that is mailed to you or a PDF download, which you can download to your computer.

Here’s a look at my block:
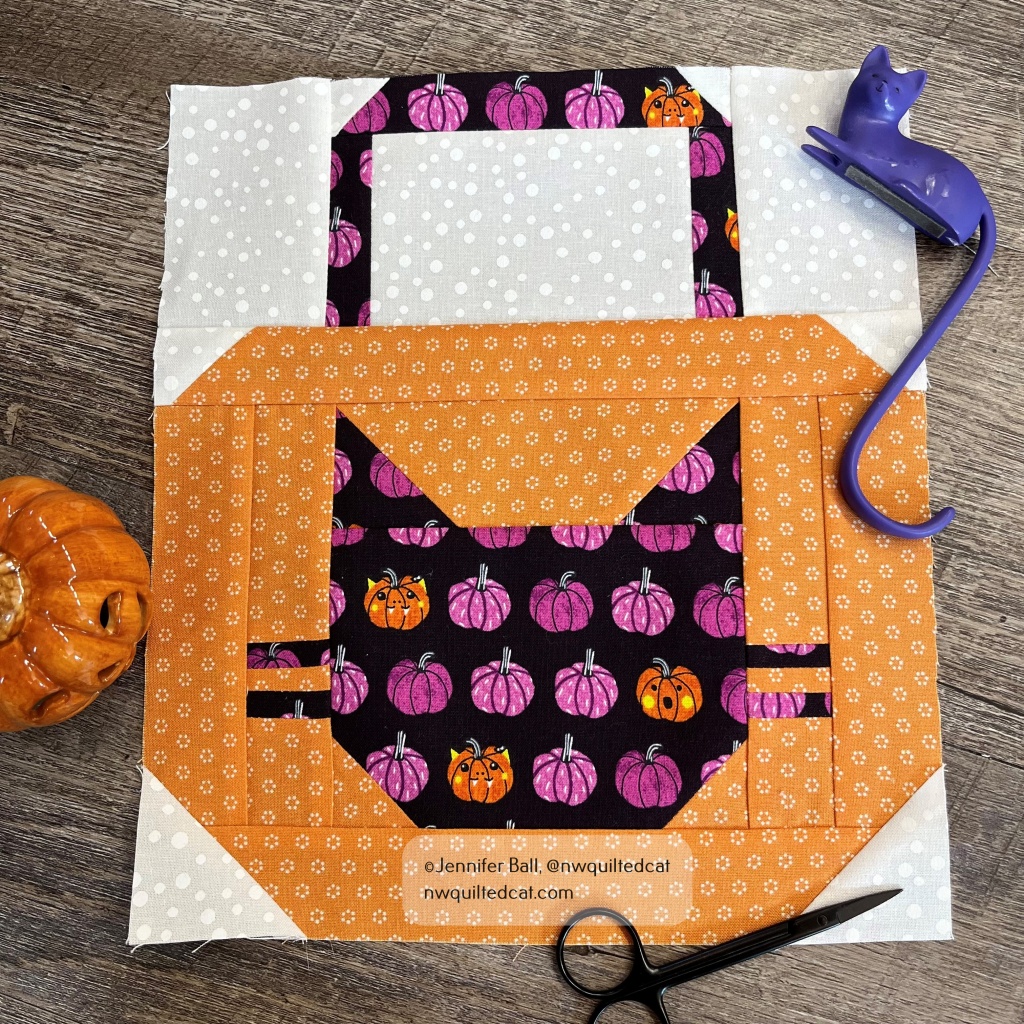
I loved using a pumpkin-themed fabric for my cat face! Aren’t those little cat-faced pumpkins with fangs just adorable? I want to make several different fabric combinations using different oranges, blacks, and low-volume backgrounds and create a lap quilt.

For my block, I used the following fabrics:

  • Background fabric: white dotted fabric from “Too Cute to Spook” by Me and My Sisters Designs.
  • Cat and handle fabric: purple/orange pumpkin fabric from “Bring Your Own Boos” by Cotton + Steel
  • Pumpkin fabric: orange fabric from “All Hallow’s Eve” by Fig Tree Quilts

This block is a great stash buster, and you can really have great fun with different fabric combinations. I love seeing a cat face block with the whiskers. It adds a nice element of whimsy to the block.

The quilt pattern in the magazine has a great layout with plus-shaped blocks added between rows of cat jack o’ lanterns and makes a finished quilt at 45″ x 48″.

Time to get started on those Halloween projects!

~Jen

Cats in Space Cuteness Overload!

It’s no secret that I’m a cat lover! I’m currently owned by three cats, including one special foster kitty named Gracie. The three cats take turns playing musical laps, rotating on my lap so that each one gets some special petting and snuggle time. When I saw a new pattern by Elizabeth Hartmann called Cats in Space, I just knew that I had to make it as soon as possible.

I had a short quilt retreat recently with my sister and two of our quilting friends. I tossed this pattern into my bag along with some fabrics to make one cat block. Usually, I like to precut pieces for a quilt retreat, but I didn’t have time with this project.

I started by cutting out each section according to the pattern, and I labeled the sections with these amazing little plastic squares called Alphabitties. I take each label and clip it to the fabric piece using a Wonder Clip. These Alphabitties labels are game changers for patterns with tons of little pieces that can be easily confused with one another.

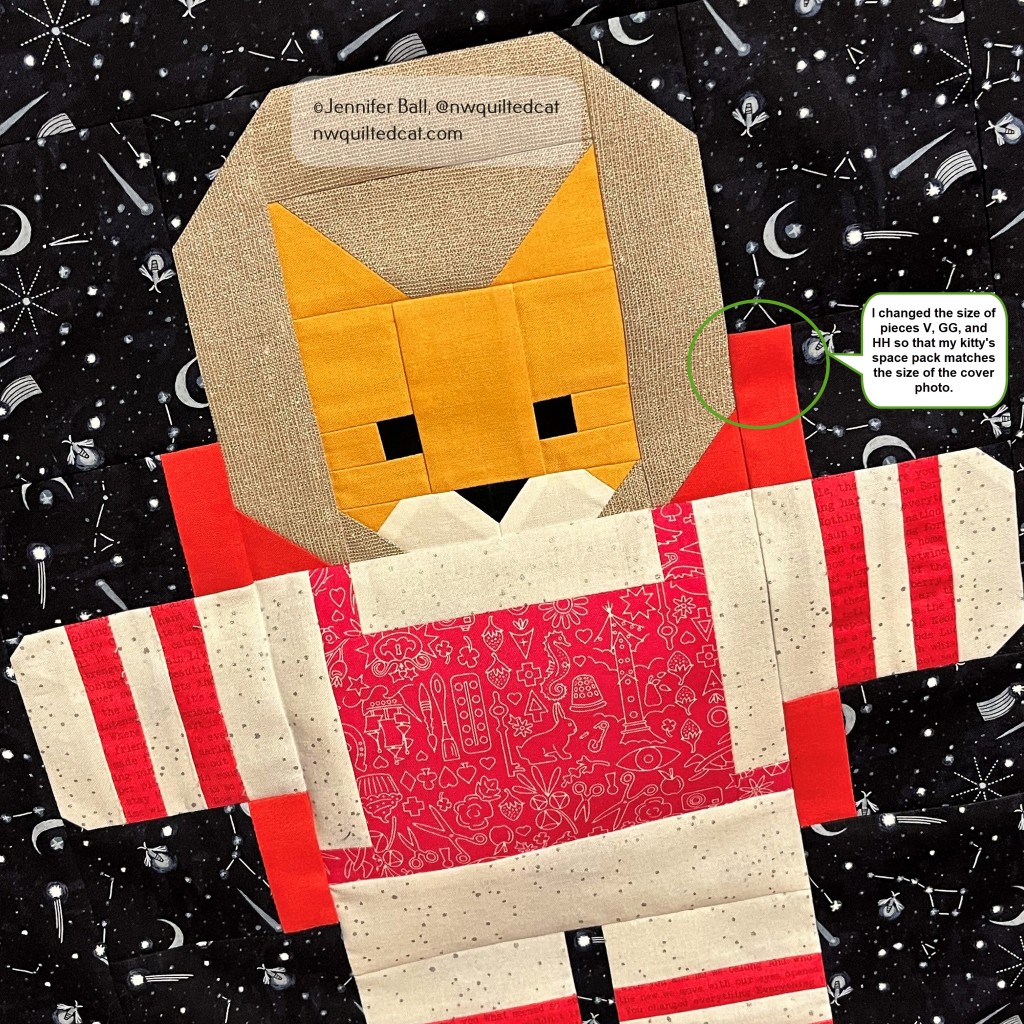
I did notice a possible pattern error related to the diagrams. If you look at the picture on the pattern cover, the space pack on the cat’s back is higher than in some of the pictures inside of the pattern. The pattern pieces (V, GG, and HH) are sized so that your space pack comes out shorter than the pattern cover photo. I adjusted these few pieces so that my kitty’s space pack is the higher version.

Here’s a close-up view of the space kitty:

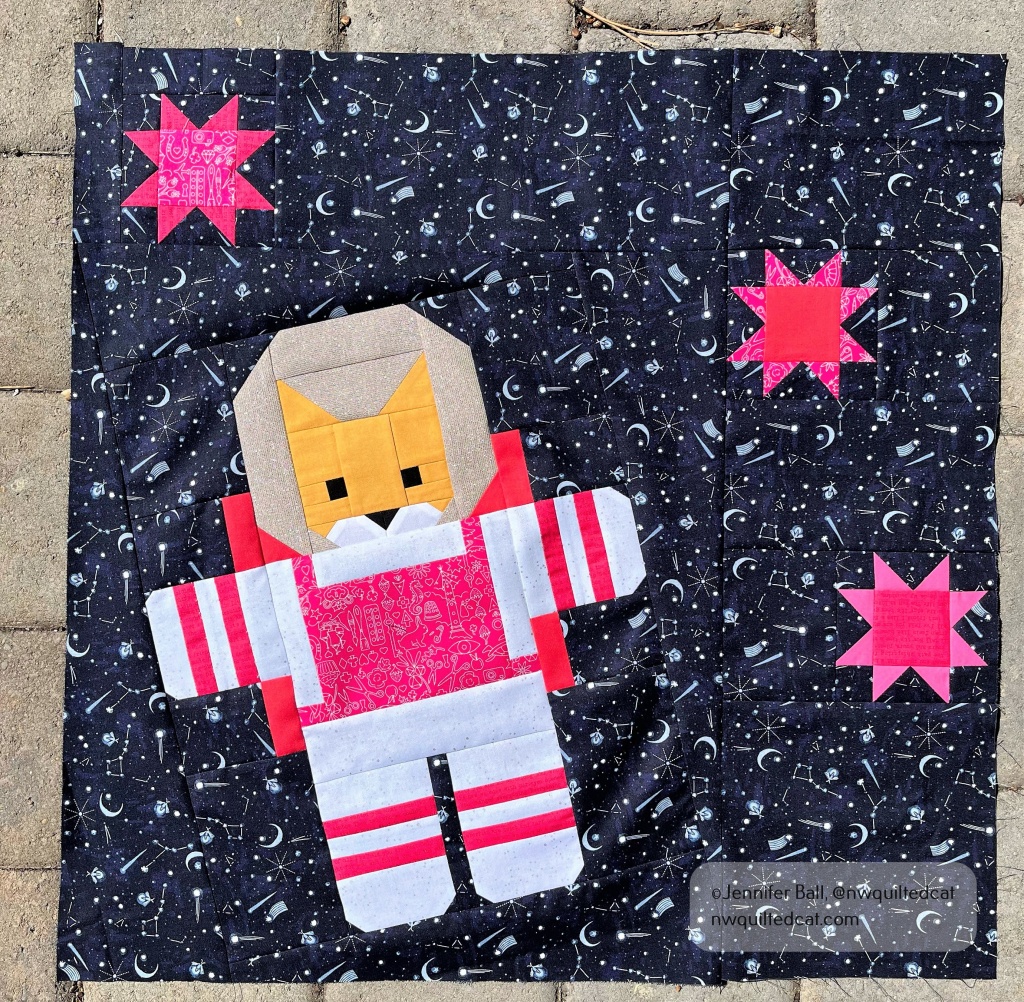
Isn’t the background fabric fun? It has little fireflies, shooting stars, and constellations. It’s called Night Sky by Dear Stella. The other fabrics are from my stash. I used some Alison Glass pink fabrics for the space suit details, some sparkly Essex linen for the helmet, and Kona cotton solids for the kitty.

Once I had created my kitty block, I wasn’t sure if I wanted to keep it as-is or go ahead and add the three stars surrounding the kitty. I’m pretty sure that I’m going to turn this block into a mini quilt so I thought that the three stars would just up the cuteness factor.

Here’s a look at my finished block:

Swoon! This block is so adorable. The kitty looks like she’s coming in for a hug with her favorite human. I love it so much!

I’m still leaning towards keeping this space kitty as a mini quilt to hang in my sewing room. If I decided to make the small size quilt, I’d need three more space kitty blocks.

What do you think? A mini quilt or enlarge it?

Happy quilting!

Jen

Modern Quilt Guild Mini Quilt Swap 2022

Hi everyone,

Earlier this year, I participated in the annual MQG mini quilt swap. This swap event is an open swap, meaning that you and your partner are making mini quilts for each other. In contrast, most swaps are not open but secret, meaning that the person you are making a mini quilt for is usually not the person who is making a mini quilt for you. It’s a surprise when you get your mini in the mail.

For the MQG swap, many participants plan to attend and swap their mini quilts in person at the annual modern quilt show called QuiltCon. For those who cannot attend, you have the option of swapping with your partner via mail. That’s the option that my partner and I selected this year.

I received my partner’s name and quilt preferences via email from our “Swap Fairy,” who is the person assigned to a group of swappers to ensure that everything is running smoothly. My partner listed her favorite colors, fabric designers, and preferences so I could take those into consideration when making her a fabulous mini quilt.

I decided to do a modern traditional feel for this swap. I designed a mini quilt using the traditional churn dash block, but I made it feel modern by setting it on-point, elongating it slightly, and then added little color accents in each corner. My partner’s favorite colors are jade, green, turquoise, and yellow.

Here’s a look at the finished mini quilt:

Modern Churn Dash mini quilt for the Modern Quilt Guild 2022 swap

I took the mini quilt with me on a short hike to Latourell Falls in the Columbia River Gorge before mailing it to my partner. My teen did the honors of holding it up while I snapped the pic. He’s such a great quilt holder!

I used a variegated Aurifil thread to quilt the spiral on the mini quilt using my domestic sewing machine. The background fabric is a light-colored Spectrastatic print by Giucy Giuce, the churn dash fabrics are Kona cotton solids, and the yellow and green accents are from my scrap bin.

I usually like to make a small extra gift to go along with mini quilt swaps. For my partner, I made a Woppet bucket, pattern by @cleverwoppet.

Woppet Bucket

Isn’t it a cute bucket? I made the little charm pull and added it to the pink handle. You can pull the fabric handles up to carry it like a little bag.

I sent my little mini quilt and bucket off to my partner, and received a package from her in return. She made me this fun rectangular shaped mini quilt with bright colors, a low-volume background, and black and white pinwheel blocks!

Mini quilt that I received in the 2022 swap!

I really enjoyed the mqgswap this year! If you want to see more pics from this swap from other quilters, you can browse Instagram using the tags, #mqgswap2022 or #makeaminimakeafriend .

Happy quilting!

~Jen

Antique Table Topper or Giant Mug Rug?

My husband and I found a little table a few years ago while antiquing that we use to have our breakfast. The table faces a sliding glass door, looking out on our background. It’s relaxing to watch the birds flitting about while sipping coffee before starting work for the day.

However, we don’t want to scuff up the table’s surface more than it already is so we’ve been using various items like kitchen towels and coffee coasters as protection. Last weekend, I decided to make a table topper for this little table, but it also reminds me of a giant mug rug! When it gets dirty, we can just toss it in the wash.

Here’s what the table looks like without any topper:

Little antique table

I had some fun fabric in my stash with an outdoors theme that I thought would work well. The colors match the kitchen, and we love to be out hiking! I measured the diameter of the table, which is 25 inches. I selected 5 fabric prints, and cut out 5.5 inch squares that finish at 5 inches each. I placed them in a 5×5 grid, stitched them together, and then quilted this base shape.

Starting quilt shape for table topper

The fabrics that I used are:

  • 5130-15 (dark mountain print) from Smoke & Rust by Lella Boutique
  • 5130-14 (gray mountain print) from Smoke & Rust
  • 5135-13 (plus sign print) from Smoke & Rust
  • 5131-16 (orange text print) from Smoke & Rust
  • 55551-21 Timber Campsite Cream from Timber by Sweetwater

I quilted the project using meandering free-motion with Glide thread in Apricot Blush.

Once I had my square-shaped base, I took placed the table upside down on the back of the quilt and traced the circle. I drew a cutting line in about 3/4″ from the original tracing line so that my quilt would not extend to the edges of the table. I wanted a little peek-a-boo border of the table.

Table topper, trimmed to fit

I choose the orange text print for my binding. I needed to use bias binding to get a stretchy binding that I can easily sew to curves. It worked out so nicely!

Circular table topper, bound

Now for the reveal! Did my quick table topper project work? Does the coffee taste better while using it?? Yes, it does, because I don’t have to worry about leaving water marks anymore.

Completed table topper
Completed table topper with chairs that need to be reupholstered

We also have these 2 antique chairs to go along with the little coffee table. However, they are in sore need of reupholstering. I hope to tackle that project this year, and choose a new fabric that will go with the table topper fabrics.

Happy quilting!

~Jen

Grinning Cat O’ Lantern Quilt

Have you heard about the Spooky Box from Fat Quarter Shop? Each year, they release a Halloween themed mystery box, filled with quilting goodies including a project with fabric and notions! You can still buy the 2021 box at Fat Quarter Shop with this link.

For last year’s 2020 Spooky Box, the quilt project was a fun Cat O’ Lantern mini quilt. I pieced this quilt last October, but then set it aside in my to-quilt pile. I was inspired to pull it out and quilt it recently as I was decorating my yard for Halloween.

I made a few modifications from the original pattern. I swapped the black and purple fabrics so that I could have black cat popping up from behind the pumpkin. I also changed the shape of the cat’s eyes and nose from squares into diamonds and a triangle. I knew that I’d quilt in more face details such as whiskers and the famous cat grin.

I did all free-motion and hand guided ruler work using Glide thread in Apricot Blush for most of the quilt and Glide thread in Black on the cat.

Here’s a look at a little spider that I added to each of the black triangles at the top and bottom portions of the quilt:

A little quilted spider

In the orange triangles, I quilted little ghost shapes. I did some basic fills in the background portion, and a swirly pumpkin fill in the purple behind the cat.

For the cat face, I added some eyebrows, whiskers, pupils, and grin. I later enhanced the pupils with an outline of black thread.

I gave the cat a little dimension by quilting some swirls on the forehead, checks, paws, and tail. For the pumpkin, I kept it simple with straight-line quilting to keep the emphasis on the sweet cat!

We went to pick pumpkins last weekend, and my son held the quilt up while I snapped a quick picture in between other pumpkin hunters. I love a striped binding so I used this black/gray/white striped fabric in my stash that I think really frames this little Cat O’ Lantern quilt perfectly.

Happy Halloween from the cat at the pumpkin patch!

~Jen

Fall 2021 Swatch Service from the Confident Stitch

Are you ready for fall? After a long, hot summer here in the Pacific Northwest, we are expecting our first soaking rain tomorrow. The leaves are beginning to turn brilliant colors, and the evenings are cooler and comfortable.

I’m starting to sew more now that summer is winding down, and I’m thinking about fall and winter projects. This quarter’s quilting cotton swatch fabrics and patterns from the Confident Stitch are absolutely perfect for the season, featuring the gorgeous fall colors.

In this quarter’s package, you’ll receive the following items:

  • (14) individual 5.5″ swatches of quilting cotton fabrics
  • (1) 5.5″ x 22″ strip of bronze solid fabric
  • (1) 5.5″ x 44″ strip of dragon fruit solid fabric
Fall 2021 Quilting Cotton Swatch Service Bundle

What is the best part? You can use the fabric in this swatch set to make the included pattern, Turkey Time Table Topper, which is perfect for your fall table settings. The table topper finishes at 17.5″ x 25.25″, and the Confident Stitch has an accompanying video for you to watch on how to make this project.

You also get an Information Card listing all the fabrics and prices in this quarter’s swatch service. The large project featured is the Faster Fourteen Quilt by Hunter’s Design Studio, and the Confident Stitch has a kit available to order or you can choose your own individual fabrics.

Fall 2021 Quilting Cotton Swatch Service Contents

I’ve used patterns from Hunter’s Design Studio, and they are great patterns that can you complete pretty quickly. Most recently, I’ve made these quilts to give as charity quilts to organizations such as Project Linus. They also make great baby quilts!

If you want to subscribe to quarterly swatch service, also known as Kate’s Swatch Experience, the cost is $15 every 3 months. The Confident Stitch offers 3 options: quilting cottons, garment fabrics in warm tones, and garment fabrics in cool tones. You can sign up for 1, 2 or all 3 swatch services. As a quilter, I highly recommend the quilting cotton service to get a nice variety of swatches plus a fun project as happy mail every quarter!

Let me know in the comments if you’ve joined! I plan on making a project with my swatches soon, and I’ll blog about it in an upcoming post.

Happy quilting,

Jen

Tula Pink Postcard Swap

Hello everyone!

Recently, I participated in a Tula Pink themed postcard swap. The only restriction was that we could only use Tula Pink fabrics. We could use any fabric technique to make the card.

Postcard swaps are really fun to join because they are such quick and easy projects, and you don’t have a long turn around time like you do with a mini quilt swap.

I decided to make a Tabby Road themed postcard for my secret partner, using a mix of foundation paper piecing, traditional piecing, and applique.

I made the kitty applique using 2 pieces of Tabby Road in different colorways and sewing them together. It was a technique that I wanted to try, and I think it added some pizazz to the postcard.

Under the striped fabric in the background, I did stitch in a piece of the selvage from Tabby Road, fluffiness included!

I made a little quilt sandwich, using the postcard top and a stabilizer in the middle. I quilted around the kitty and in the background before attaching the backing.

I used a satin-stitch to go around the postcard two times to secure it completely to the inner stabilizer as well as the light-colored fabric on the back. You can learn more about my postcard technique by reading my free Fabric Postcard Tutorial.

The Tabby Road postcard that I made for my partner!

In return, I received a wonderful EPP postcard from Maureen (@sewhappyquilting), filled with a rainbow of Tula Pink fabrics. These hexies are tiny, just 1/2 inches! I really love it.

The postcard I received! So beautiful!

Maureen mailed this postcard as-is with a stamp on the back through the USPS, and it arrived just fine. If this method makes you nervous, you can always send your postcard in an envelope. It may cost an extra stamp, but it will also be less likely to get damaged.

These bright postcards are a sure way to brighten up someone’s day. I think I’ll make a few more to mail out as random surprises! I’m also thinking of hosting a fabric postcard swap sometime this year?? Would you be interested??

Happy quilting!

~Jen

My Quilt at QuiltCon Together

Happy March, everyone! We are seeing glimmers of spring everywhere around us after our ice storm several weeks ago. I have crocus and some early daffodils blooming and birds are joyfully singing!

A few weeks ago, I attended QuiltCon Together, which was a virtual quilt show this year due to the pandemic. Normally, QuiltCon, which features modern quilts in many categories, is held in person and alternates between west coast venues and east coast venues.

This year, I entered a quilt in the “Floral & Vine Fabric Challenge” category and, for the first time ever, I got a quilt juried into QuiltCon!! In this category, participants received 4
fat-eighths of specific fabric prints to use in the construction of a modern quilt. We could only use these prints plus any number of solid fabrics. We could buy extra quantities of the specified prints, but I decided to challenge myself by using only the provided fat eighth pack. I used 3 of the 4 prints plus a white solid in my quilt. The binding is a gray solid.

I drafted my pattern using paper and pencil initially. I wanted my quilt to express my hope that we will soon be able to gather together in person, and that this weird situation that we are currently living through will not last forever.

I came up with a design and then used EQ8 to create my foundation paper pieced templates and curved traditionally pieced templates. I then calculated my setting triangles to complete the design. I called my quilt, Concourse.

Here’s a picture of Concourse:

My quilt, Concourse, at QuiltCon Together, February 2021

Although QuiltCon Together is now over, the images below show what my quilt looked like displayed virtually. Quilt show attendees could zoom in on individual quilts and even listen to a short audio clip from the quilt makers.

My quilt, Concourse, hanging virtually at QuiltCon Together 2021, front view
My quilt, Concourse, hanging virtually at QuiltCon Together 2021, back view

I was very pleased to have my quilt selected as one of the entrants in this challenge fabric category. Although I did not win a ribbon, I’m just so happy to have had a quilt in the show.

I took a screen cap of the other quilts in the category so that you could see the variety of modern quilts that used just these 4 prints plus solids. Quite impressive!

QuiltCon 2022 is scheduled to be an in-person quilt show in Phoenix in February. I’m very hopeful that we’ll be returning to in-person events later this year. I hope to enter a quilt into that show and maybe (just maybe), I might get to attend it with my sister!

P.S. I added a new page to my blog with recommended quilting supplies and notions. Go check it out!

Happy quilting!

-Jennifer

Farm Pig Mini Quilts

Hi everyone,

Recently, I decided to make a cute little Penny the Pig block from Lori Holt’s Farm Girl Vintage 2 book. I had some pig themed fabric on hand called State Fair by Windham Fabrics. Why not combine them?

I pulled in other pieces from my stash for the ears, nose, feet, and the ground. The background is hand-dyed Cherrywood. I made the 12″ block size.

Penny Pig block from Farm Girl Vintage 2 book

Isn’t this just the cutest little block? In fact, I decided to make a second one to gift to my sister.

As these blocks are small, I went ahead and quilted them side-by-side using a ruler to create diagonal lines and Glide thread in Cotton Candy.

Quilting the pig blocks

After I quilted them, I decided each little pig needed a name. I didn’t want to name them both “Penny” so I kept one named Penny and one named Mabel.

But how to distinguish them? How about a fun embellishment? I added letter beads on colored jewelry wire to the top of each quilt after I finished the binding.

Completed pigs with names

I gifted one pig to my sister, and she loved it! I have the matching one hanging in my sewing room.

Happy quilting!

~Jen

Introducing Alfie the Alpaca Foundation Paper Pieced Pattern!

Hi everyone,

I’m so excited to introduce you to Alfie the alpaca! I designed this cute alpaca block for a mini quilt exchange with my sister.

Alfie is foundation paper pieced, suitable for quilters with some paper piecing experience. The block size is about 16.5 inches by 8 inches before adding borders. The pattern does include instructions for adding the same size borders as shown in my finished quilt.

You can purchase Alfie for just $4 on my Etsy store, QuiltedCatPatterns!

Let’s take a closer look at Alfie the alpaca! I based this pattern on a photo that I took of a cheeky little alpaca in Sisters, Oregon during summer 2019. I used Cherrywood fabrics for the alpaca body, and Pie Making Day in Key Lime from RJR fabrics for the background. I pieced each section of the pattern, and then pinned the sections to a design board before stitching them together. This process helps you to catch any fabric placement mistakes before the whole block is stitched together.

The picture on the left shows all of the individual foundation sections pieced. The picture on the right shows the sections as I started to sew them together into units. I love watching foundation paper piecing patterns come together!


Alfie the alpaca block without borders

After I sewed all of the sections together, I decided to add some off-set borders to the Alfie block. I used a very narrow inner border from a peach colored Grunge fabric on the left side and along the bottom side. This peach fabric matches the peach tone of the blankets on the llamas in the outer green border.

I knew that I would add the dark green outer border before ever designing this block. My sister picked out this fabric as our challenge fabric for our mini quilt swap. We each had a fat quarter to use in our mini quilt somewhere. The llama fabric is called Llama Life Faraway Places by Cloud 9 Fabrics.

I also auditioned many fabrics for the bottom border, and finally settled on a black and white square print that I had in my stash.

I did simple quilting with an all-over meander on Alfie’s face and body using Glide thread in Linen and Bone, free-motion swirls using Glide in Celery in the light green background print, and some diamond shapes in the dark green border. I also free-motion quilted “Alfie” in Glide Apricot Blush on the bottom border.

Alfie the alpaca block without hair

I thought Alfie might be missing something, some integral part of his cheeky self. I figured that he needed some hair!! I went to a local alpaca farm and purchased some alpaca yarn in a shade to match Alfie’s head.

I used a couching foot on my Bernina to sew the yarn to Alfie’s head in little swirls. I love the texture and dimension that the yarn added to this mini quilt. I think it brings Alfie to life!

Adding alpaca yarn to make hair

Here’s a look at my Alfie completed mini quilt from a recent day hike with his fluffy head and shorn body:

Alfie the alpaca mini quilt with avalanche lilies

I hope you enjoy my new pattern, Alfie Alpaca available now for purchase. I’d love to see a photo if you make something using this pattern!

Happy quilting,

Jen